由于最近在学习Hibernate时,特别是在Mac+idea16+Mysql网上的环境搭建教程比较少,另一个原因也是为了记录自己在建立Hibernate项目时所遇到的一系列问题,特此写下该文档来记录,方便自己和他人日后遇到同样的问题,能少走弯路。
由于Maven有良好的仓库管理的优点,方便导入必要Jar包,也便于用户管理本地的Jar文件,因此此次简单项目的建立如图 新建Maven项目。
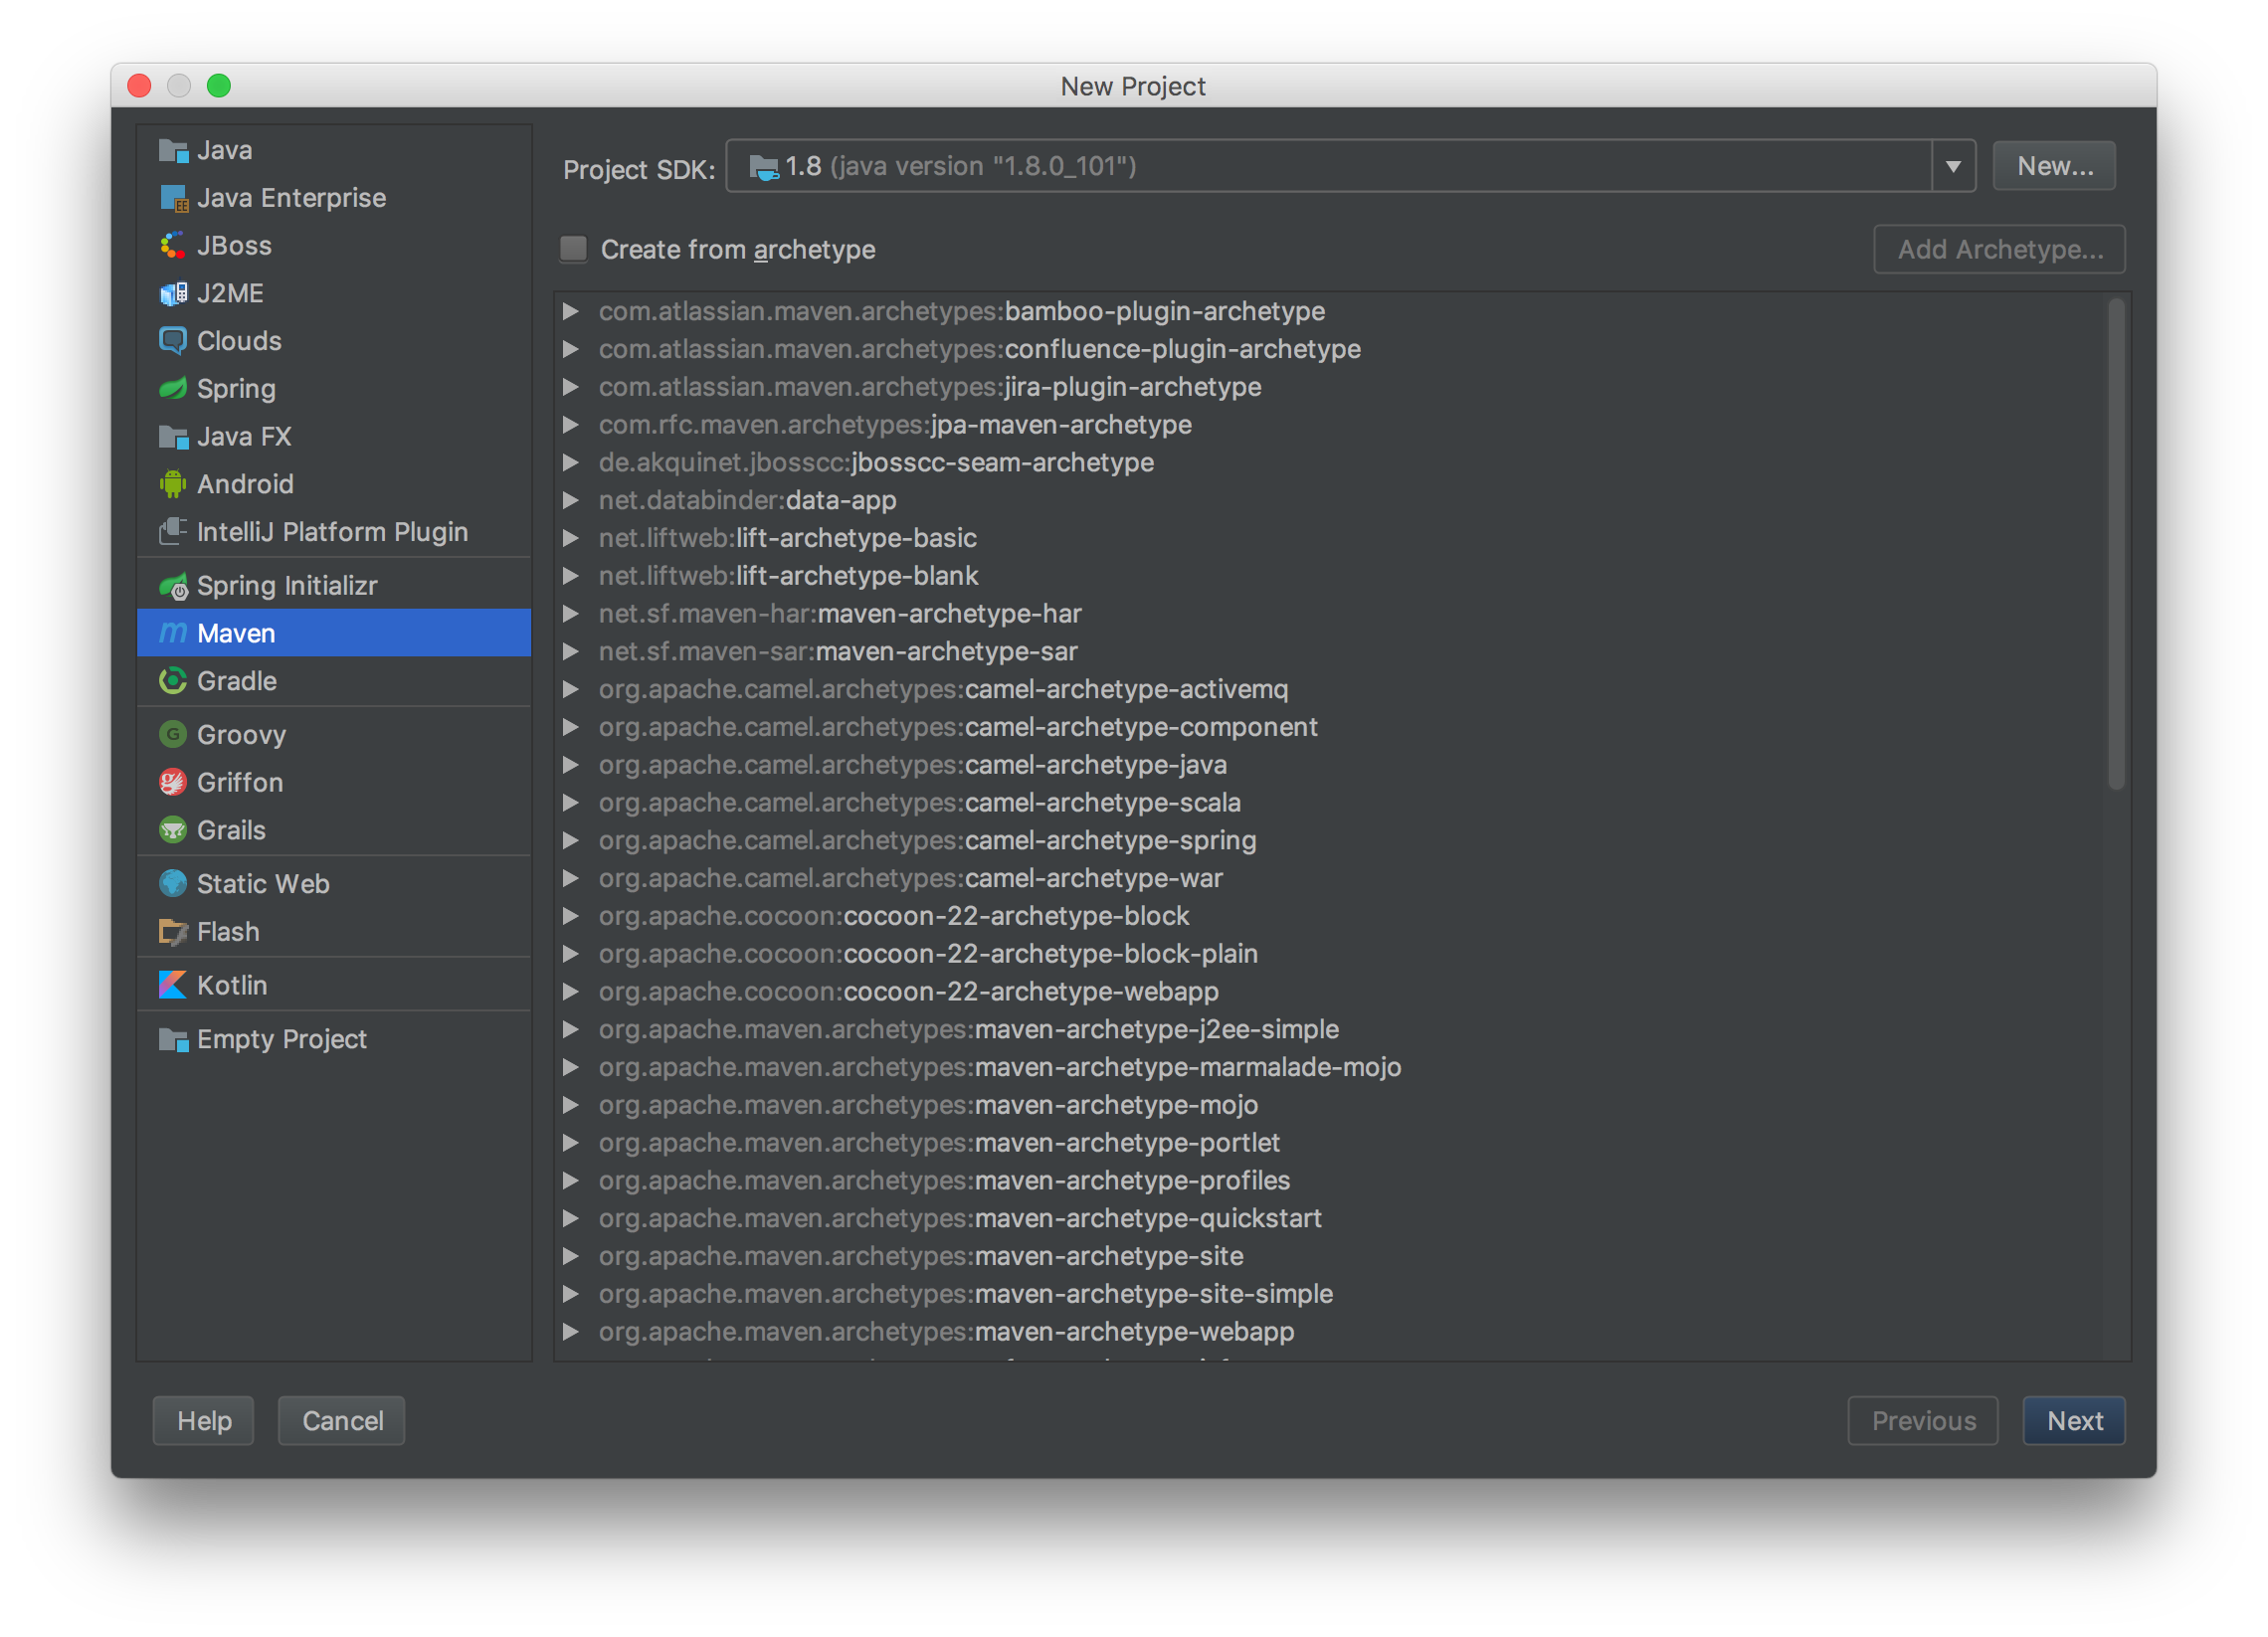
由于只是简单的项目演示,不必选相应的模板,直接点Next
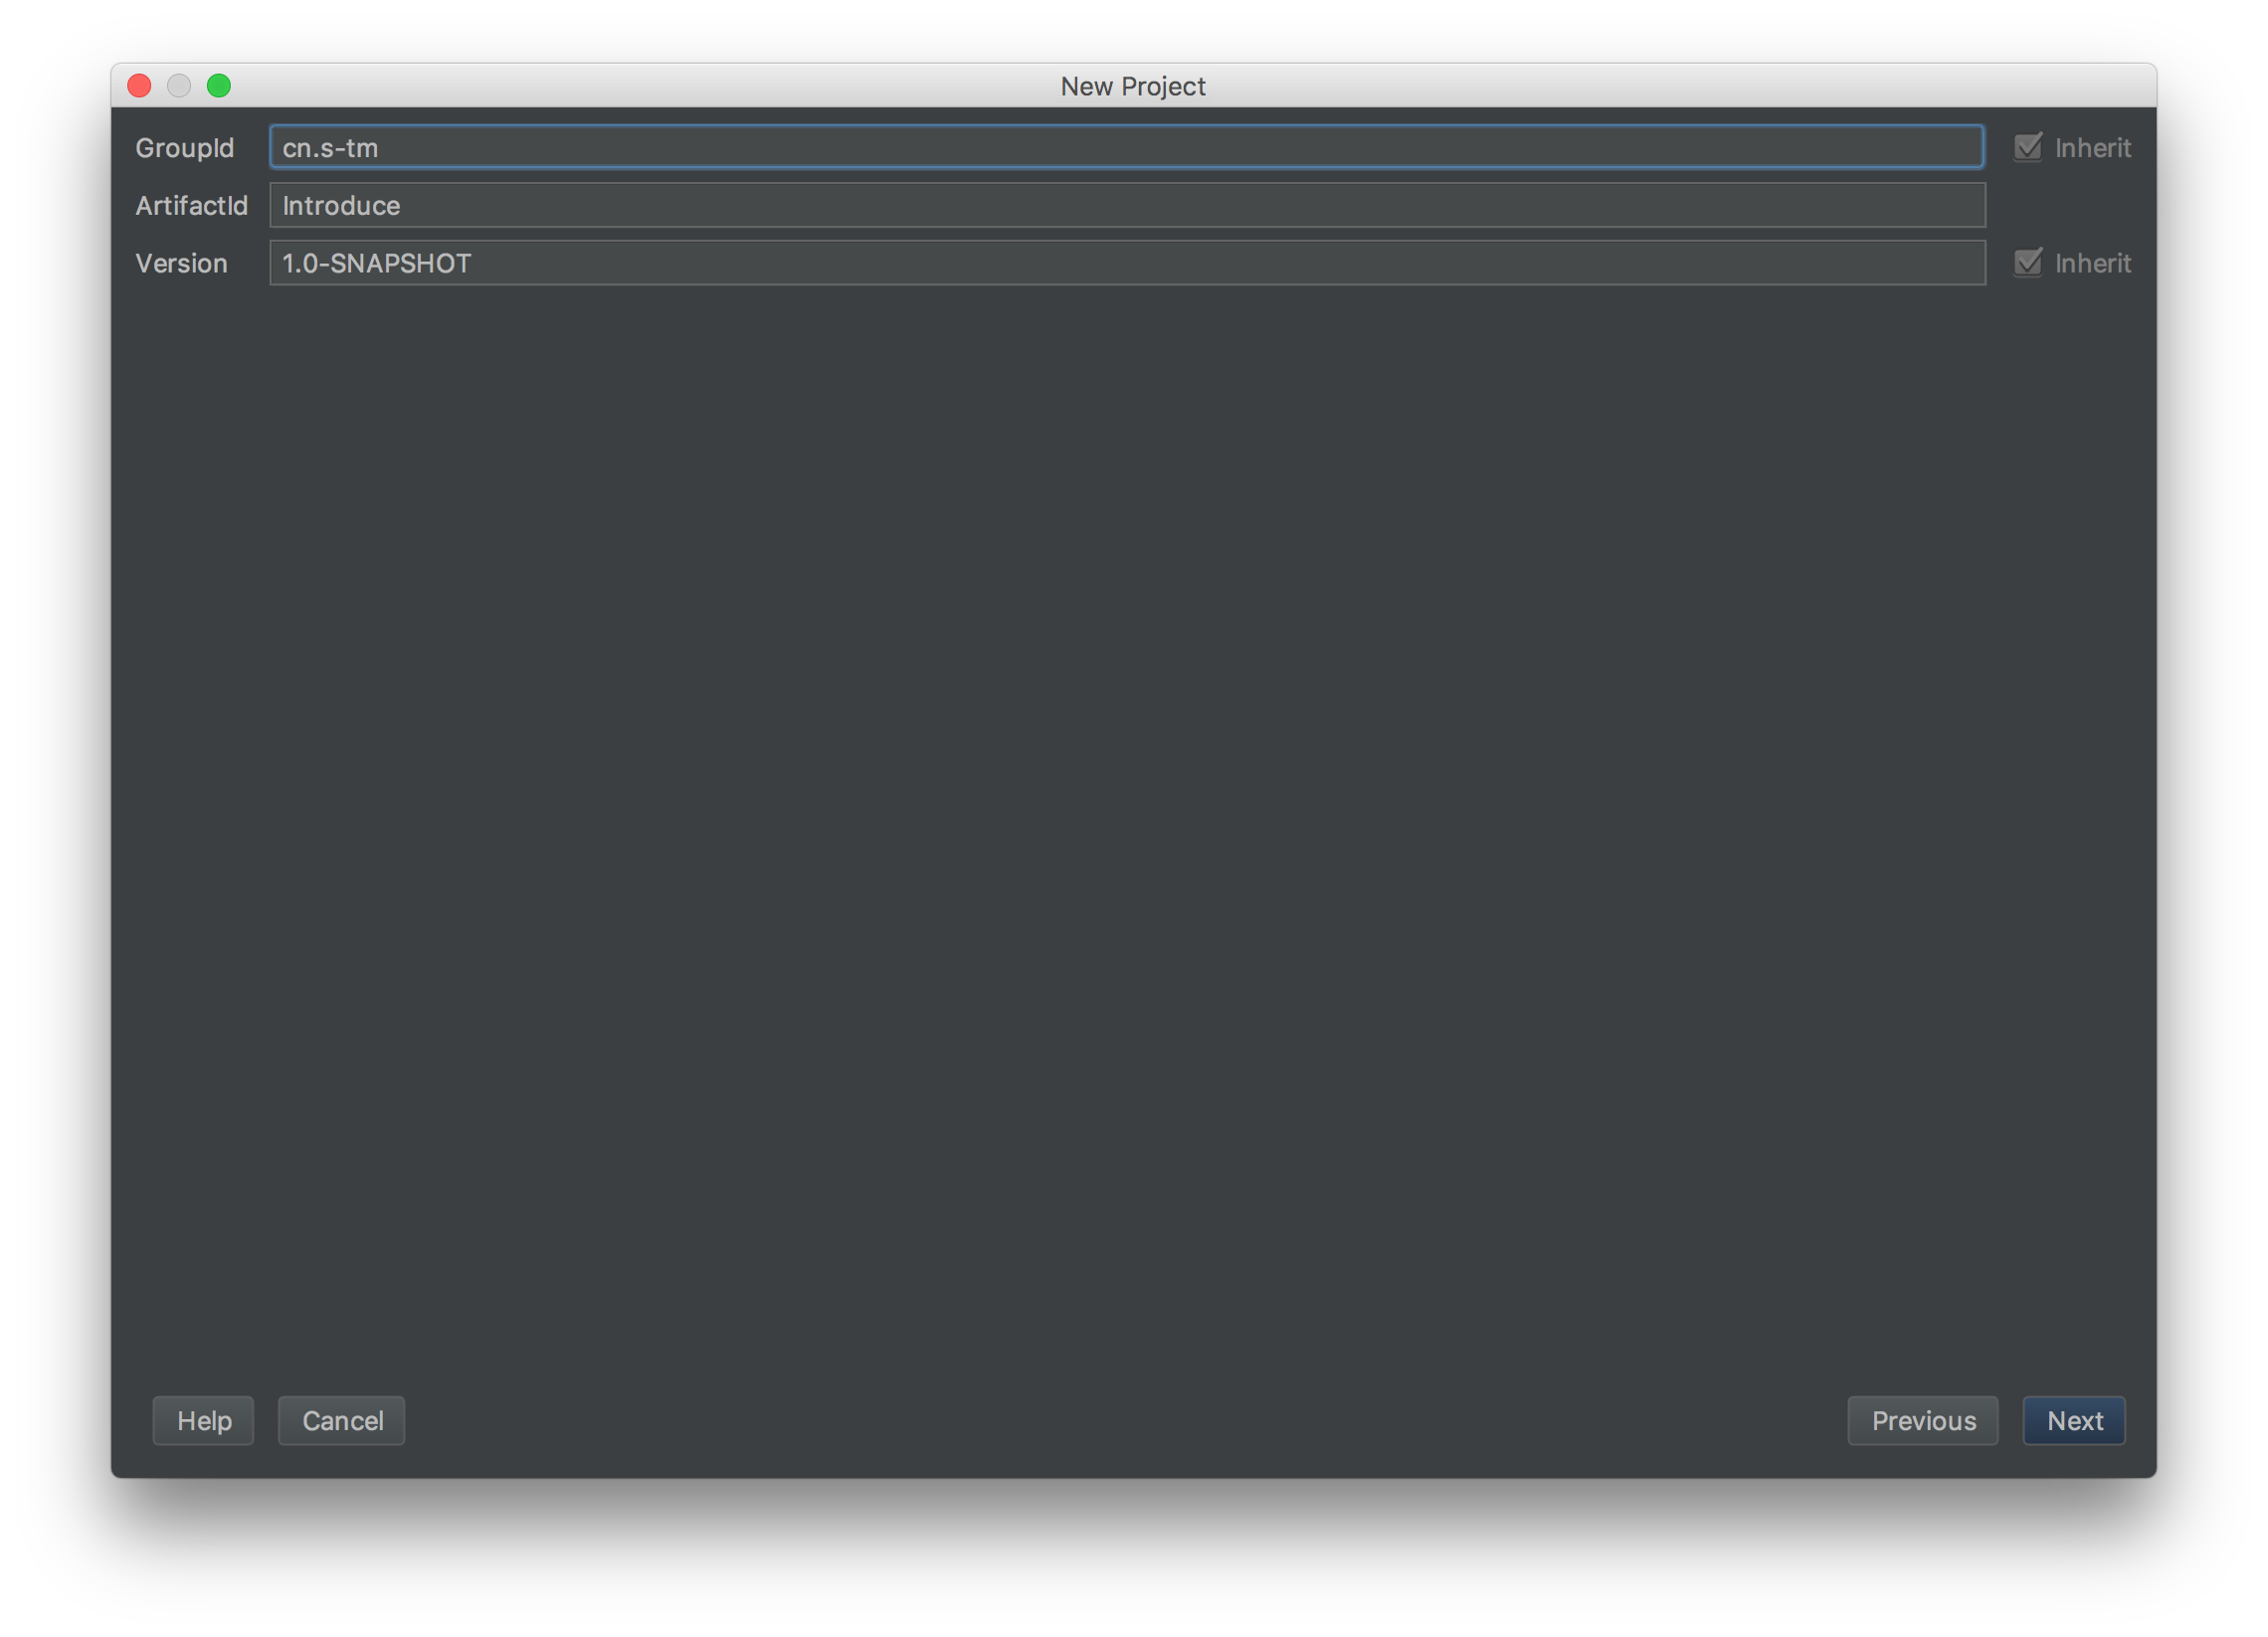
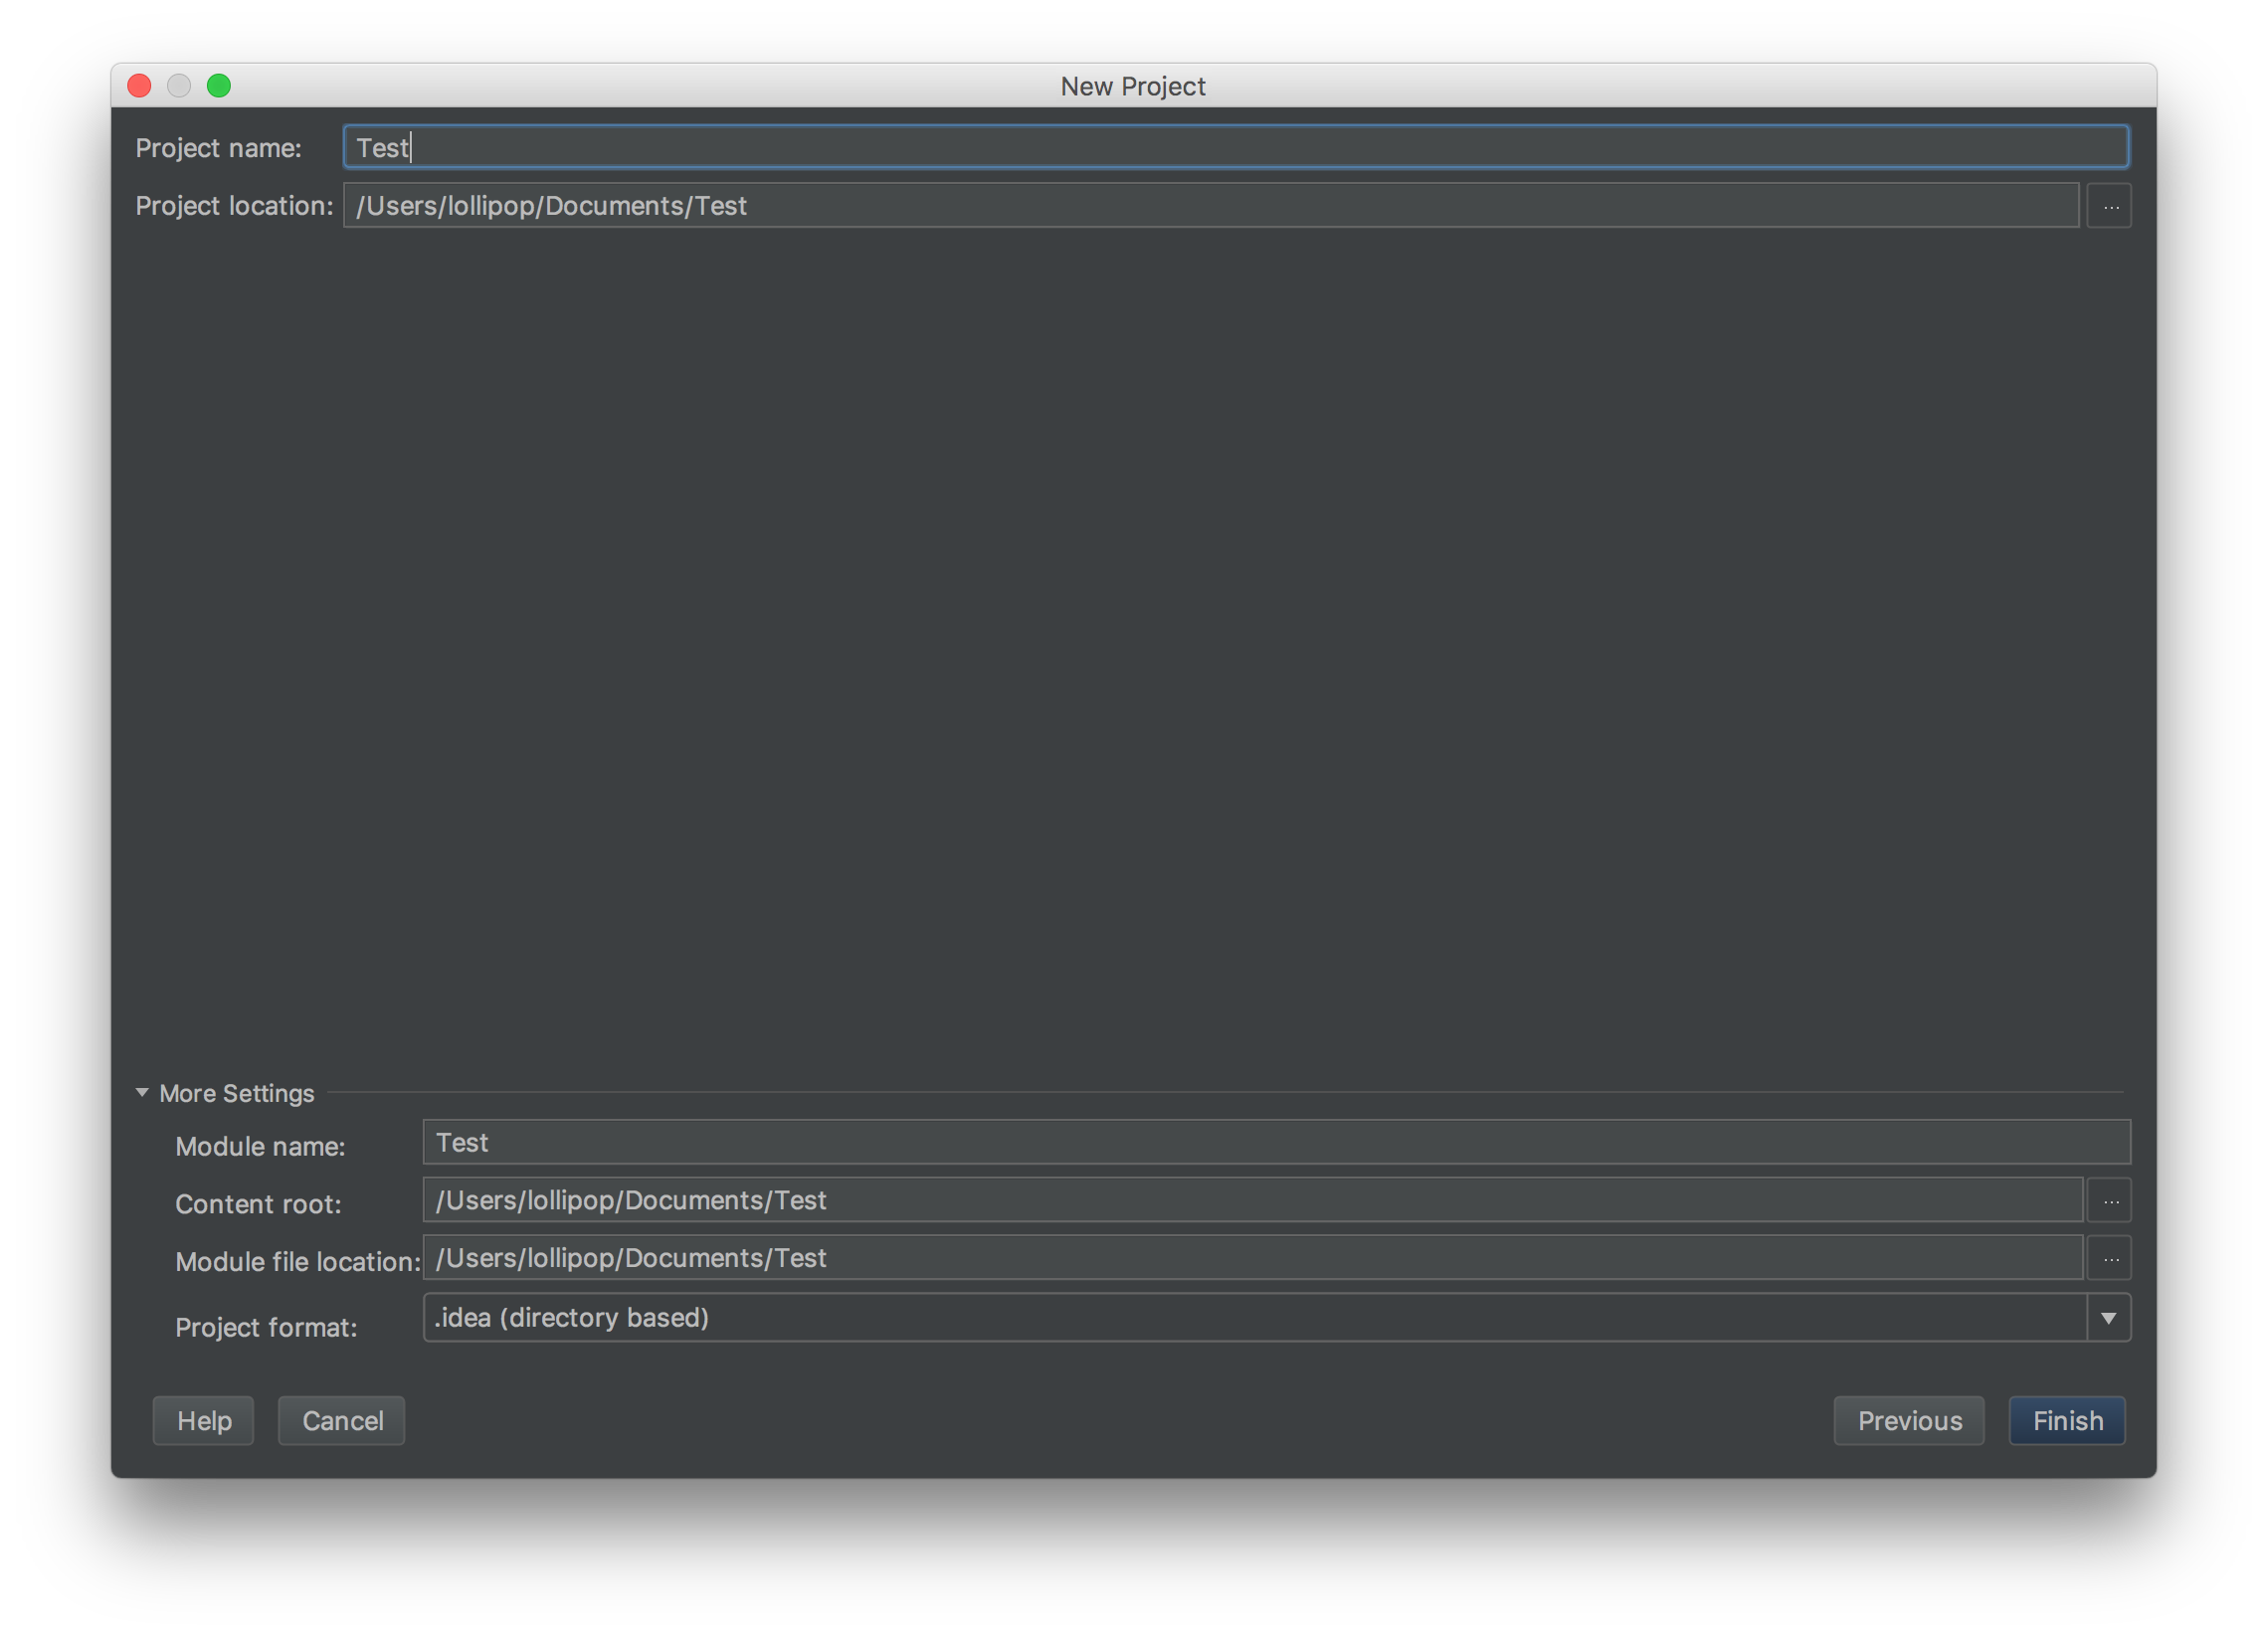
建立好项目后,打开Maven配置文件pom.xml
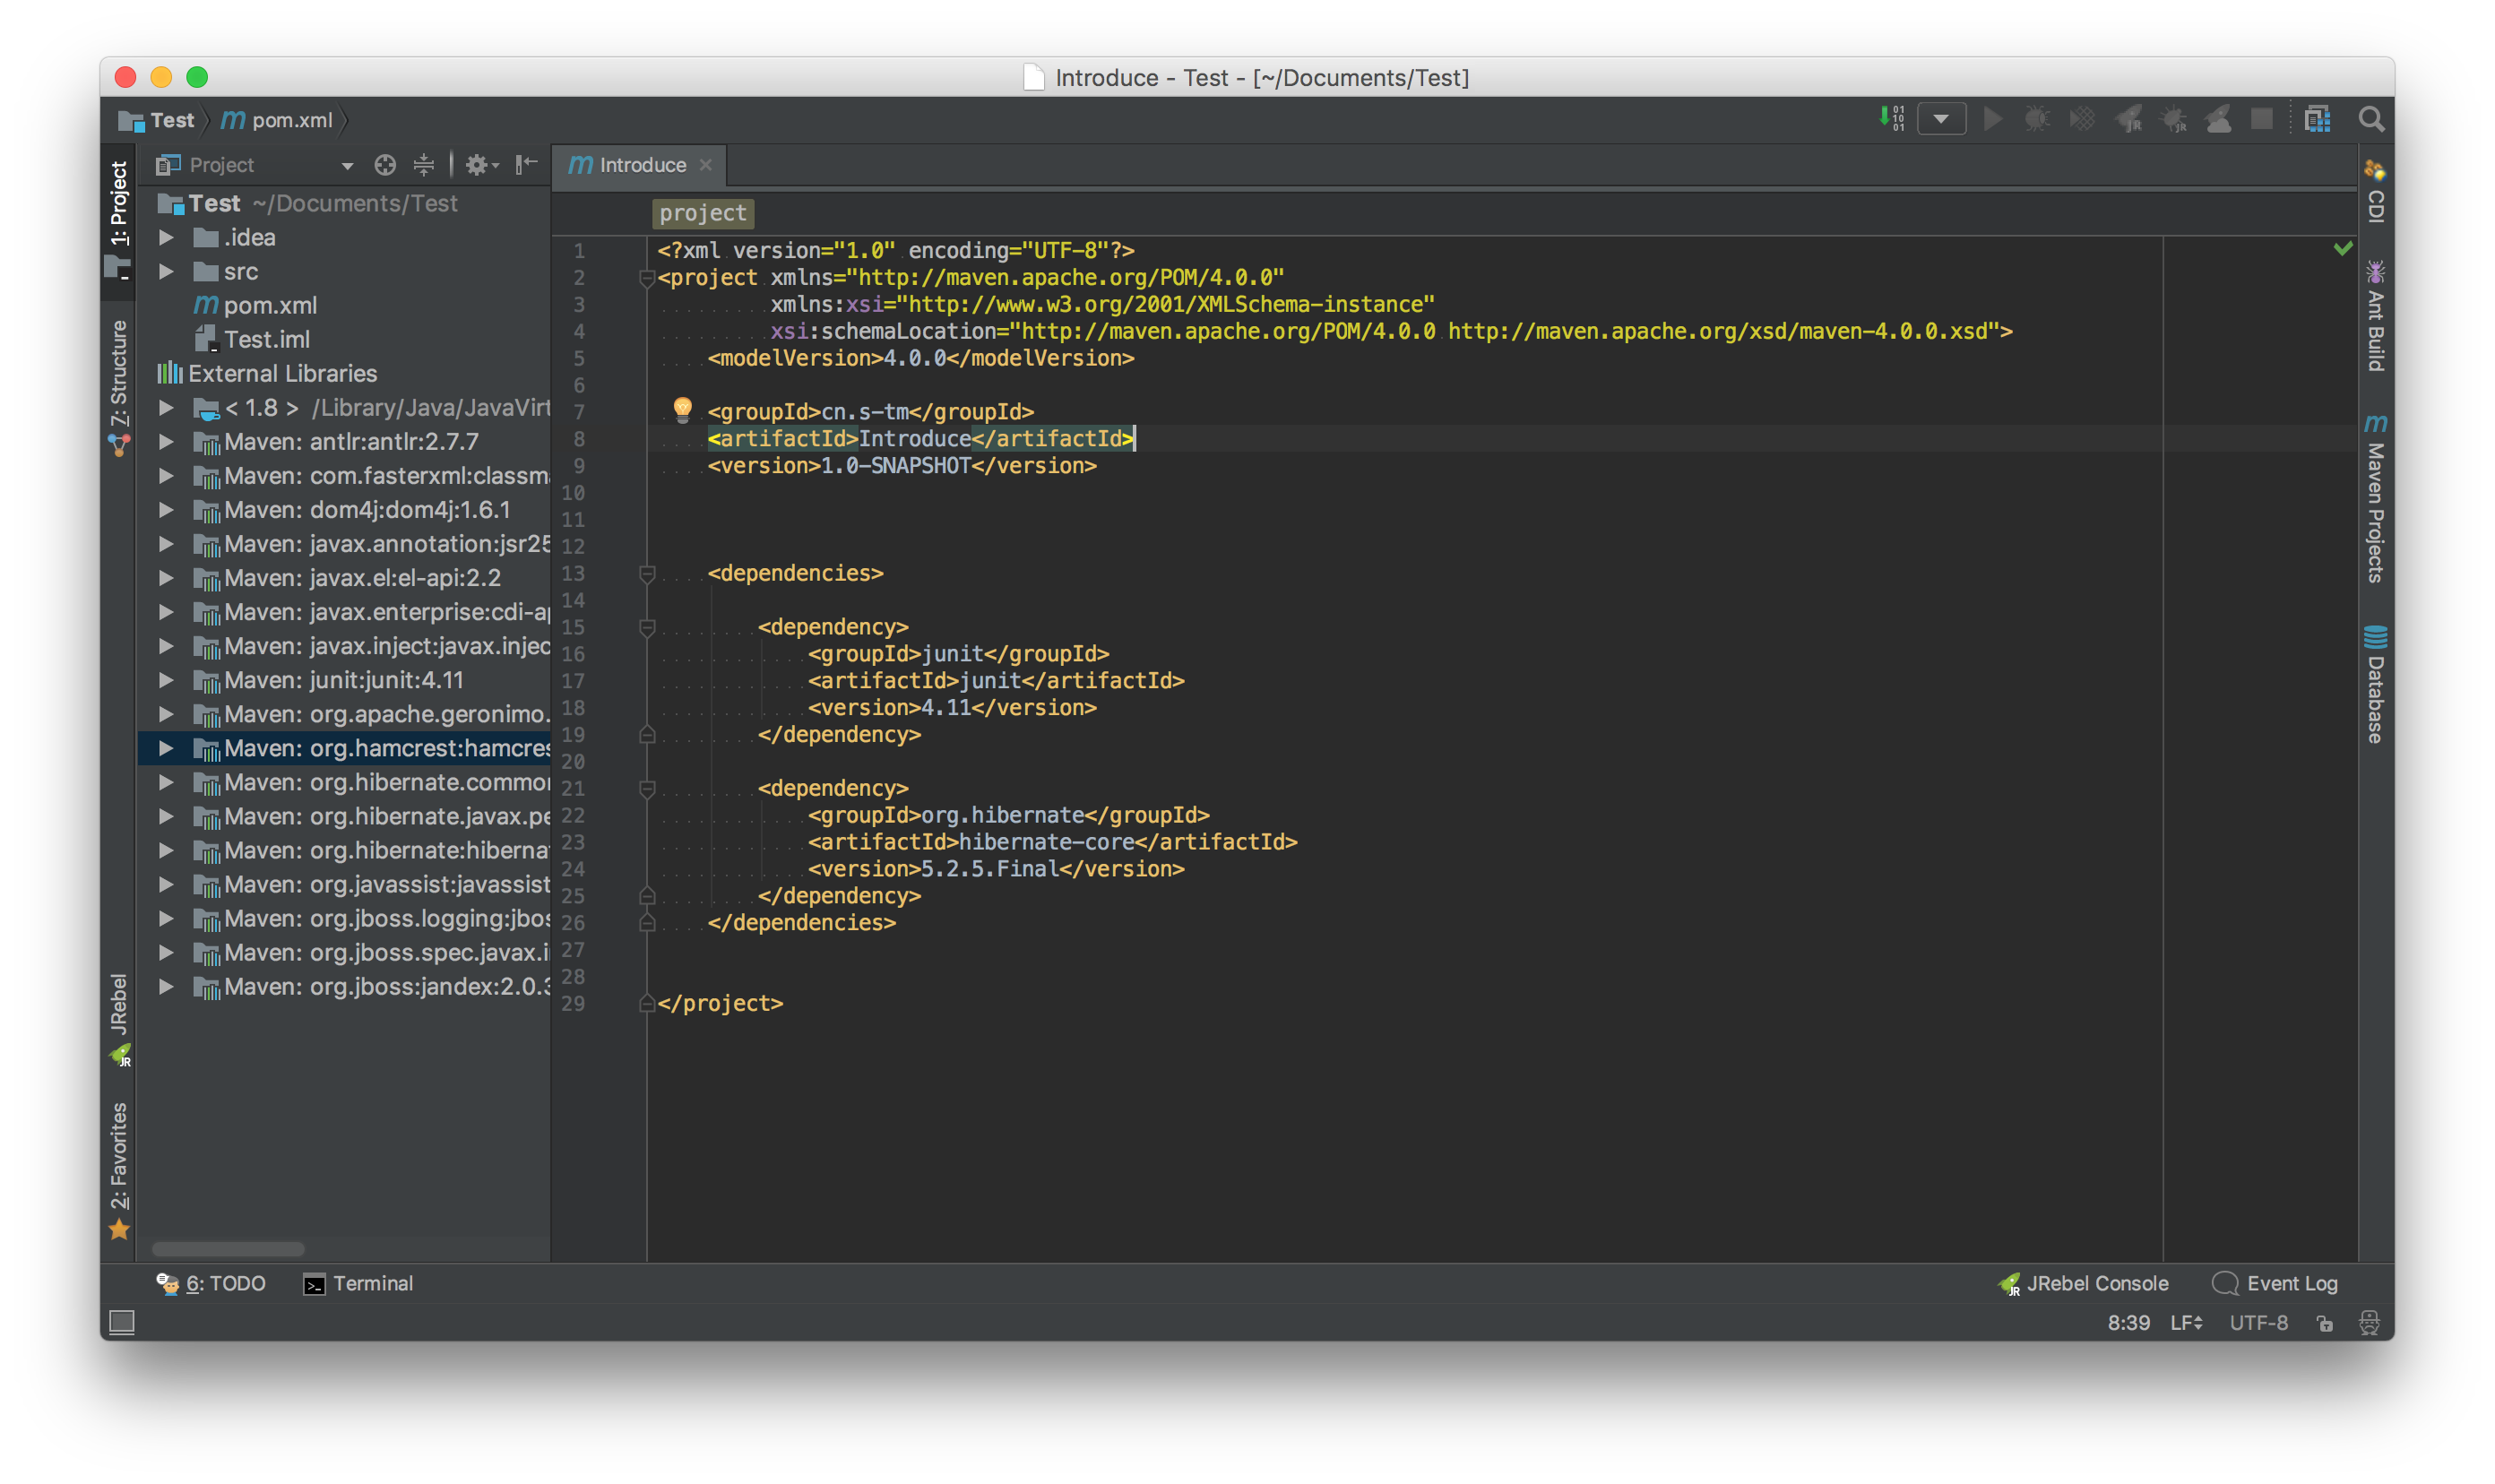
并如图,添加相应的Jar包依赖。junit 有较好的分部调试的功能,可以方便我们对部分方法的调试;其中,hibernate-core的Jar包才是该项目的核心文件。如果,本地仓库中没有,则idea会自动从远程仓库中下载相应的文件到本地仓库。(出现下不动的情况很正常,具体原因你懂得)
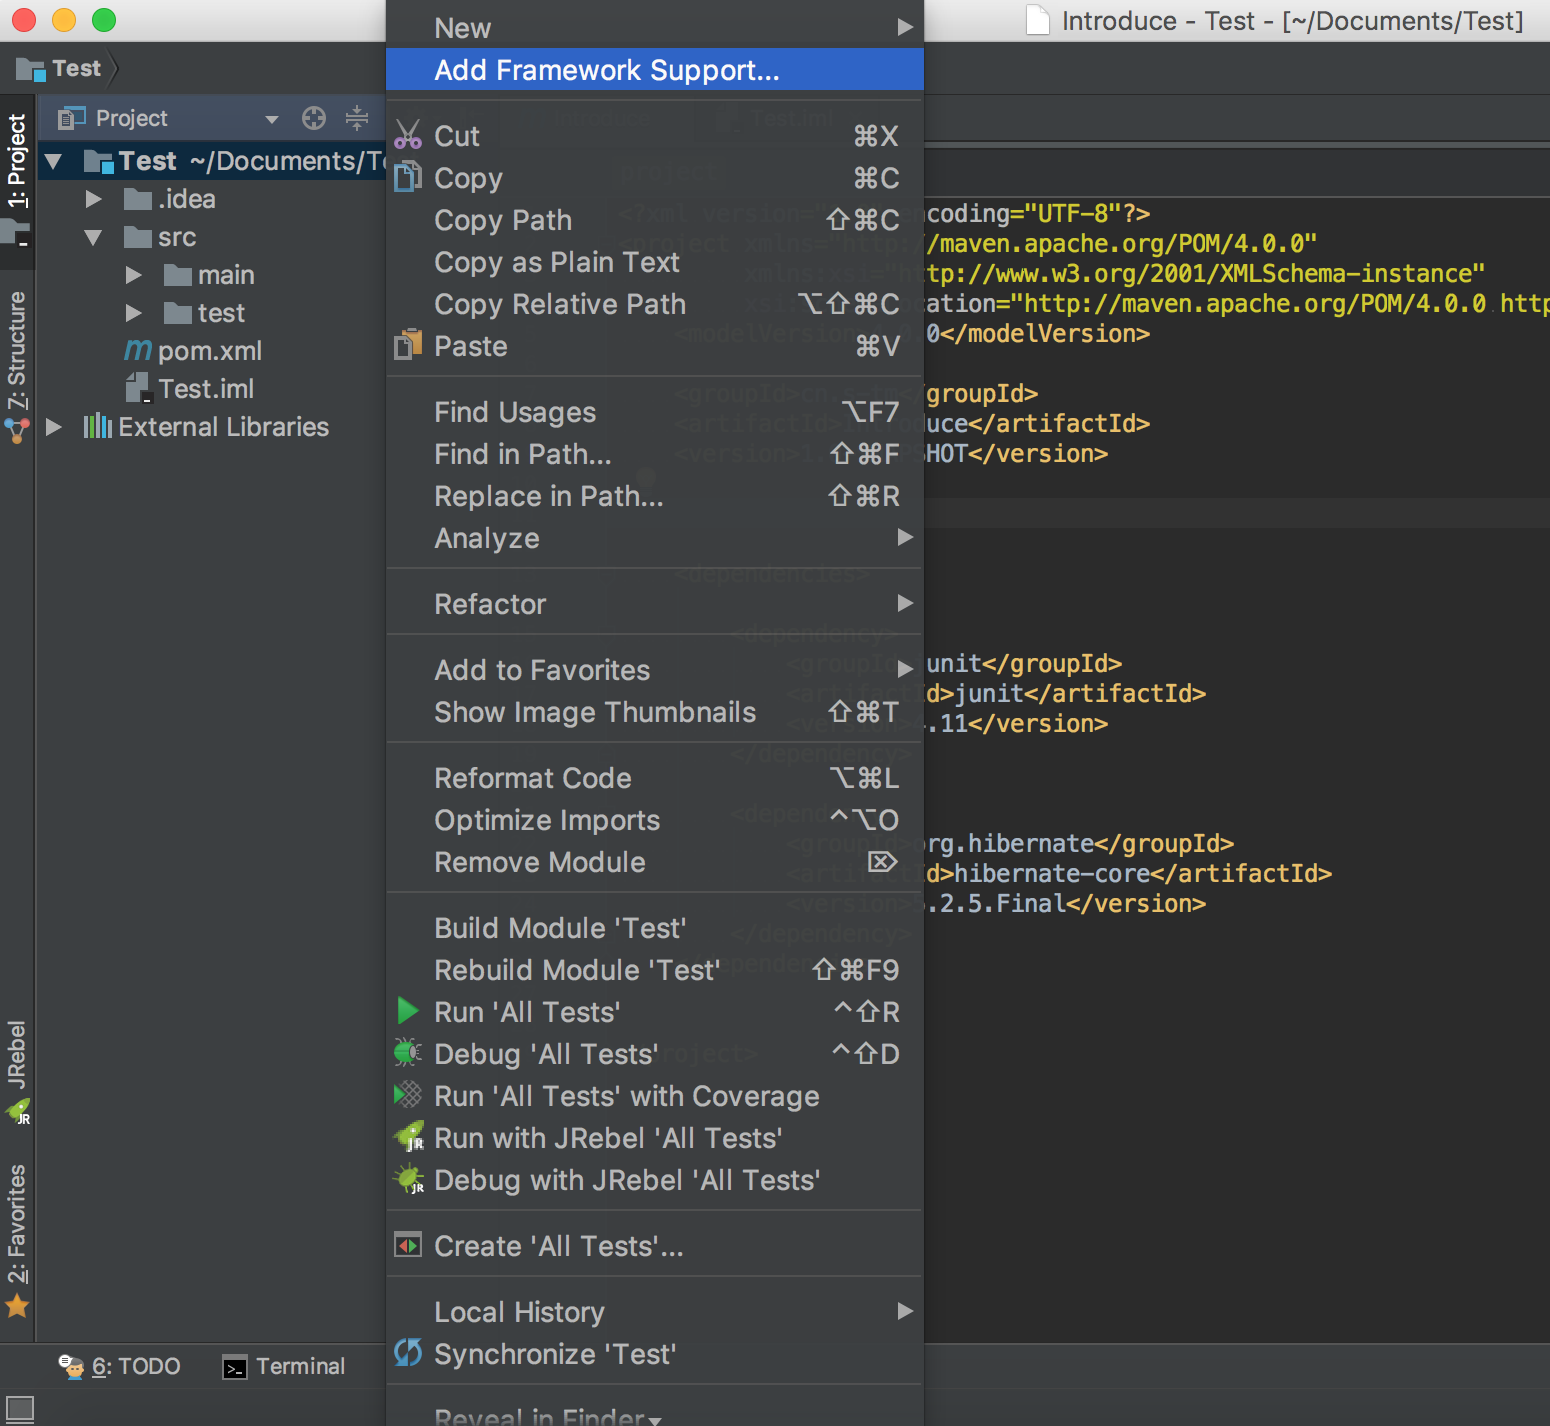
导入成功后。如图,在项目包,鼠标右键打开Add Framework Support为项目添加相应的框架。
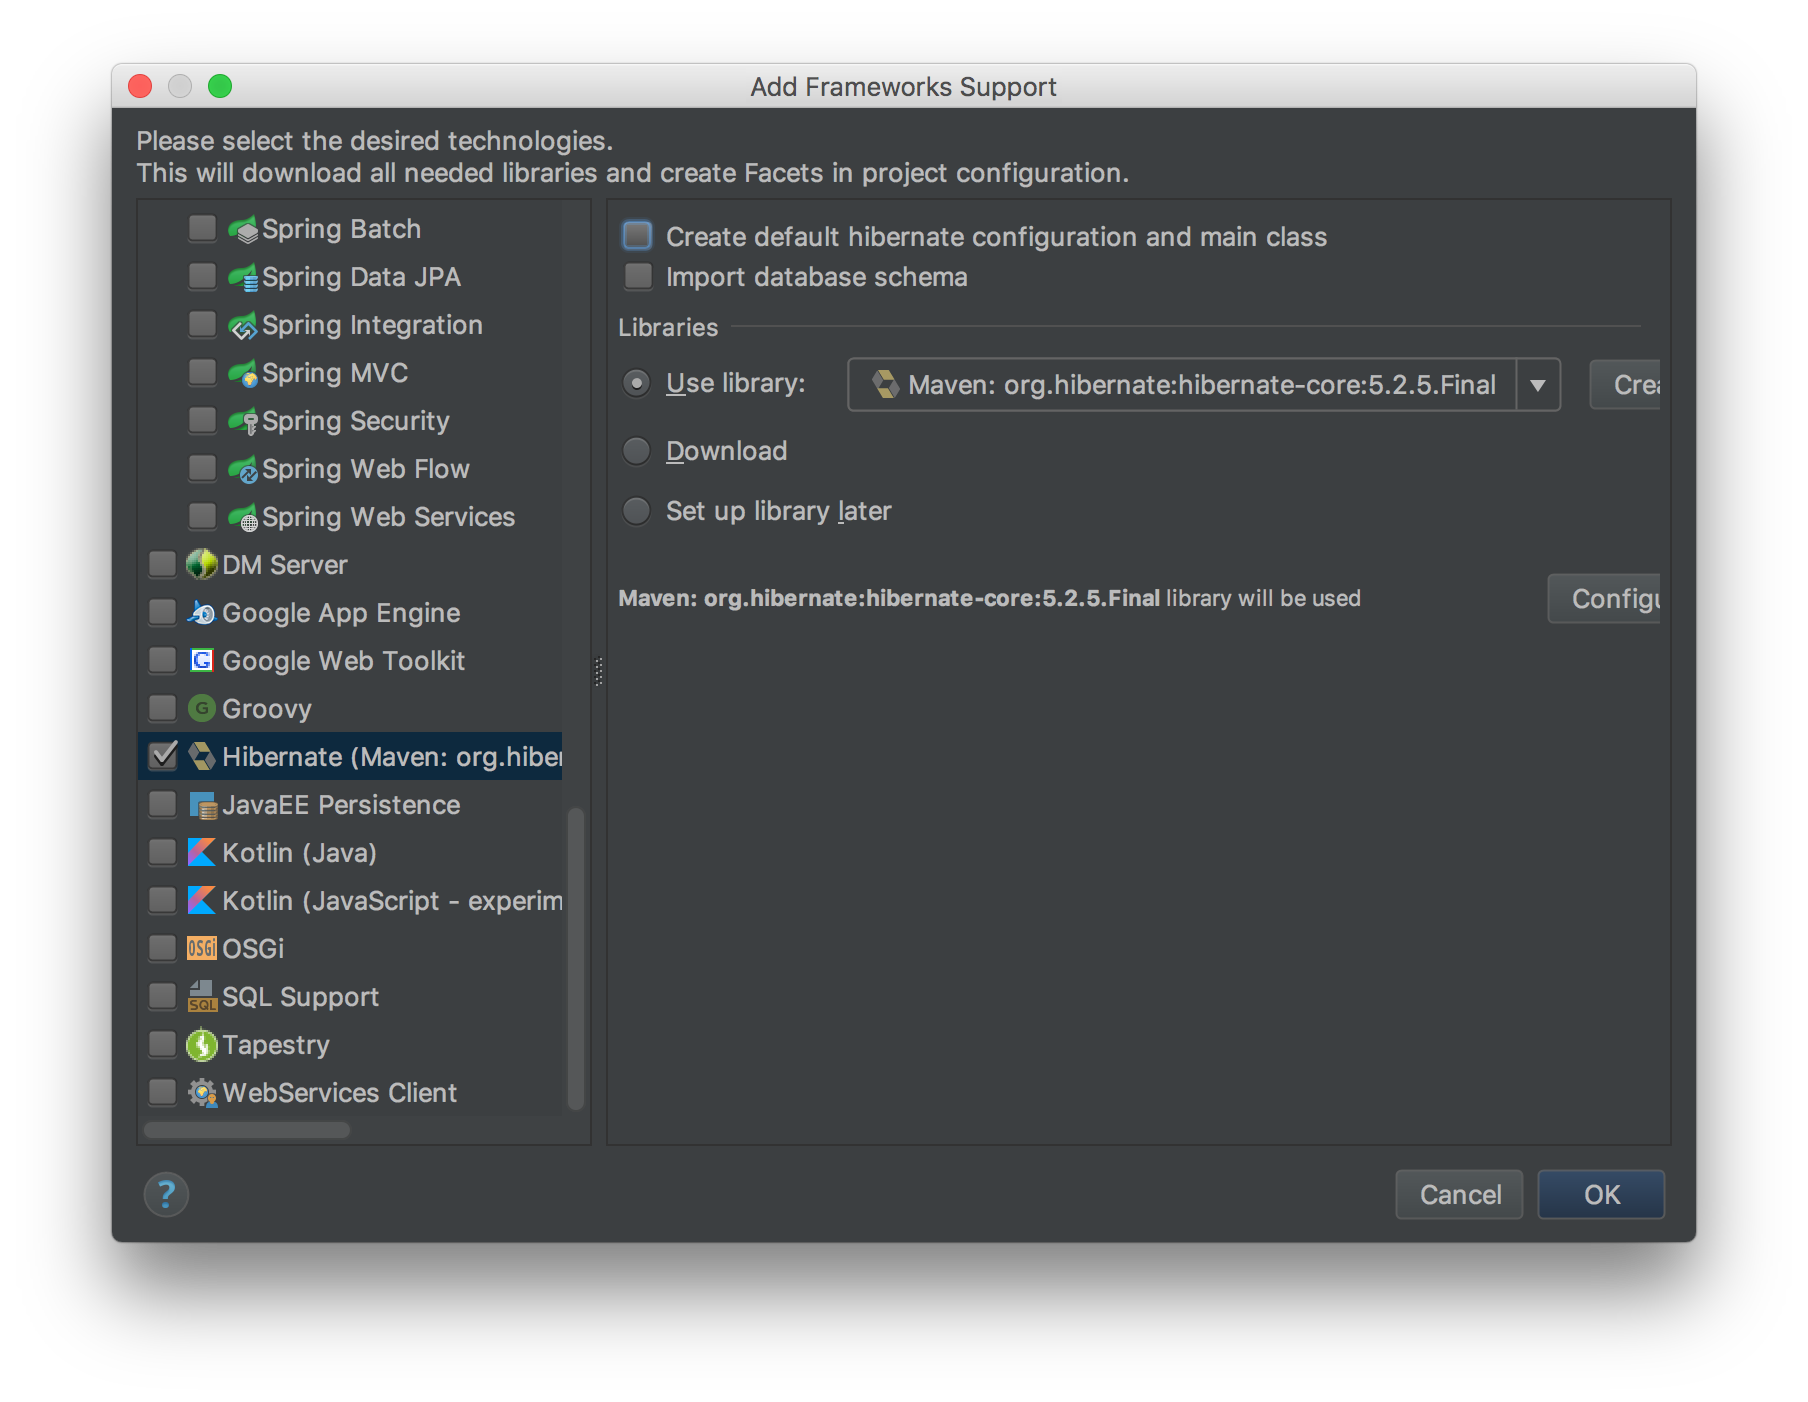
打开后如图选中Hibernate,由于已从Maven中导入了相关的库,idea会自动识别。如果未识别,请手动匹配相关的库。
以上有两个可选项:
Create default hibernate configuration and main class
第一个是创建一个系统默认的hibernate的测试类(初学Hibernate时建议勾选,因为它会 给你提供相应的一些建立session的方法及帮助),勾选后会生成如下调试代码:
1
2
3
4
5
6
7
8
9
10
11
12
13
14
15
16
17
18
19
20
21
22
23
24
25
26
27
28
29
30
31
32
33
34
35
36
| public class Main {
private static final SessionFactory ourSessionFactory;
static {
try {
Configuration configuration = new Configuration();
configuration.configure();
ourSessionFactory = configuration.buildSessionFactory();
} catch (Throwable ex) {
throw new ExceptionInInitializerError(ex);
}
}
public static Session getSession() throws HibernateException {
return ourSessionFactory.openSession();
}
public static void main(final String[] args) throws Exception {
final Session session = getSession();
try {
System.out.println("querying all the managed entities...");
final Metamodel metamodel = session.getSessionFactory().getMetamodel();
for (EntityType<?> entityType : metamodel.getEntities()) {
final String entityName = entityType.getName();
final Query query = session.createQuery("from " + entityName);
System.out.println("executing: " + query.getQueryString());
for (Object o : query.list()) {
System.out.println(" " + o);
}
}
} finally {
session.close();
}
}
}
|
在这里为了演示,这两个都不勾选。

添加完成后,打开右上角的项目架构图标
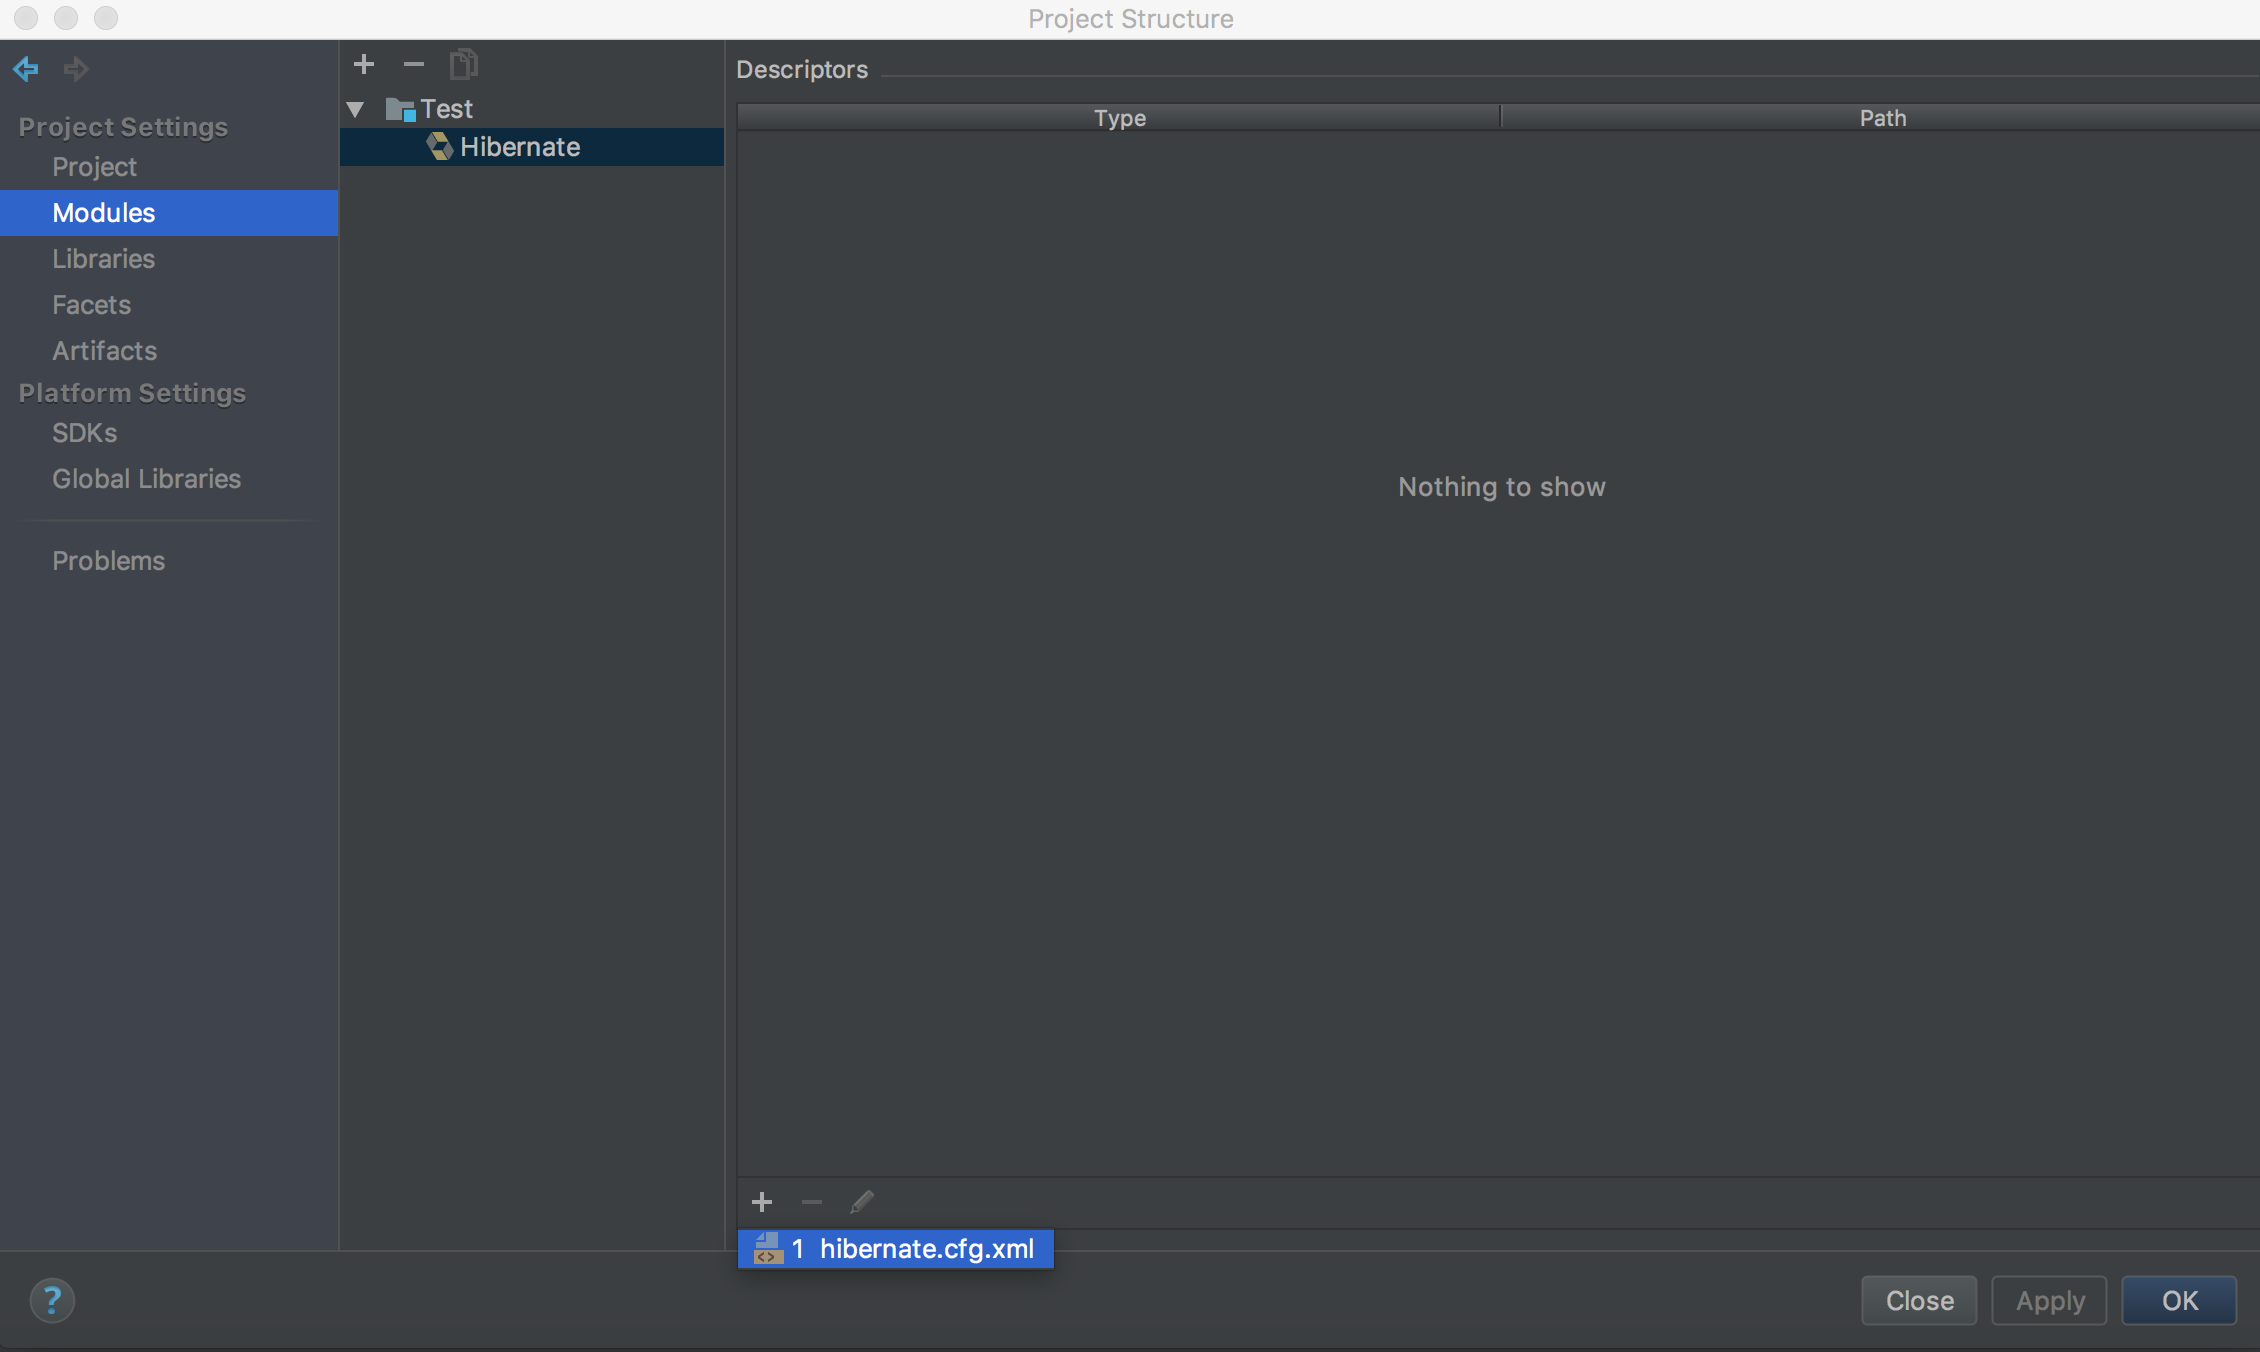
打开后如图选中Modules —>Hibernate —> + hibernate.cfg.xml ,来添加相应的配置文件,一路ok。
由于Idea不像Eclipse可以根据写好的映射类来自动生成相应的hbm映射文件,但Idea可以根据已有的表来生成相应的hbm映射文件。
因此我们先建立数据库。
如下图设置
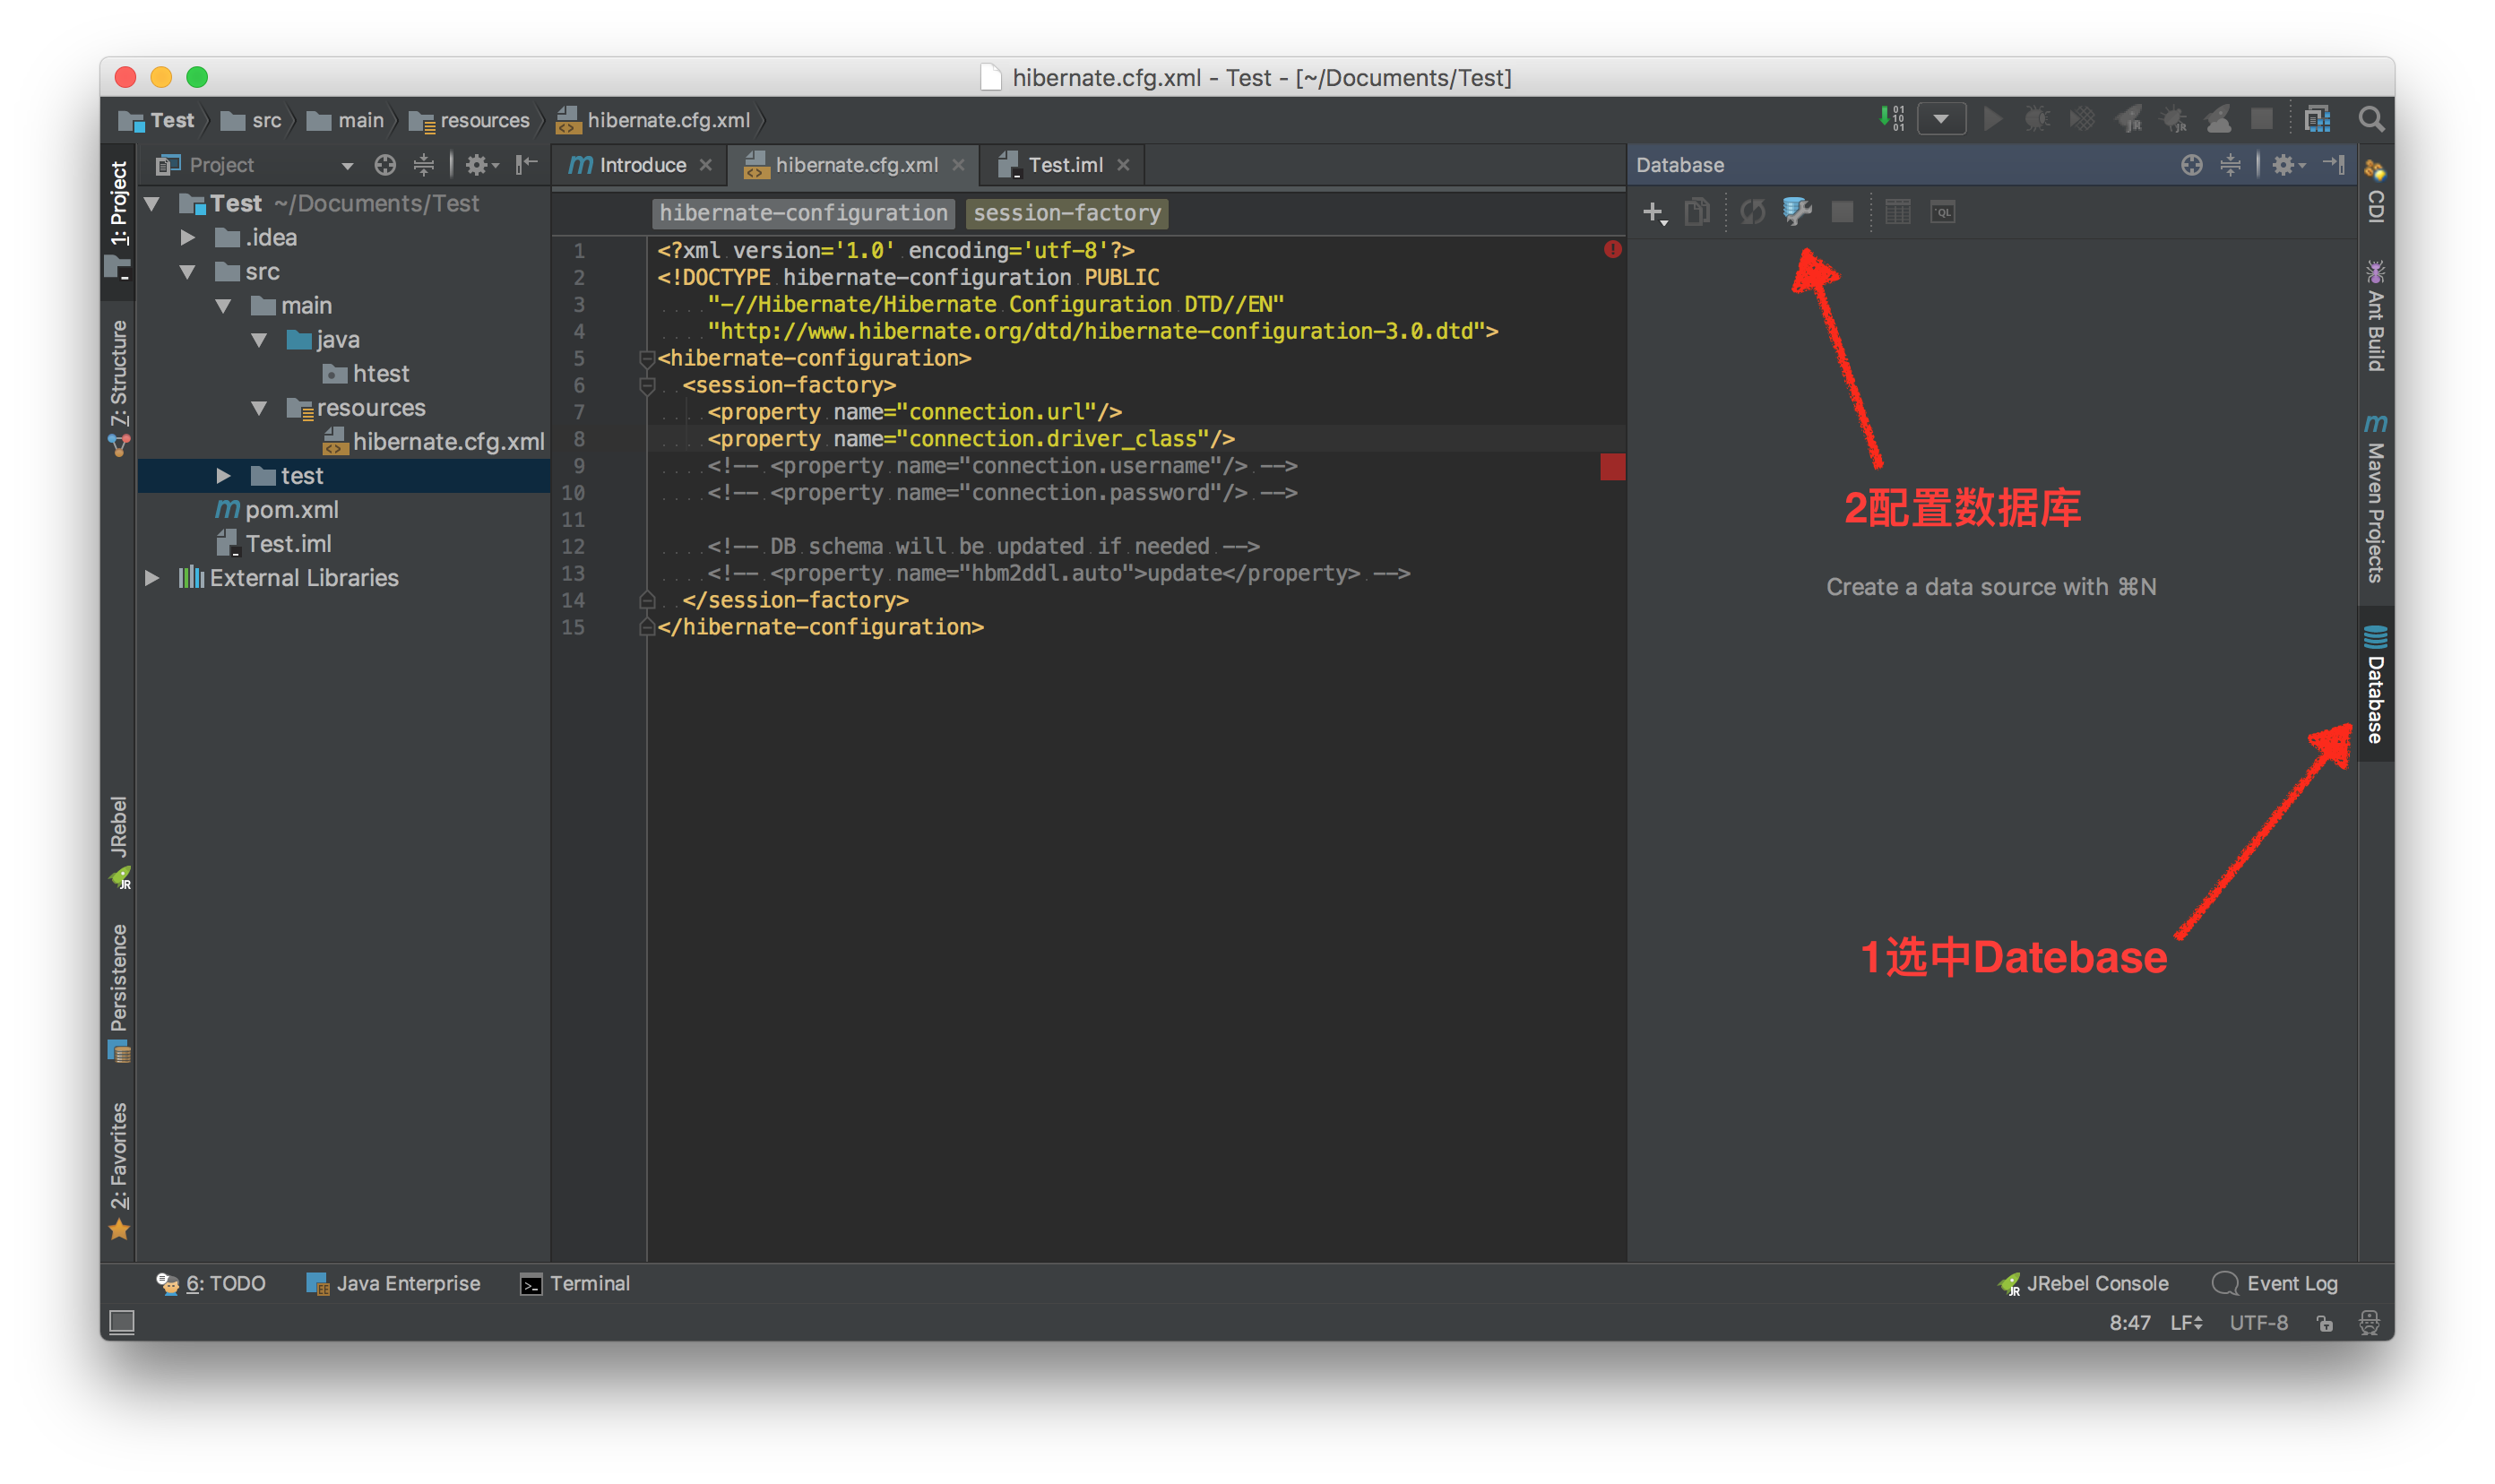
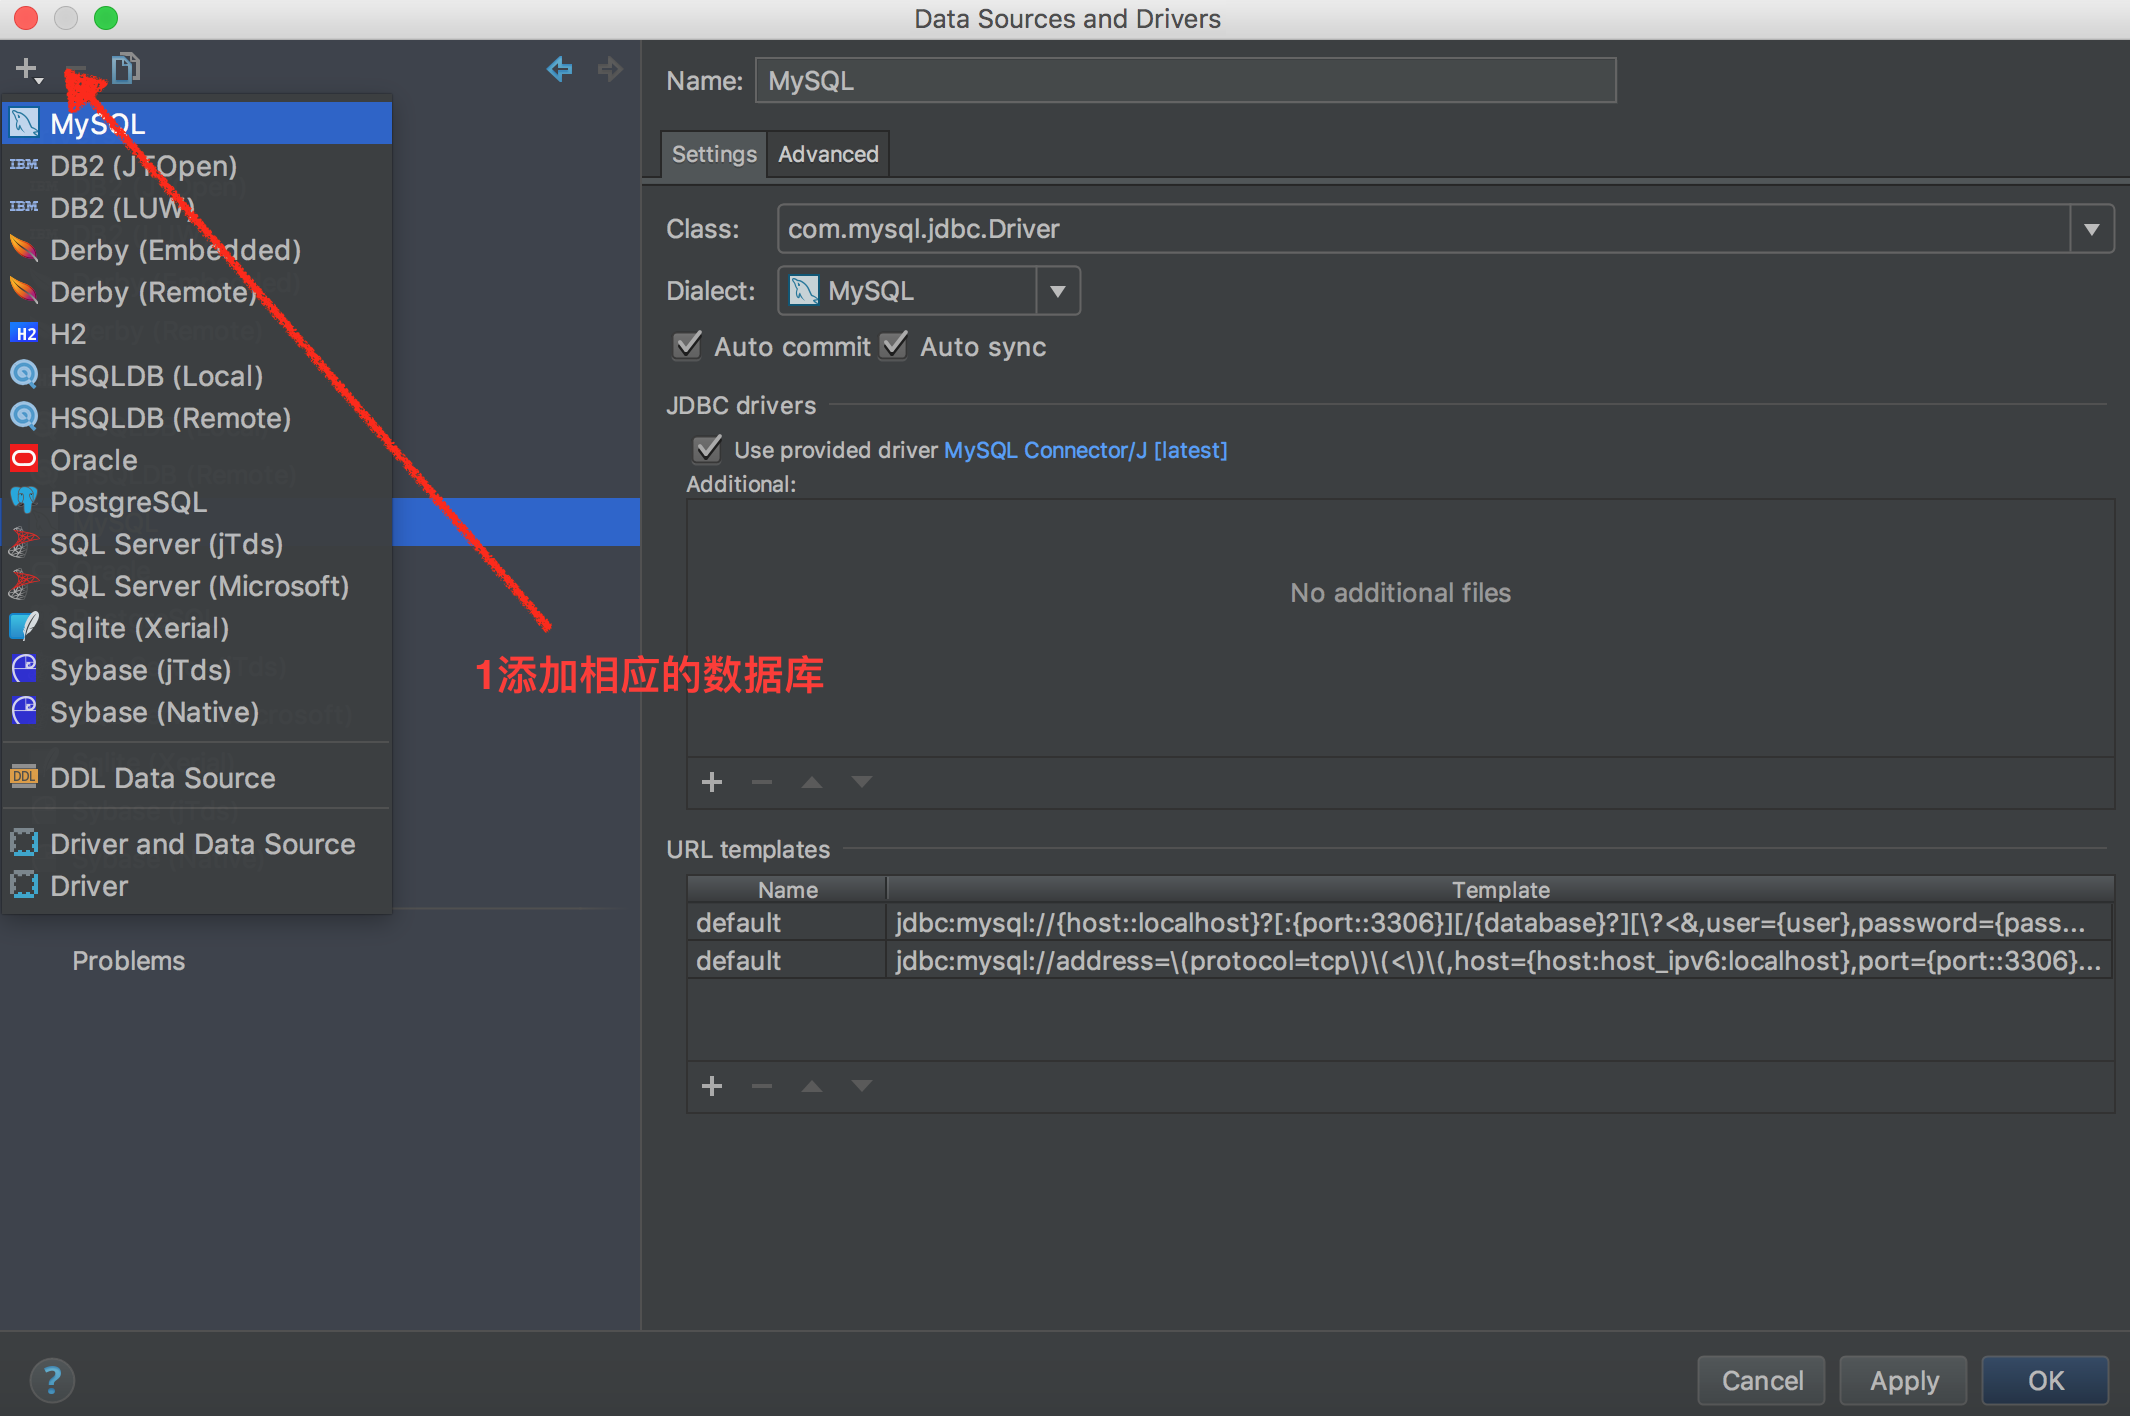
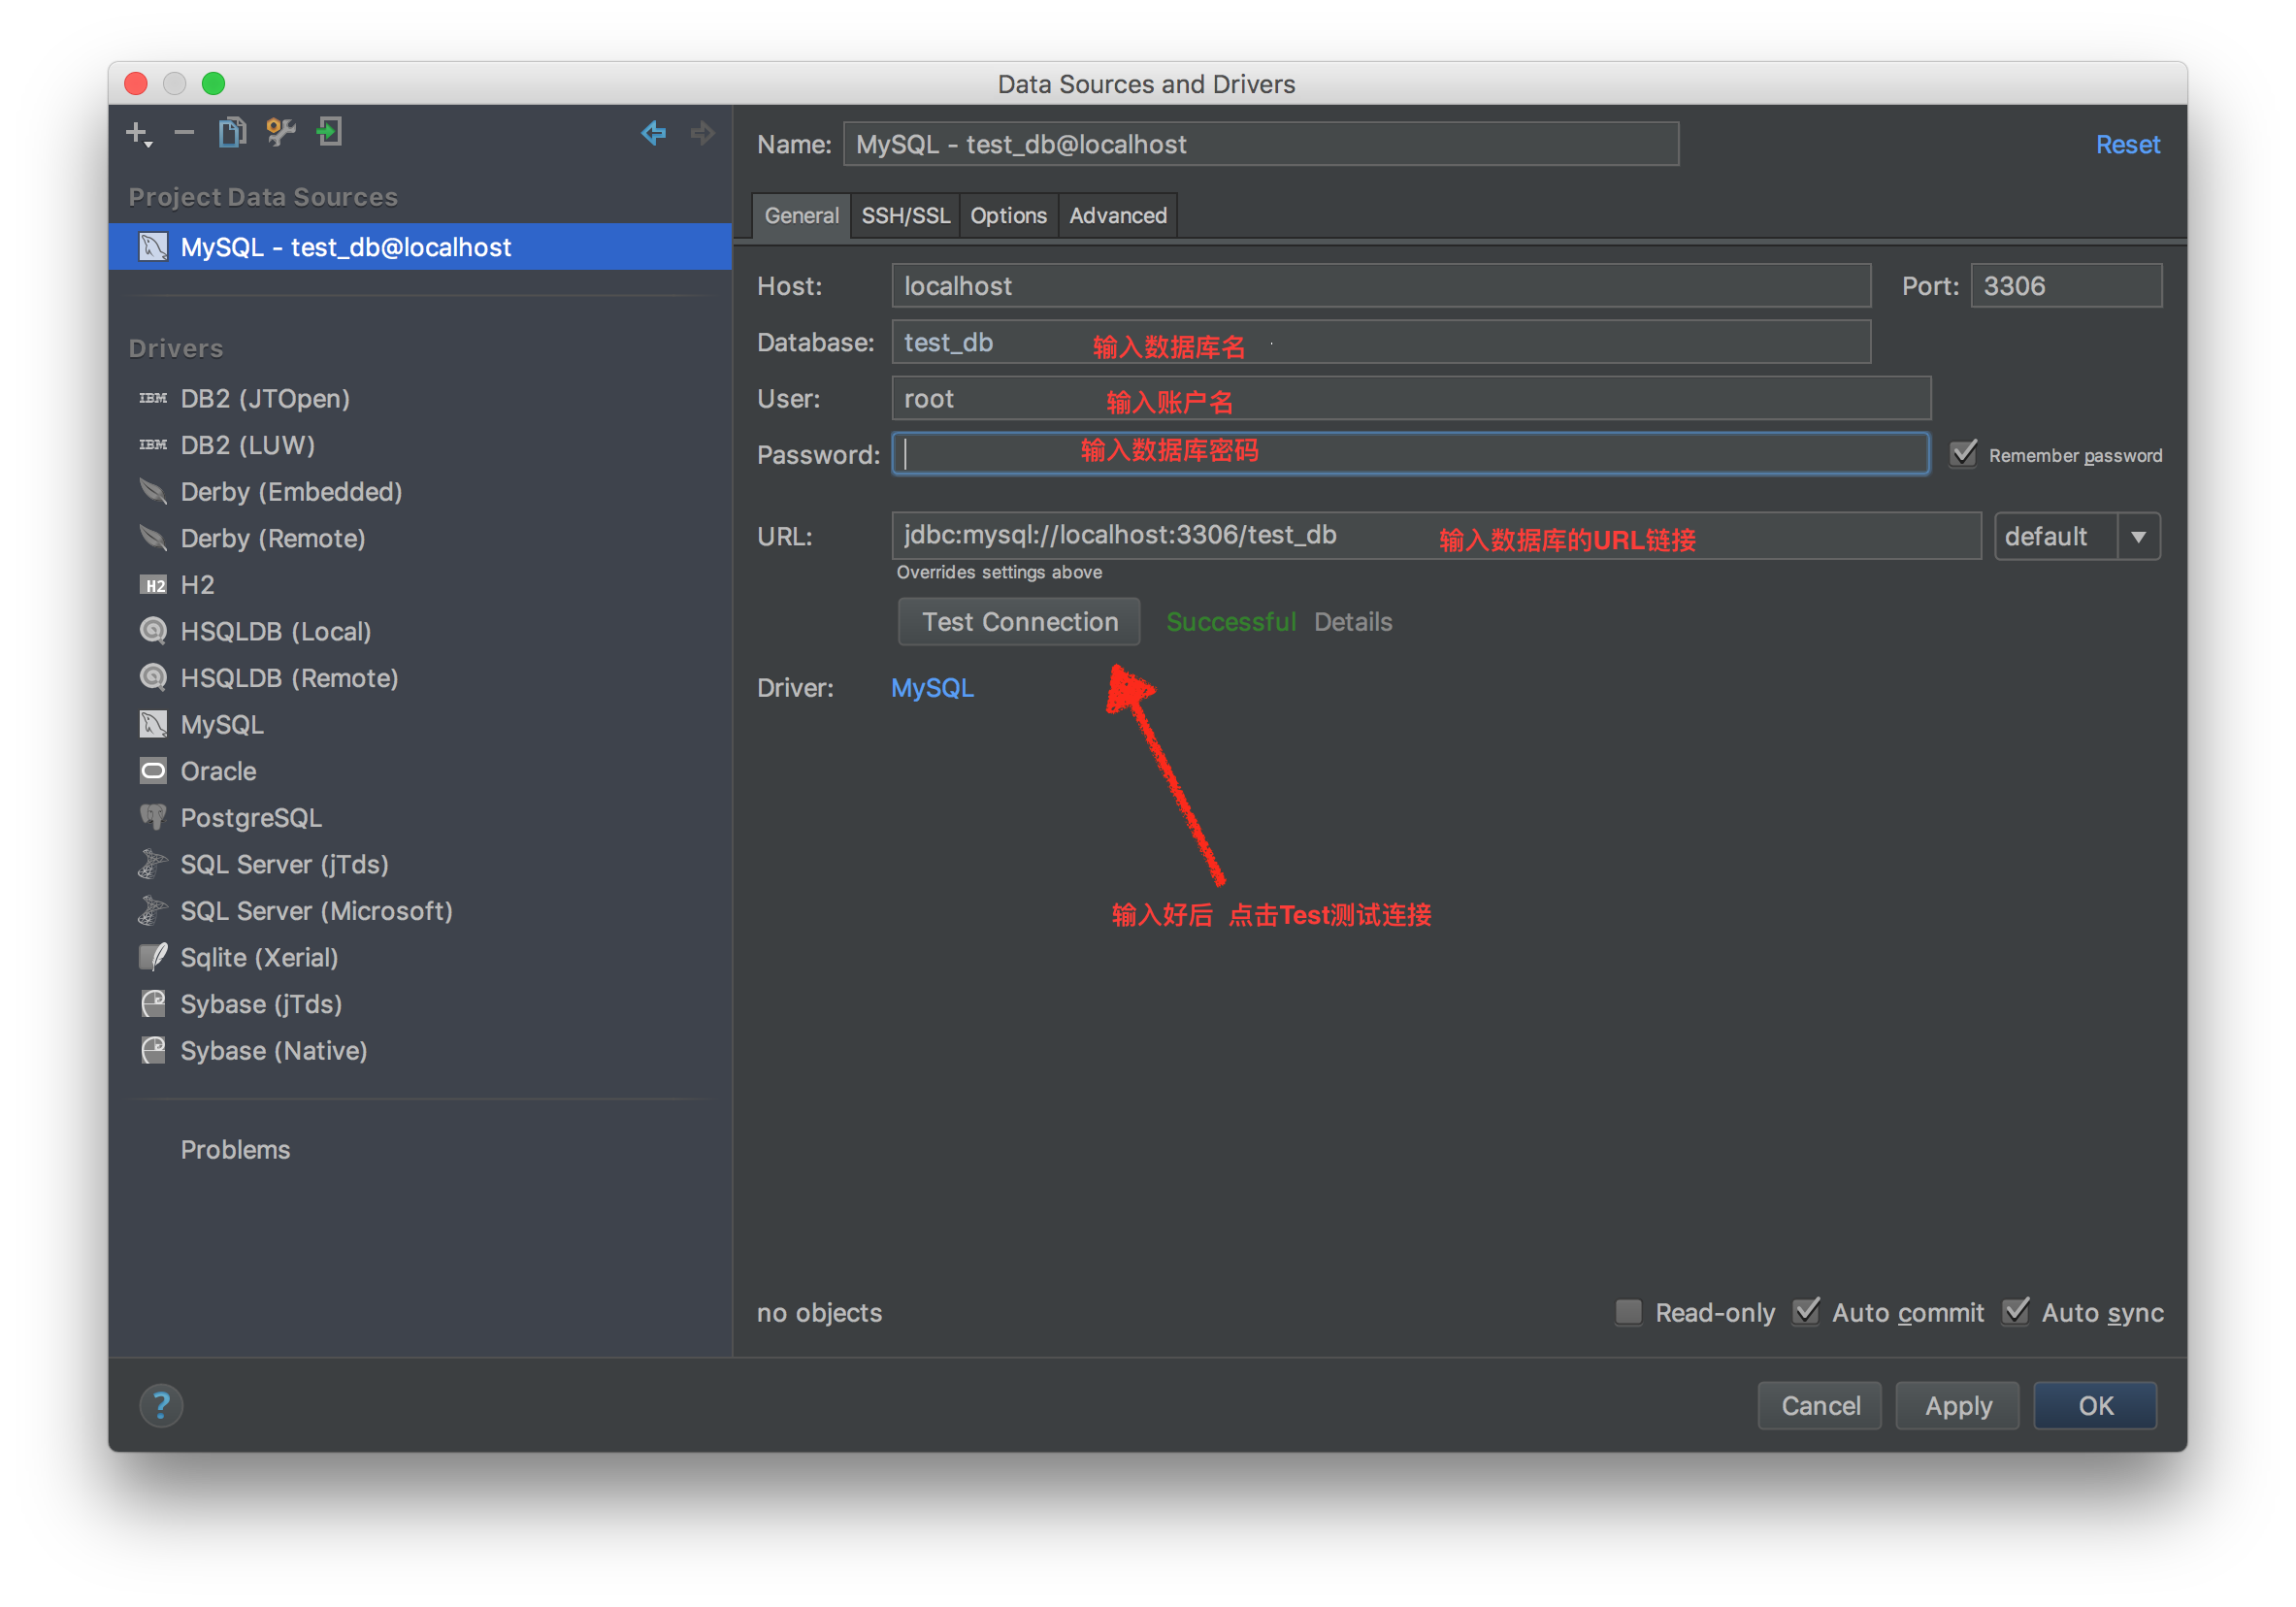
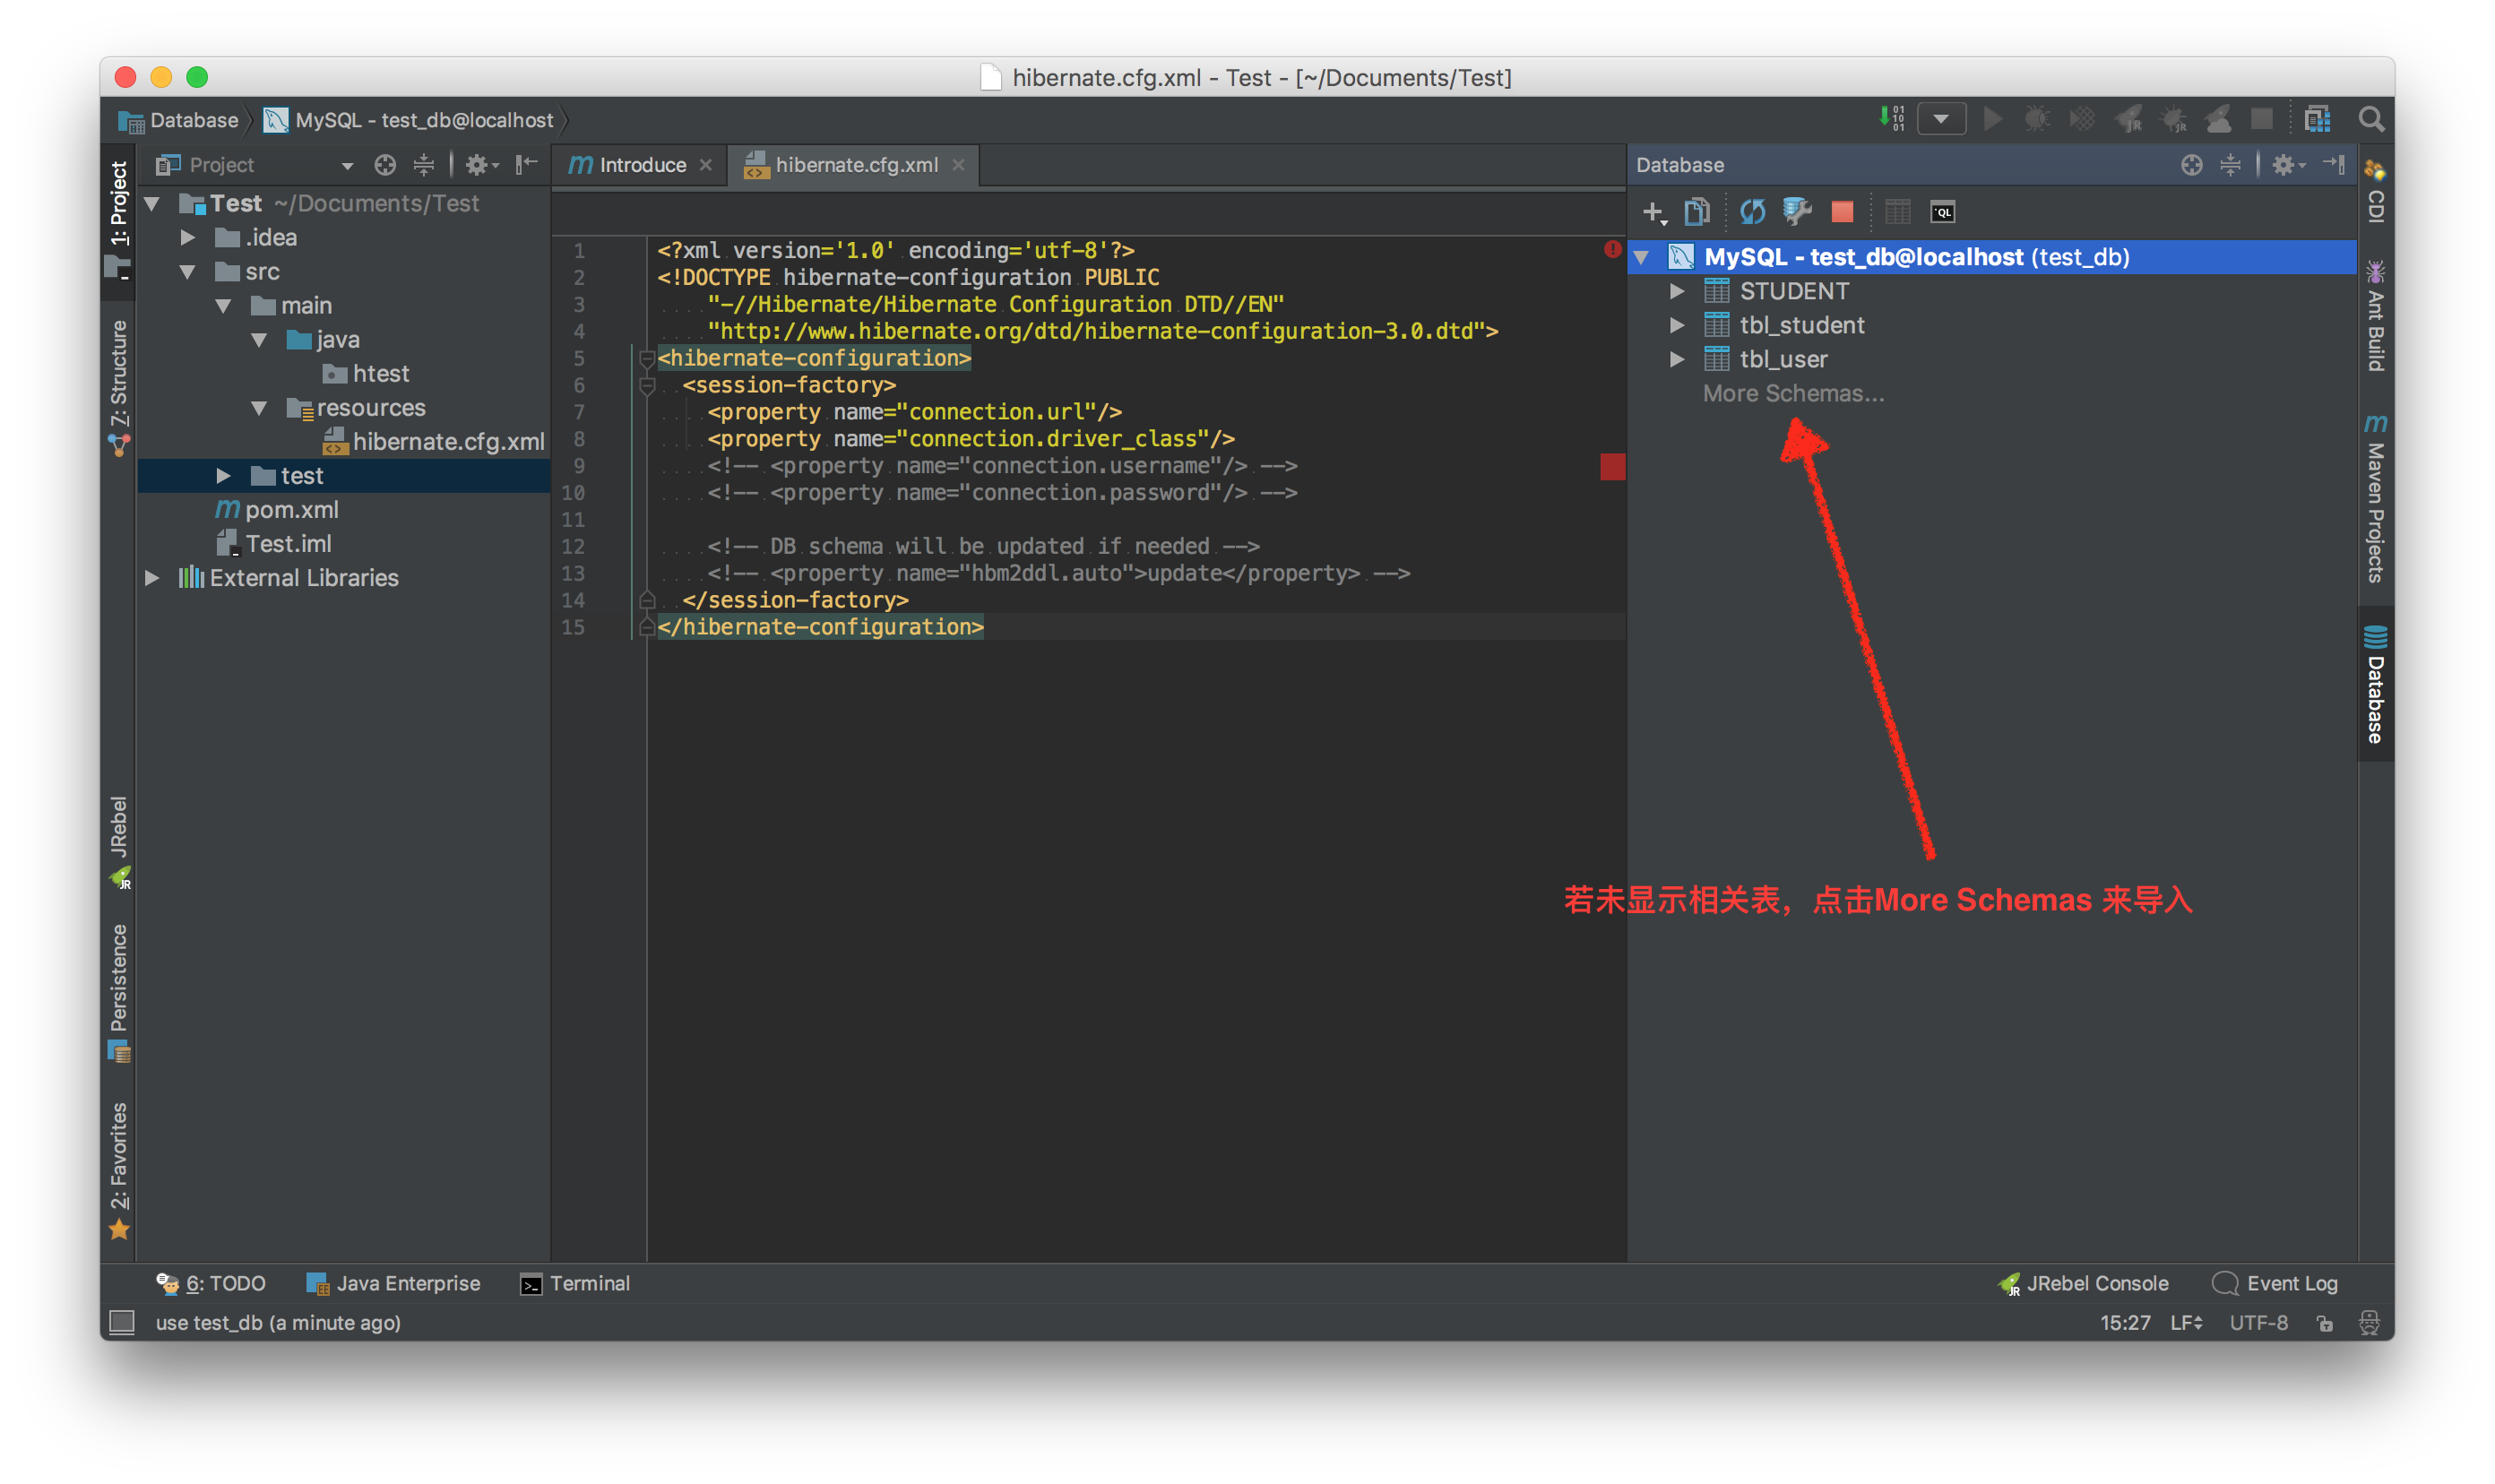
建立连接后,可以如图会显示该数据库中的表项目。
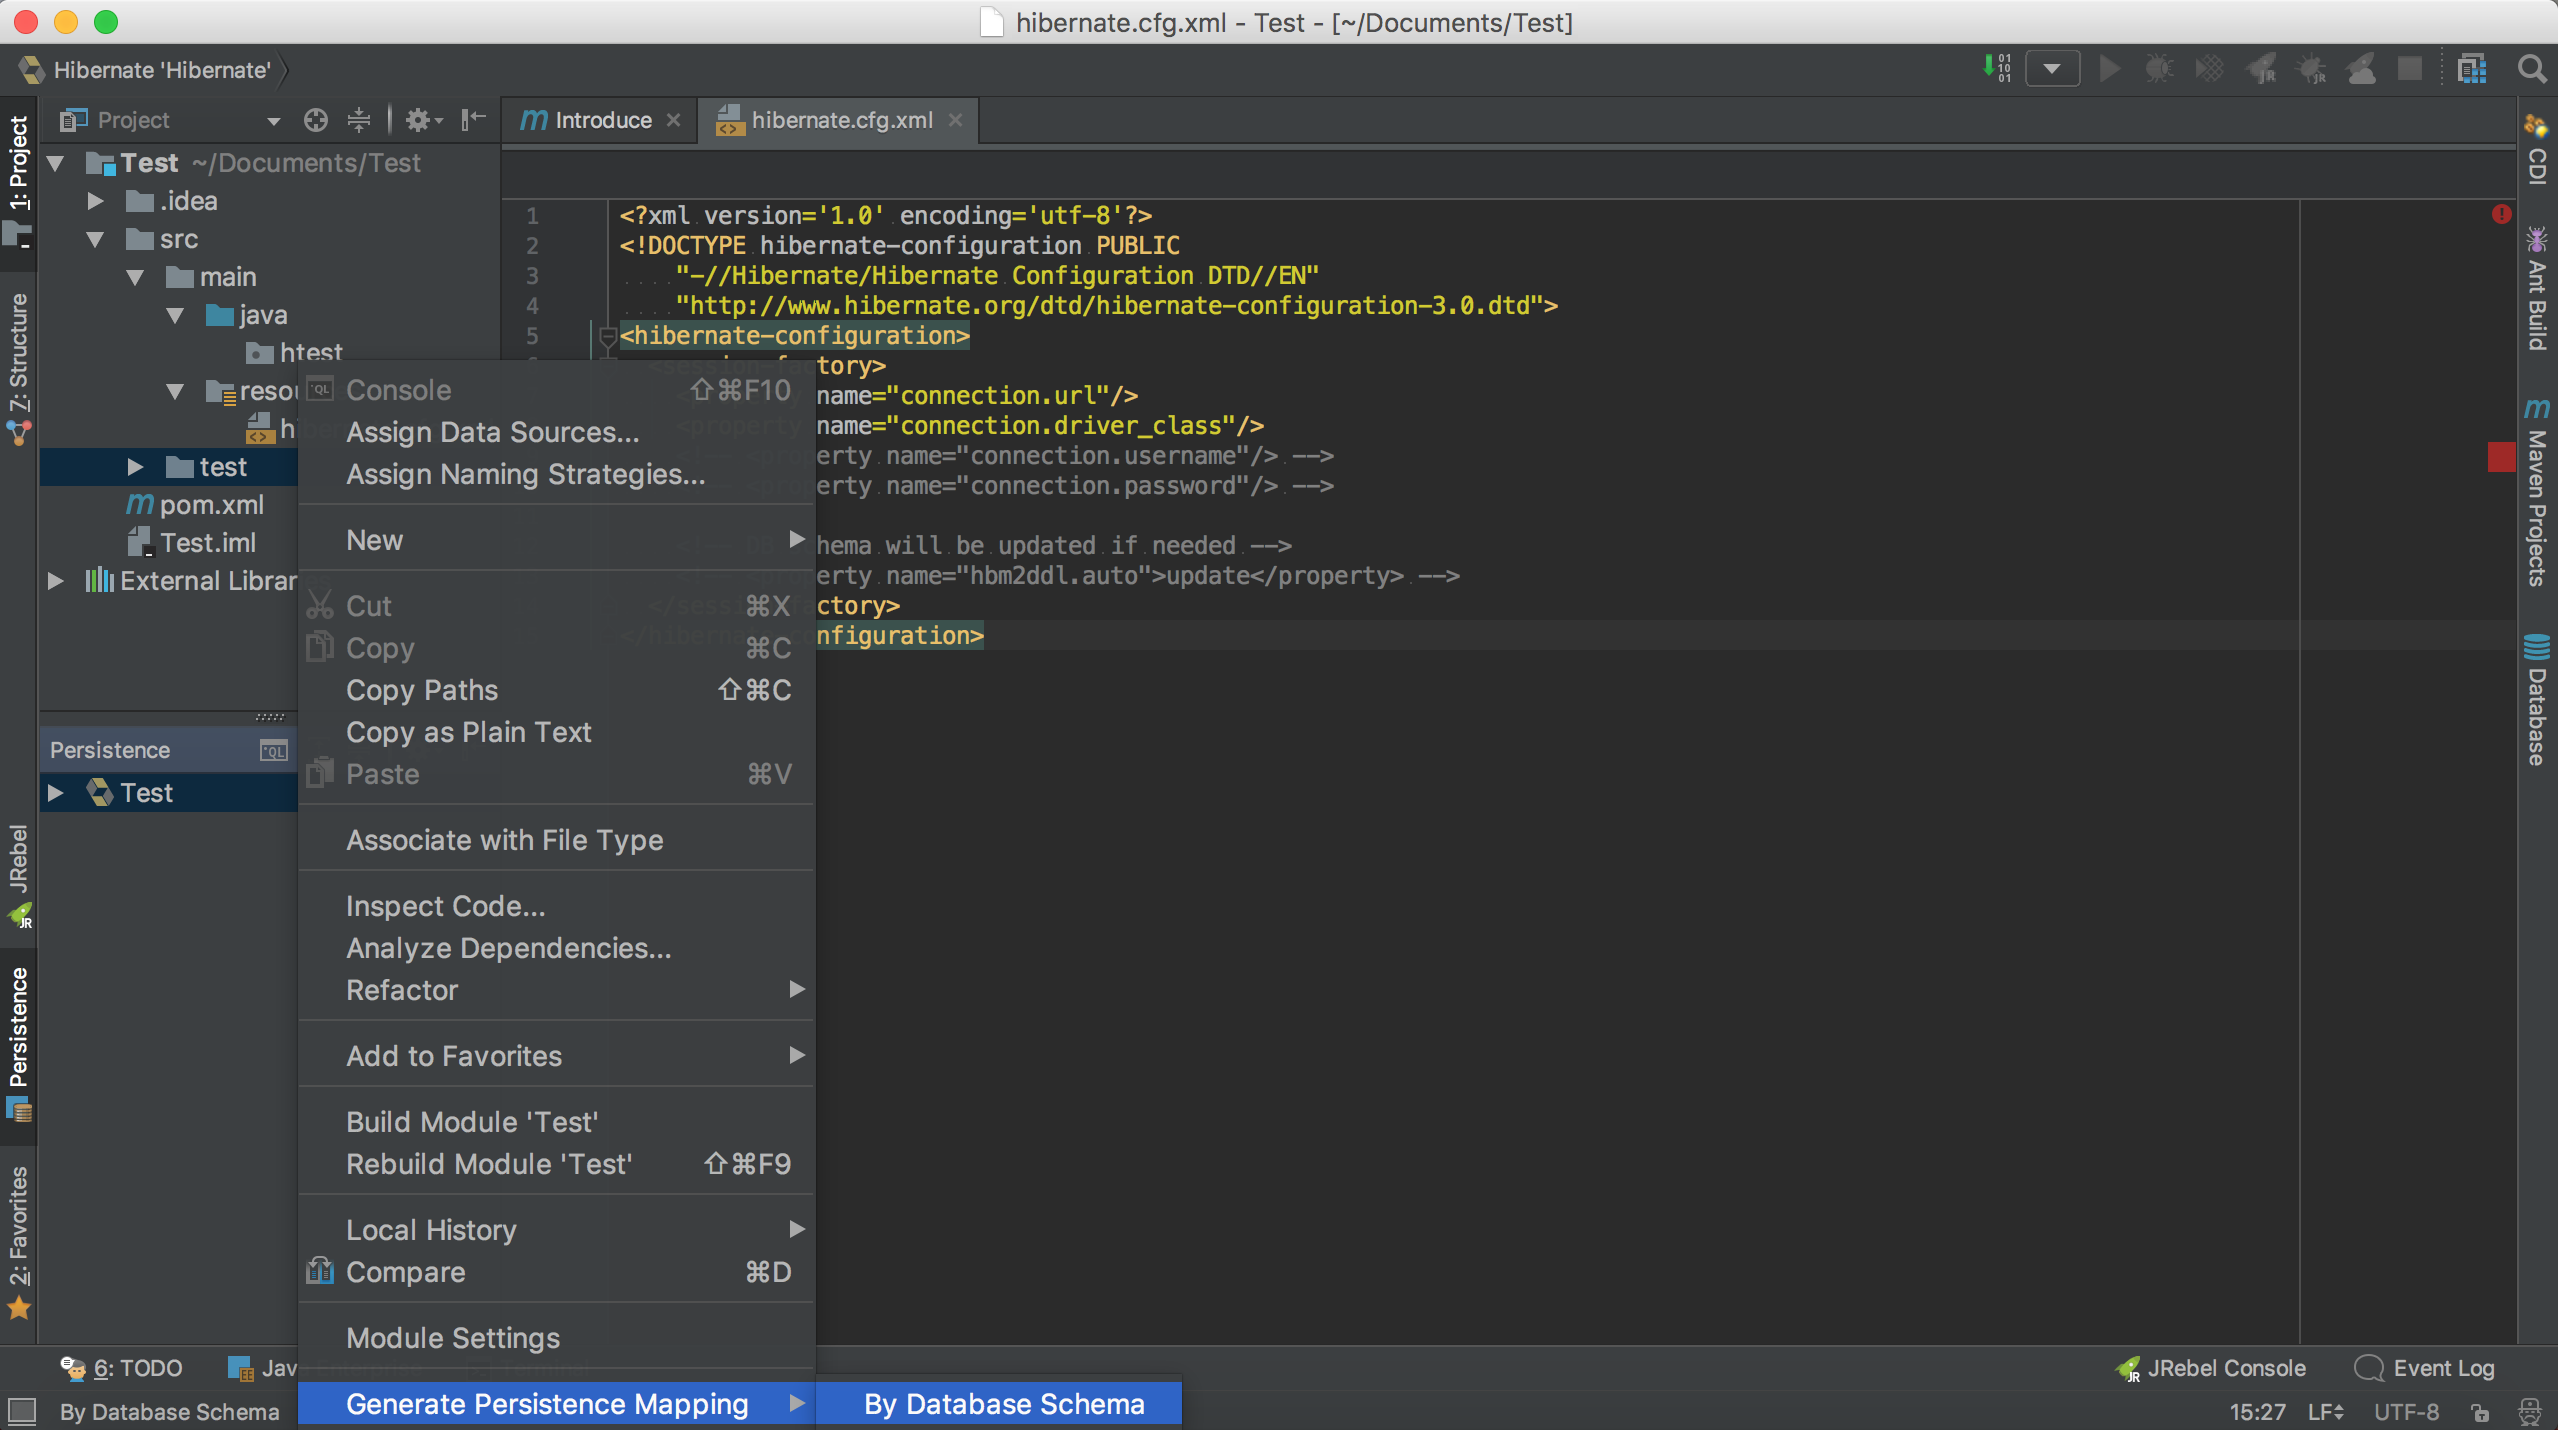
接下来根据相应的表来建立相应的映射类及hbm映射配置文件。
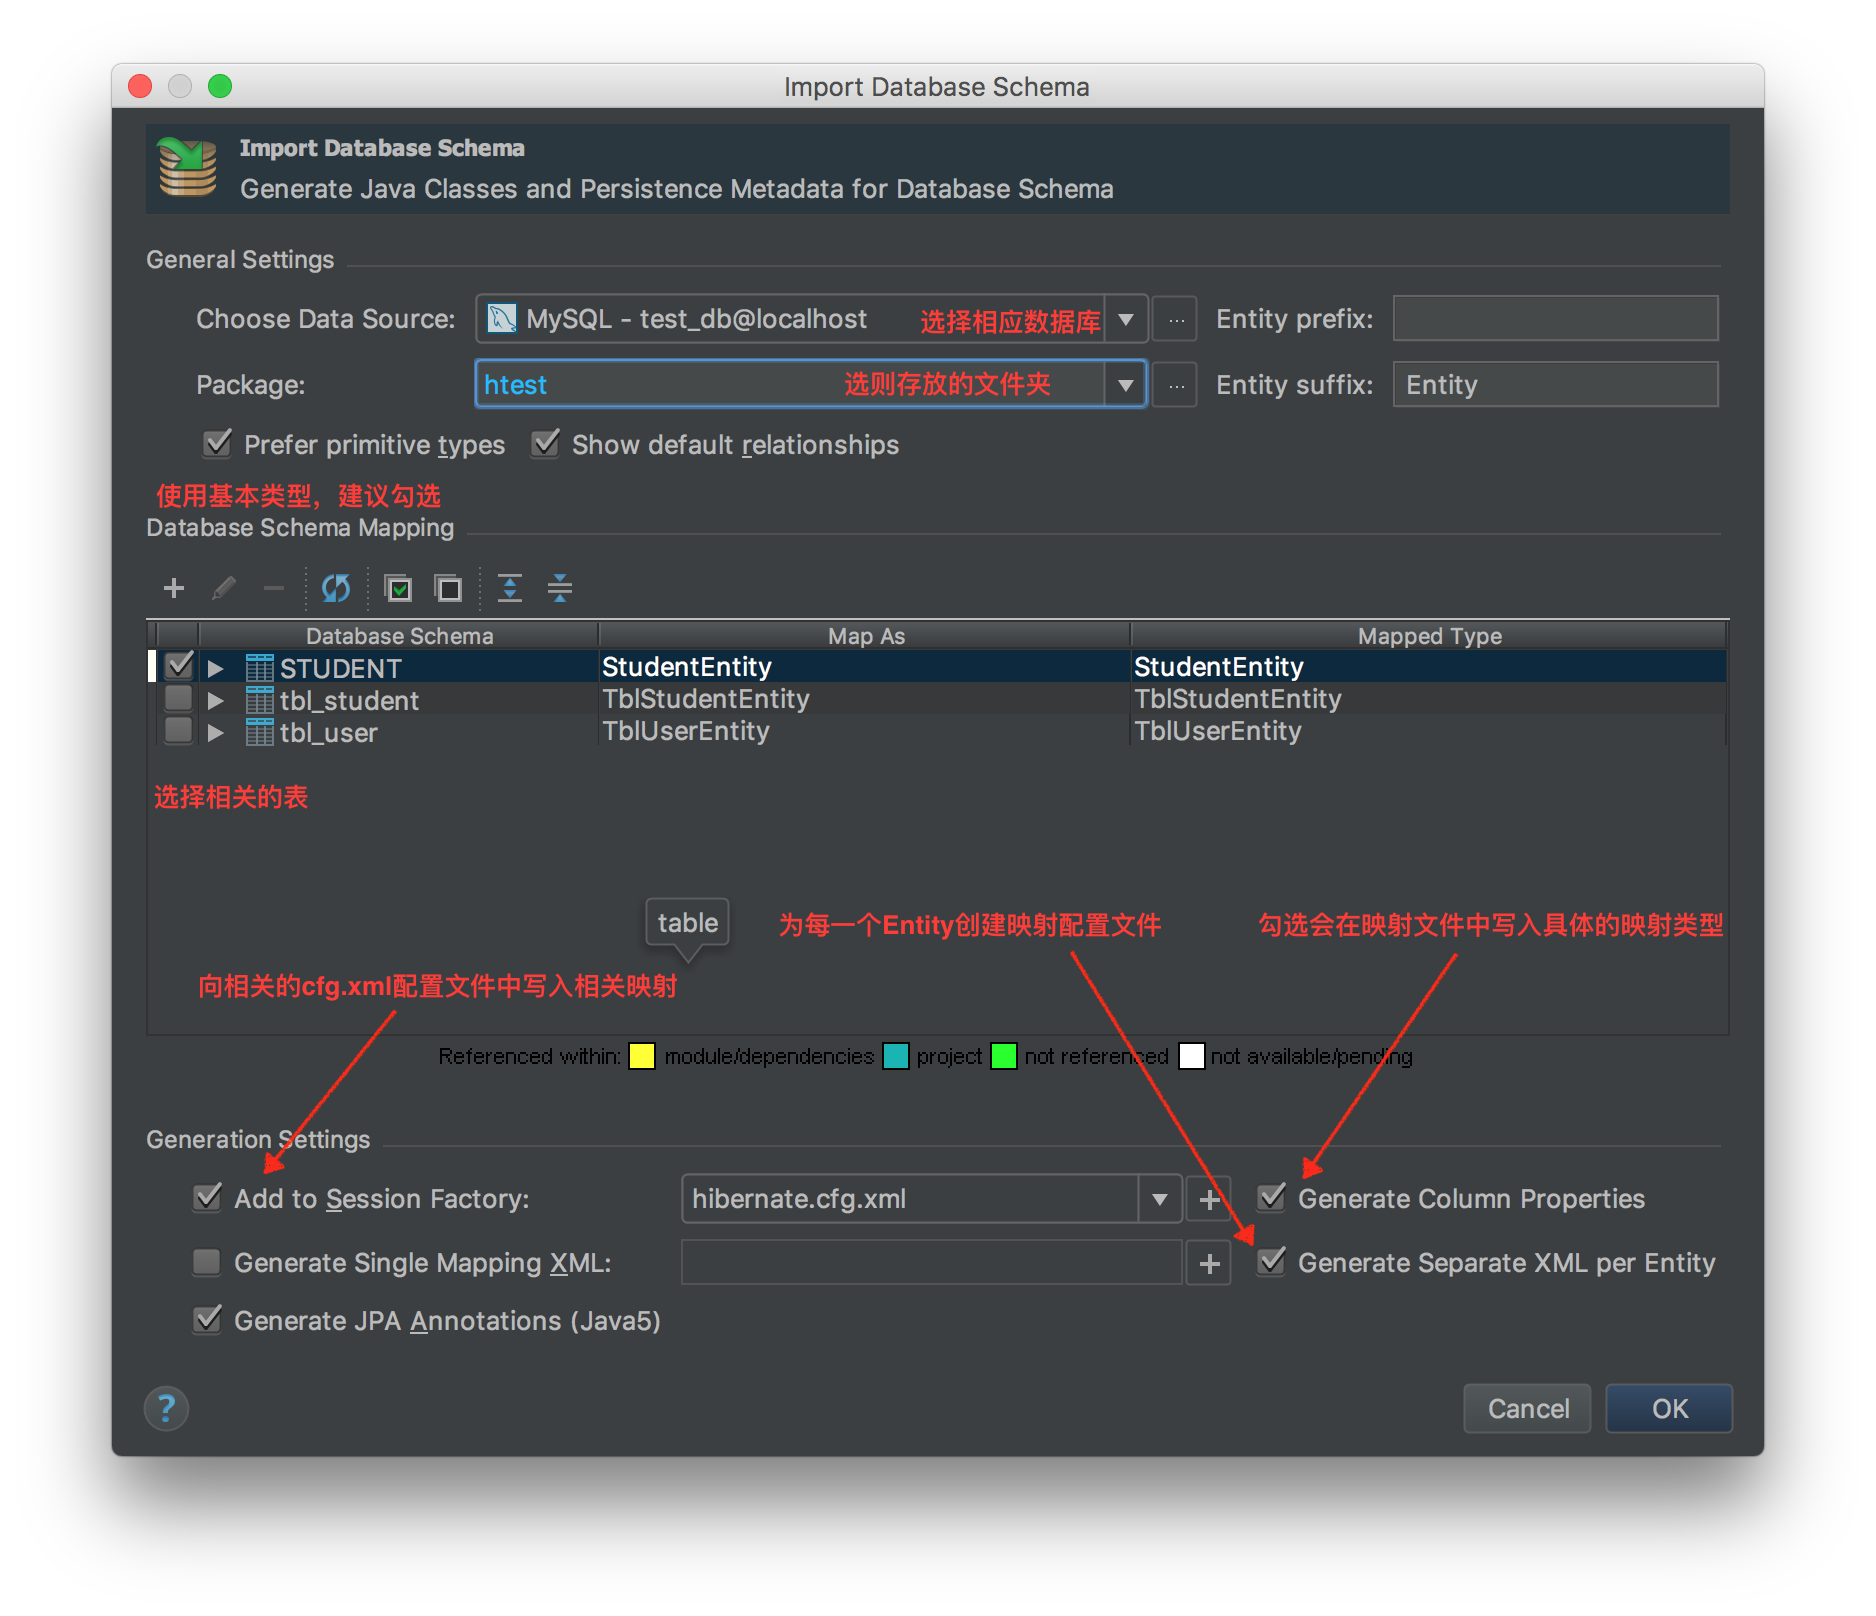
如图 ,一路OK。
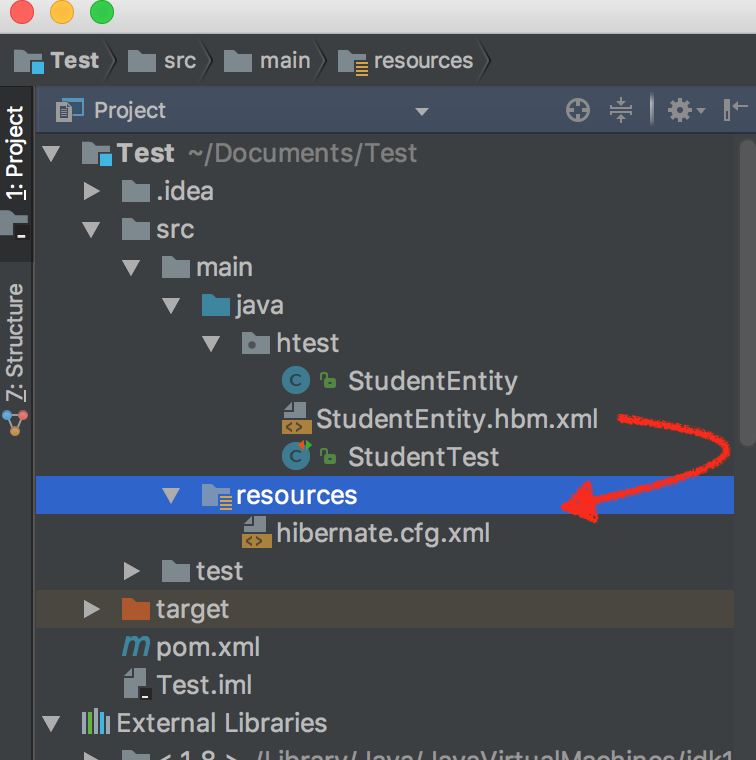
并将默认生成的hbm文件手动移动到resources中,默认位置与生成的类位置相同,如果未移动,则会报错 找不到映射文件
1
| org.hibernate.boot.MappingNotFoundException: Mapping (RESOURCE) not found : htest/StudentEntity.hbm.xml : origin(htest/StudentEntity.hbm.xml)
|
打开生成相应的StudentEntity类,并作相应修改
1
2
3
4
5
6
7
8
9
10
11
12
13
14
15
16
17
18
19
20
21
22
23
24
25
26
27
28
29
30
31
32
33
34
35
36
37
38
39
40
41
42
43
44
45
46
47
48
49
50
51
52
53
54
55
56
57
58
59
60
61
62
63
64
65
66
67
68
69
70
71
72
73
74
75
76
77
78
79
80
81
82
83
84
85
86
87
88
89
90
91
92
93
94
95
96
97
98
99
100
101
102
103
104
105
106
107
108
109
110
111
112
113
114
115
116
117
118
119
120
121
122
123
| @Entity
@Table(name = "STUDENT", schema = "test_db")
public class StudentEntity {
private int sid;
private String name;
private String gender;
private String address;
private String phone;
private Date birthday;
public StudentEntity() {
}
public StudentEntity(int sid, String name, String gender, String address, String phone, Date birthday) {
this.sid = sid;
this.name = name;
this.gender = gender;
this.address = address;
this.phone = phone;
this.birthday = birthday;
}
@Id
@Column(name = "SID", nullable = false)
public int getSid() {
return sid;
}
public void setSid(int sid) {
this.sid = sid;
}
@Basic
@Column(name = "NAME", nullable = false, length = 45)
public String getName() {
return name;
}
public void setName(String name) {
this.name = name;
}
@Basic
@Column(name = "GENDER", nullable = false, length = 45)
public String getGender() {
return gender;
}
public void setGender(String gender) {
this.gender = gender;
}
@Basic
@Column(name = "ADDRESS", nullable = false, length = 45)
public String getAddress() {
return address;
}
public void setAddress(String address) {
this.address = address;
}
@Basic
@Column(name = "PHONE", nullable = false, length = 45)
public String getPhone() {
return phone;
}
public void setPhone(String phone) {
this.phone = phone;
}
@Basic
@Column(name = "BIRTHDAY", nullable = false)
public Date getBirthday() {
return birthday;
}
public void setBirthday(Date birthday) {
this.birthday = birthday;
}
@Override
public boolean equals(Object o) {
if (this == o) return true;
if (o == null || getClass() != o.getClass()) return false;
StudentEntity that = (StudentEntity) o;
if (sid != that.sid) return false;
if (name != null ? !name.equals(that.name) : that.name != null) return false;
if (gender != null ? !gender.equals(that.gender) : that.gender != null) return false;
if (address != null ? !address.equals(that.address) : that.address != null) return false;
if (phone != null ? !phone.equals(that.phone) : that.phone != null) return false;
if (birthday != null ? !birthday.equals(that.birthday) : that.birthday != null) return false;
return true;
}
@Override
public int hashCode() {
int result = sid;
result = 31 * result + (name != null ? name.hashCode() : 0);
result = 31 * result + (gender != null ? gender.hashCode() : 0);
result = 31 * result + (address != null ? address.hashCode() : 0);
result = 31 * result + (phone != null ? phone.hashCode() : 0);
result = 31 * result + (birthday != null ? birthday.hashCode() : 0);
return result;
}
@Override
public String toString() {
return "StudentEntity{" +
"sid=" + sid +
", name='" + name + '\'' +
", gender='" + gender + '\'' +
", address='" + address + '\'' +
", phone='" + phone + '\'' +
", birthday=" + birthday +
'}';
}
}
|
同时生成相应的SrudentEntity.hbm.xml文件
1
2
3
4
5
6
7
8
9
10
11
12
13
14
15
16
17
18
19
20
21
22
23
24
25
26
27
| <?xml version='1.0' encoding='utf-8'?>
<!DOCTYPE hibernate-mapping PUBLIC
"-//Hibernate/Hibernate Mapping DTD 3.0//EN"
"http://www.hibernate.org/dtd/hibernate-mapping-3.0.dtd">
<hibernate-mapping>
<class name="htest.StudentEntity" table="STUDENT" schema="test_db">
<id name="sid">
<column name="SID" sql-type="int(11)"/>
</id>
<property name="name">
<column name="NAME" sql-type="varchar(45)" length="45"/>
</property>
<property name="gender">
<column name="GENDER" sql-type="varchar(45)" length="45"/>
</property>
<property name="address">
<column name="ADDRESS" sql-type="varchar(45)" length="45"/>
</property>
<property name="phone">
<column name="PHONE" sql-type="varchar(45)" length="45"/>
</property>
<property name="birthday">
<column name="BIRTHDAY" sql-type="date"/>
</property>
</class>
</hibernate-mapping>
|
然后修改相应的hibernate.cfg.xml文件
1
2
3
4
5
6
7
8
9
10
11
12
13
14
15
16
17
18
19
20
21
22
23
24
25
26
27
28
29
30
31
32
33
34
| <?xml version='1.0' encoding='utf-8'?>
<!DOCTYPE hibernate-configuration PUBLIC
"-//Hibernate/Hibernate Configuration DTD//EN"
"http://www.hibernate.org/dtd/hibernate-configuration-3.0.dtd">
<hibernate-configuration>
<session-factory>
<property name="connection.url">jdbc:mysql://127.0.0.1:3306/test_db?useSSL=false&useUnicode=true&characterEncoding=utf-8</property>
<property name="connection.driver_class">com.mysql.jdbc.Driver</property>
<property name="connection.username">root</property>
<property name="connection.password"></property>
<property name="hbm2ddl.auto">update</property>
<property name="format_sql">true</property>
<property name="show_sql">true</property>
<property name="dialect">org.hibernate.dialect.MySQLDialect</property>
<mapping class="htest.StudentEntity"/>
<mapping resource="StudentEntity.hbm.xml"/>
</session-factory>
</hibernate-configuration>
|
然后,创建测试类
1
2
3
4
5
6
7
8
9
10
11
12
13
14
15
16
17
18
19
20
21
22
23
24
25
26
27
28
29
30
31
| public class StudentTest {
private SessionFactory sessionFactory;
private Session session;
private Transaction transaction;
@Before
public void Init() {
Configuration configuration = new Configuration().configure();
sessionFactory = configuration.buildSessionFactory();
session = sessionFactory.openSession();
transaction = session.beginTransaction();
}
@Test
public void test() {
StudentEntity student1 = new StudentEntity(20, "张三", "男", "北京", "188888888", Date.valueOf("2008-08-08"));
session.save(student1);
}
@After
public void destroy() {
transaction.commit();
session.close();
sessionFactory.close();
}
}
|
运行测试类代码后,查看数据库,并更新,若写入了相应的数据则代表配置成功
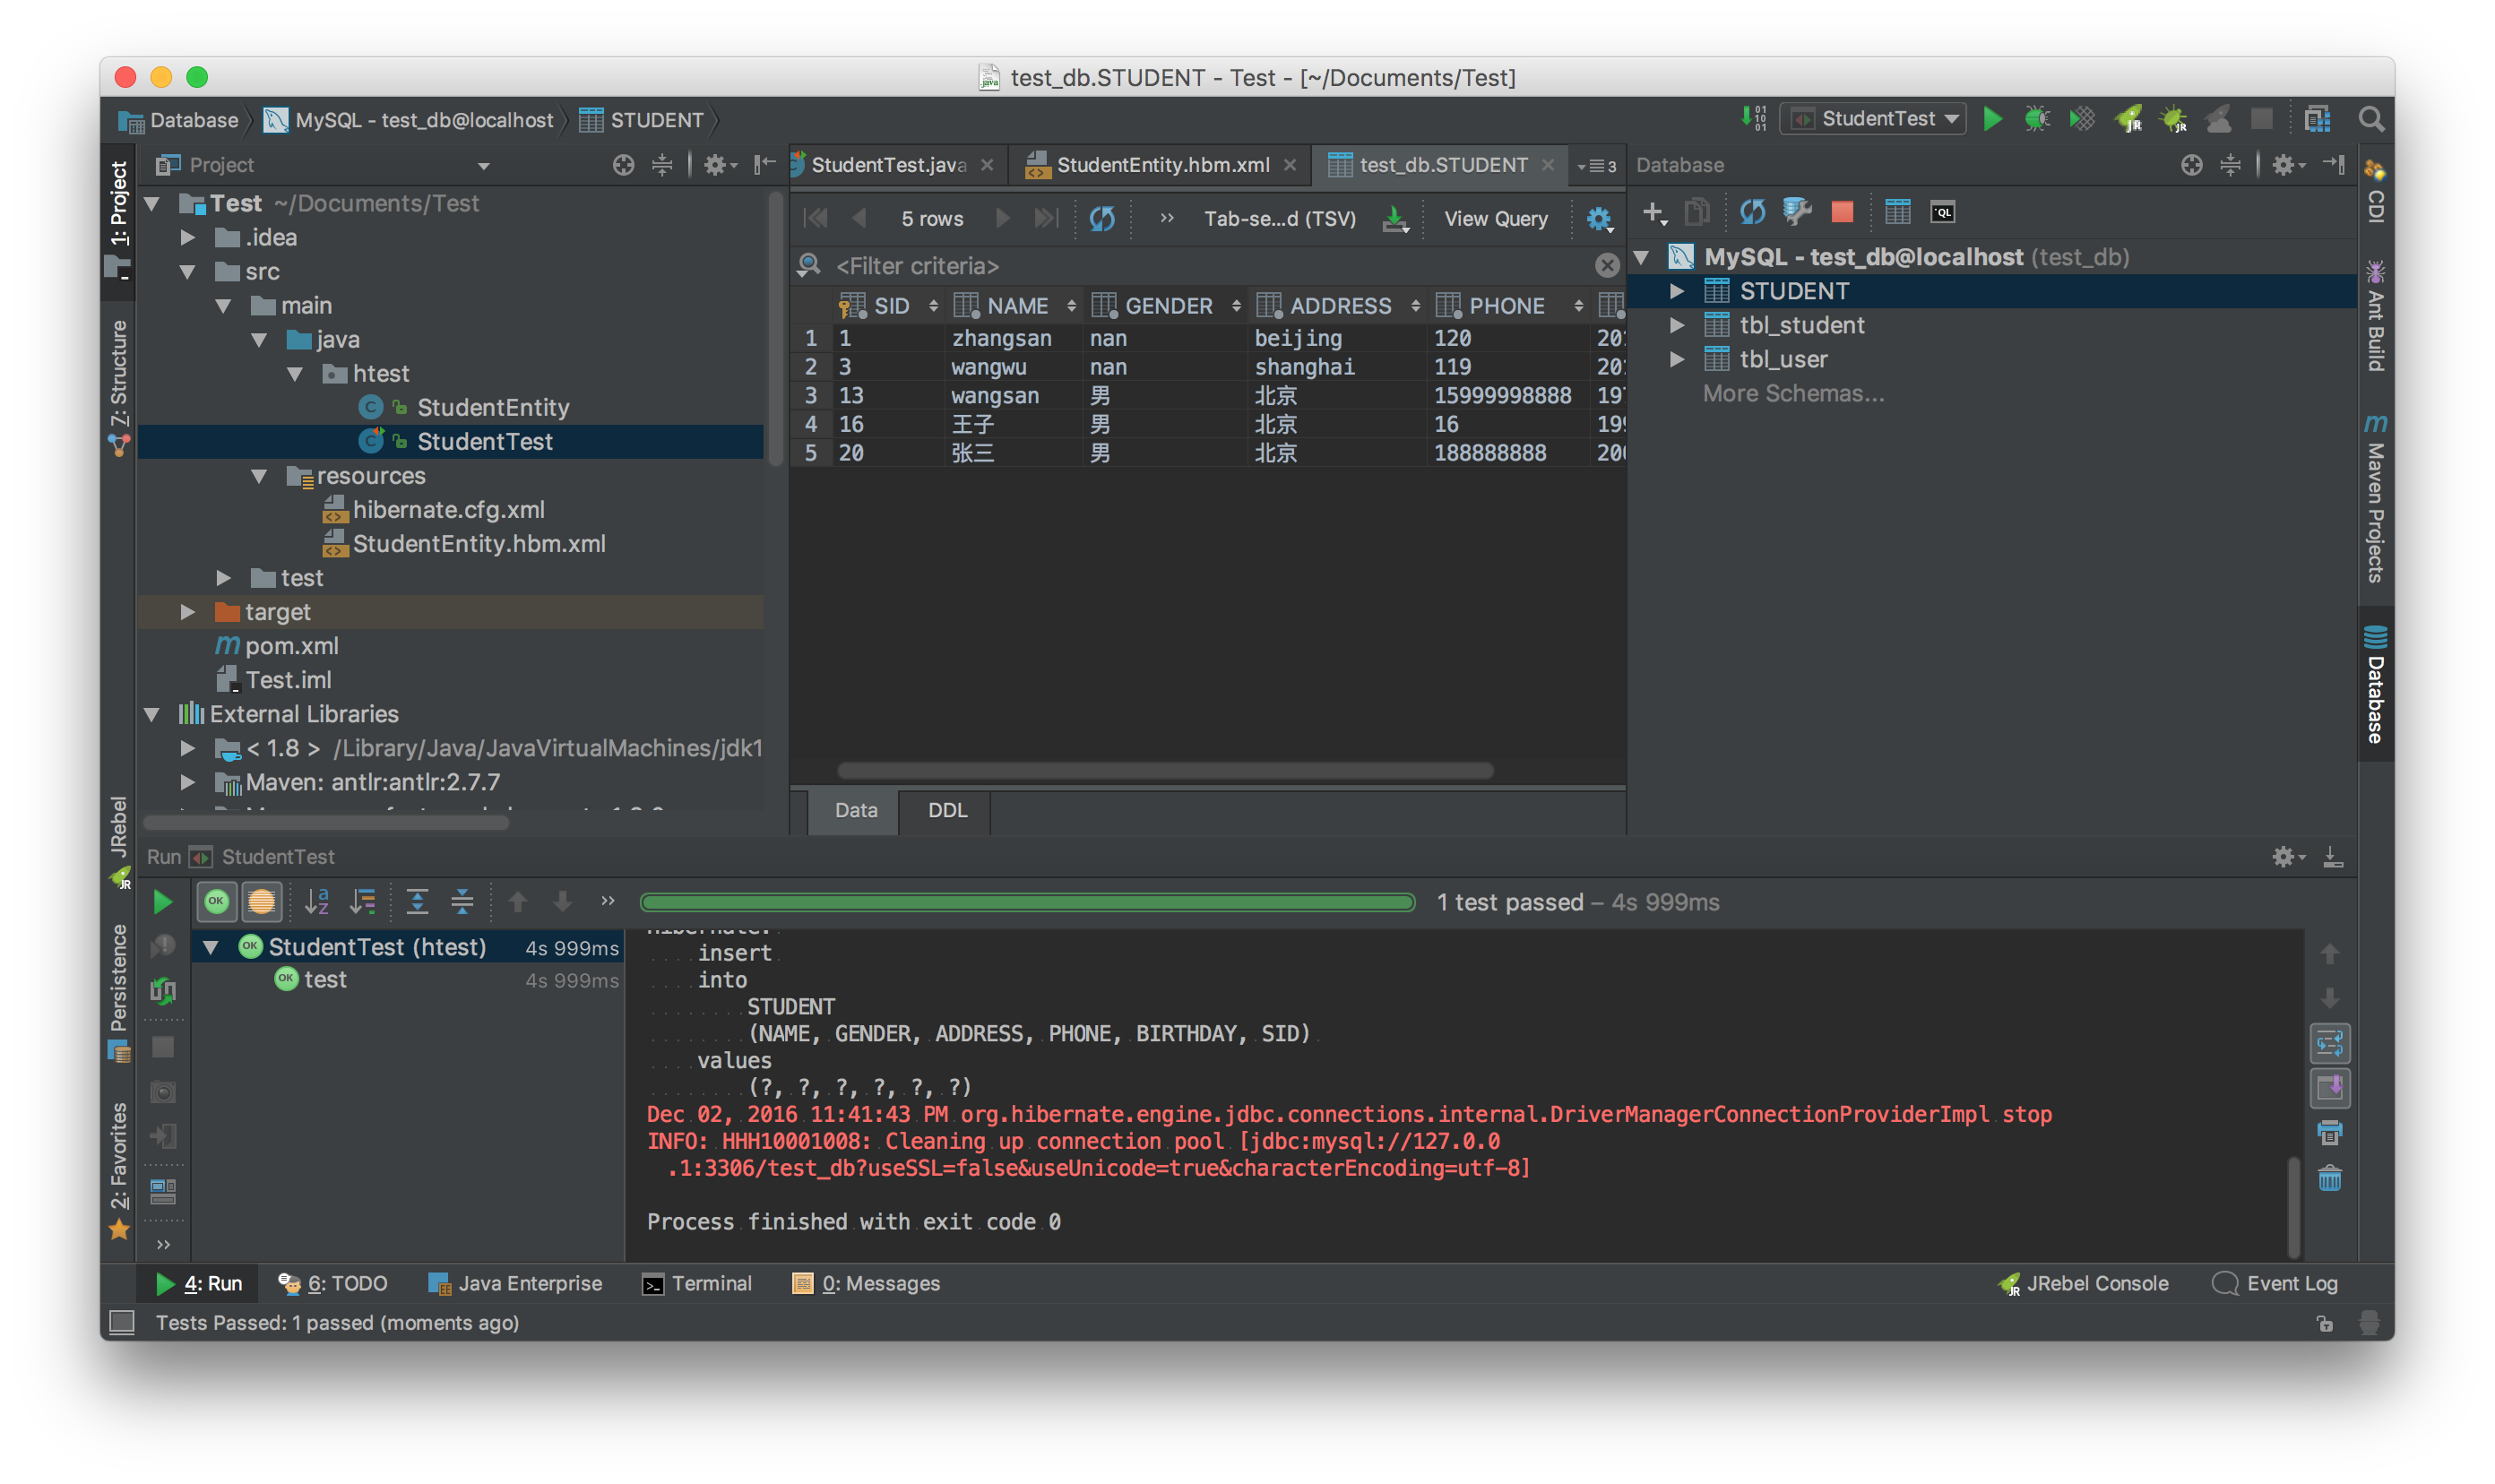
有关Hibernate写入数据 中文问题
当写入中文时,报错如下
1
2
3
4
5
6
7
8
| Dec 02, 2016 11:46:02 PM org.hibernate.engine.jdbc.spi.SqlExceptionHelper logExceptions
WARN: SQL Error: 1366, SQLState: HY000
Dec 02, 2016 11:46:02 PM org.hibernate.engine.jdbc.spi.SqlExceptionHelper logExceptions
ERROR: Incorrect string value: '\xE5\xBC\xA0\xE4\xB8\x89' for column 'NAME' at row 1
Dec 02, 2016 11:46:02 PM org.hibernate.engine.jdbc.batch.internal.AbstractBatchImpl release
INFO: HHH000010: On release of batch it still contained JDBC statements
Dec 02, 2016 11:46:02 PM org.hibernate.internal.ExceptionMapperStandardImpl mapManagedFlushFailure
ERROR: HHH000346: Error during managed flush [org.hibernate.exception.GenericJDBCException: could not execute statement]
|
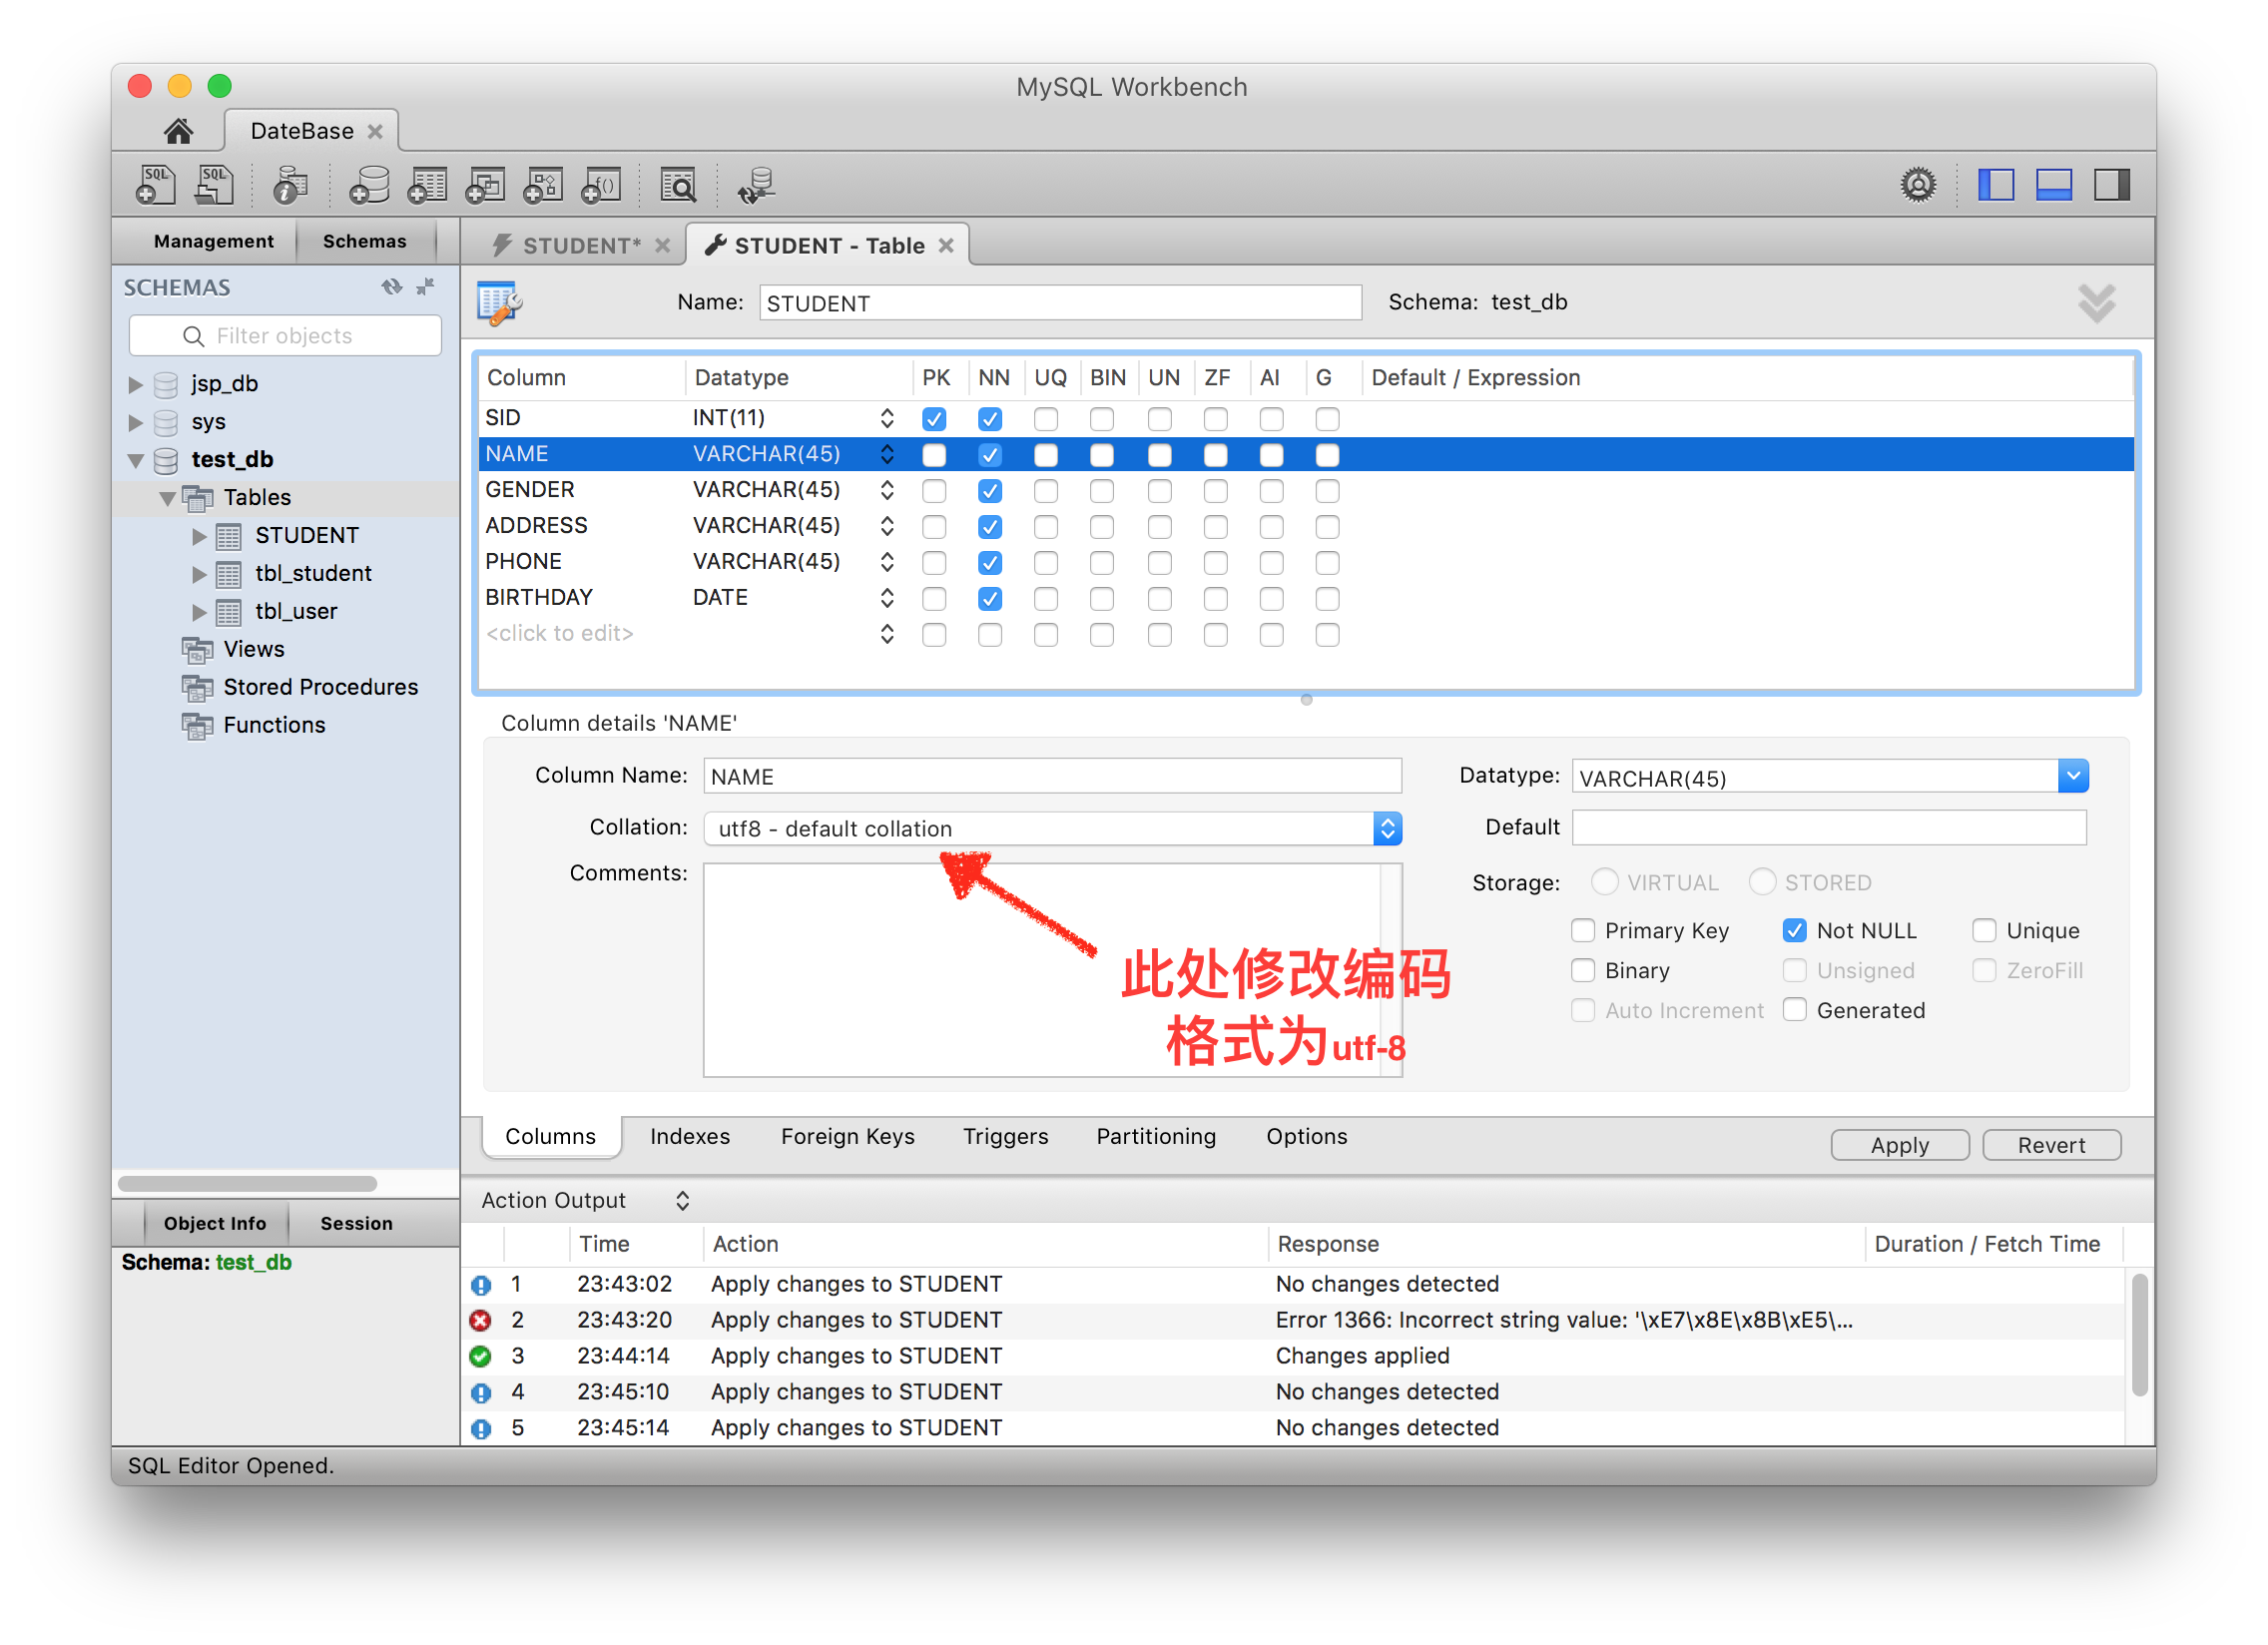
博主是通过MySQLWorkbench来建的表,如果出现下面的错误,主要有2个原因
1.检查hibernate.cfg.xml中url是否强调为utf-8
2.检查MySQL默认的编码是否为utf-8
解决办法:
原因1:在相应的URL中添加useUnicode=true&characterEncoding=utf-8 。
原因2:如图在MySQLWorkbench中修改(或在创建表时 明确为UTF-8)
