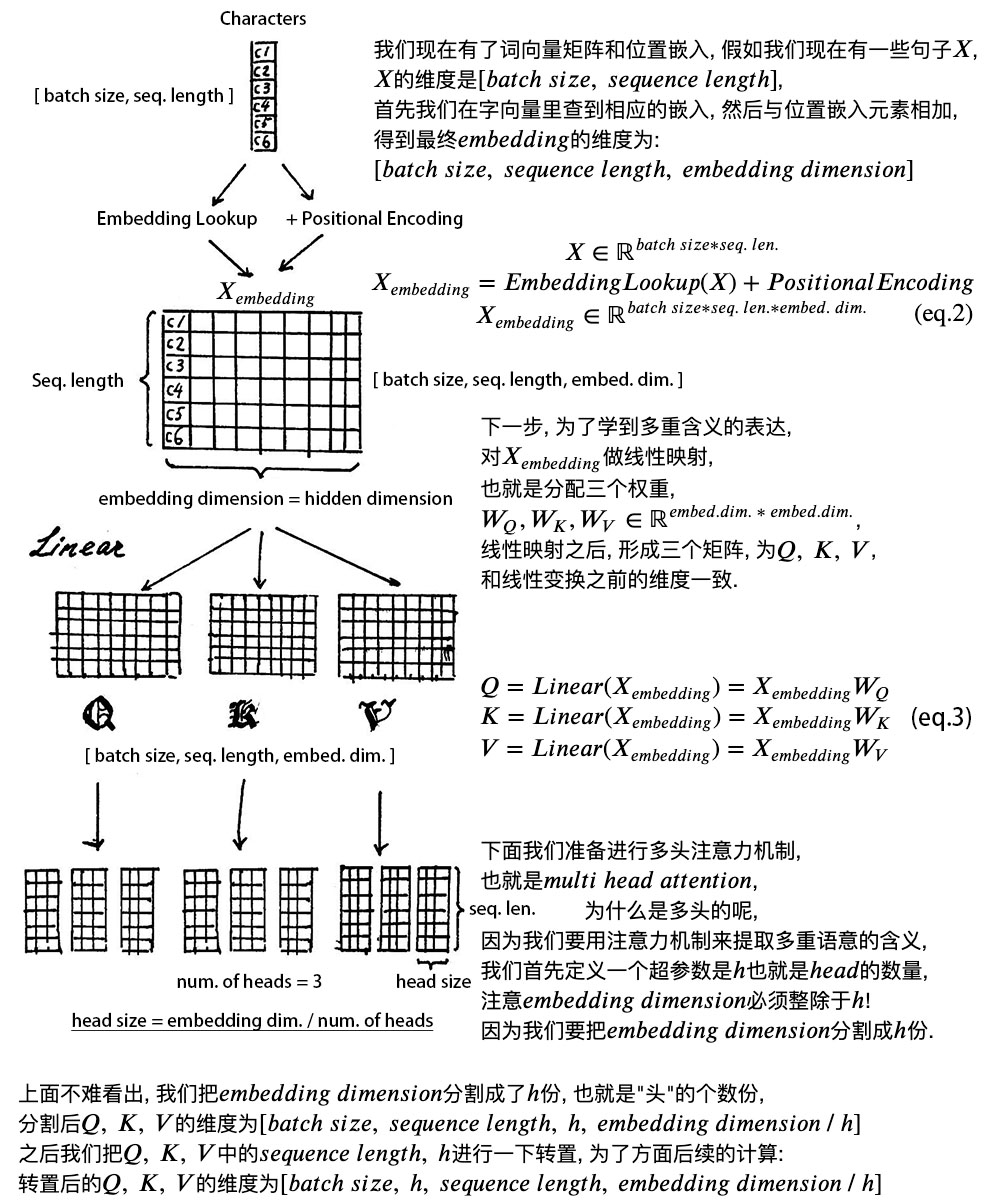
Bert全名Bidirectional Encoder Representations from Transformers. 顾名思义,Bert最关键的在于Transformer.
Transformer是谷歌大脑在2017年底发表的论文attention is all you need 中所提出的seq2seq模型. 现在已经取得了大范围的应用和扩展, 而BERT就是从transformer中衍生出来的预训练语言模型,Bert主要用到了Transformer的encoder部分. Transformer的具体介绍 在后面transformer_model 部分会详细介绍。
在github上,下载google开源的 bert模型,文件目录如下:
1
2
3
4
5
6
7
8
9
10
11
12
13
14
15
16
17
18
19
├── CONTRIBUTING.md ├── LICENSE ├── README.md ├── create_pretraining_data.py ├── extract_features.py ├── modeling.py ├── modeling_test.py ├── multilingual.md ├── optimization.py ├── optimization_test.py ├── predicting_movie_reviews_with_bert_on_tf_hub.ipynb ├── requirements.txt ├── run_classifier.py ├── run_classifier_with_tfhub.py ├── run_pretraining.py ├── run_squad.py ├── sample_text.txt ├── tokenization.py └── tokenization_test.py
Google给出了许多bert预训练模型,这里我主要用的是
BERT-Base, Uncased: 12-layer, 768-hidden, 12-heads, 110M parameters
uncase 指该模型会自动将大写字母转换为小写,从而无视大小写。
该模型有12层Transformer Block,768个隐藏神经元,在attention_layer 中 有12个 multi-heads,110M个参数。
在后面我会用该模型 在run_classifier 对 IMDB 的评价进行 情感分析。
在下载的模型里,会看见以下5个文件。
1
2
3
4
5
6
7
8
. ├── bert_config.json ├── bert_model.ckpt.data-00000-of-00001 ├── bert_model.ckpt.index ├── bert_model.ckpt.meta └── vocab.txt 0 directories, 6 files
vocab.txt是词汇表,bert_config.json记录了一些模型相关参数,bert_midel.ckpt是模型的具体配置。
下面开始对Bert 的源码进行解读分析
modeling.py BertConfig bert配置类 1 2 3 4 5 6 7 8 9 10 11 12 13 14 15 16 17 18 19 20 21 22 23 24 25 26 27 28 29 30 31 32 33 34 35 36 37 38 39 40 41 42 43 44 45 46 47 48 49 50 51 52 53 54 55 56 57 58 59 60 61 62 63 64 65 66 class BertConfig (object ): """Bert模型的配置类.""" def __init__ (self, vocab_size, hidden_size=768 , num_hidden_layers=12 , num_attention_heads=12 , intermediate_size=3072 , hidden_act="gelu" , hidden_dropout_prob=0.1 , attention_probs_dropout_prob=0.1 , max_position_embeddings=512 , type_vocab_size=16 , initializer_range=0.02 ): """Constructs BertConfig. Args: vocab_size: Bert模型中所用到的词表大小. hidden_size: 隐藏层神经元的个数.(与最后词向量的输出 维度有关) num_hidden_layers: 在Transformer encoder中 隐藏层的数目. num_attention_heads: multi-head attention 的head数.(注意力机制) intermediate_size: 中间层神经元的个数. hidden_act: 非线性激活函数的选择,这里使用的是Gelu函数(是一种特别的Relu函数). hidden_dropout_prob: 全连接层中的DroupOut率. attention_probs_dropout_prob: 注意力部分中的DroupOut率. max_position_embeddings: 最大序列长度 type_vocab_size: token_type_ids种类的个数,这里 一般都设置为了2,这里的2指的就是 segment_A,segment_B initializer_range: 正则化率 """ self.vocab_size = vocab_size self.hidden_size = hidden_size self.num_hidden_layers = num_hidden_layers self.num_attention_heads = num_attention_heads self.hidden_act = hidden_act self.intermediate_size = intermediate_size self.hidden_dropout_prob = hidden_dropout_prob self.attention_probs_dropout_prob = attention_probs_dropout_prob self.max_position_embeddings = max_position_embeddings self.type_vocab_size = type_vocab_size self.initializer_range = initializer_range @classmethod def from_dict (cls, json_object ): """Constructs a `BertConfig` from a Python dictionary of parameters.""" config = BertConfig(vocab_size=None ) for (key, value) in six.iteritems(json_object): config.__dict__[key] = value return config @classmethod def from_json_file (cls, json_file ): """Constructs a `BertConfig` from a json file of parameters.""" with tf.gfile.GFile(json_file, "r" ) as reader: text = reader.read() return cls.from_dict(json.loads(text)) def to_dict (self ): """Serializes this instance to a Python dictionary.""" output = copy.deepcopy(self.__dict__) return output def to_json_string (self ): """Serializes this instance to a JSON string.""" return json.dumps(self.to_dict(), indent=2 , sort_keys=True ) + "\n"
Gelu函数 上面hidden_act中,所选用的Gelu函数(一种更加平滑的Relu函数,尤其是在0点处)。 源码如下。
1 2 3 4 5 6 def gelu (x ): """高斯误差线性单元""" cdf = 0.5 * (1.0 + tf.tanh( (np.sqrt(2 / np.pi) * (x + 0.044715 * tf.pow (x, 3 ))))) return x * cdf
Embedding_lookup获取词向量 1 2 3 4 5 6 7 8 9 10 11 12 13 14 15 16 17 18 19 20 21 22 23 24 25 26 27 28 29 30 31 32 33 34 35 36 37 38 39 40 41 42 43 44 45 46 47 48 49 50 51 52 def embedding_lookup (input_ids, vocab_size, embedding_size=128 , initializer_range=0.02 , word_embedding_name="word_embeddings" , use_one_hot_embeddings=False ): """Looks up words embeddings for id tensor. Args: input_ids: int32 Tensor of shape [batch_size, seq_length] containing word ids. vocab_size: 词汇表大小. embedding_size: 词嵌入层的宽度.(即 每个词 用几维表示) initializer_range: 嵌入层初始化率. word_embedding_name: 设置嵌入层名字,可在TensorBoard 显示. use_one_hot_embeddings: 是否使用one-hot 还是 tf.gather; Returns: float Tensor of shape [batch_size, seq_length, embedding_size]. """ if input_ids.shape.ndims == 2 : input_ids = tf.expand_dims(input_ids, axis=[-1 ]) embedding_table = tf.get_variable( name=word_embedding_name, shape=[vocab_size, embedding_size], initializer=create_initializer(initializer_range)) flat_input_ids = tf.reshape(input_ids, [-1 ]) if use_one_hot_embeddings: one_hot_input_ids = tf.one_hot(flat_input_ids, depth=vocab_size) output = tf.matmul(one_hot_input_ids, embedding_table) else : output = tf.gather(embedding_table, flat_input_ids) input_shape = get_shape_list(input_ids) output = tf.reshape(output, input_shape[0 :-1 ] + [input_shape[-1 ] * embedding_size]) return (output, embedding_table)
Embedding_postprocessor词嵌入处理 Bert模型的输入有三个部分:Token Embeddings,Segment Embeddings, Position Embedings。
在Embedding_lookup中,已经得到了Token Embenddings。接下来,我们来处理Segment Embeddings, Position Embedings。。最后进行相加,得到最后的输出
1 2 3 4 5 6 7 8 9 10 11 12 13 14 15 16 17 18 19 20 21 22 23 24 25 26 27 28 29 30 31 32 33 34 35 36 37 38 39 40 41 42 43 44 45 46 47 48 49 50 51 52 53 54 55 56 57 58 def embedding_postprocessor (input_tensor, use_token_type=False , token_type_ids=None , token_type_vocab_size=16 , token_type_embedding_name="token_type_embeddings" , use_position_embeddings=True , position_embedding_name="position_embeddings" , initializer_range=0.02 , max_position_embeddings=512 , dropout_prob=0.1 ): input_shape = get_shape_list(input_tensor, expected_rank=3 ) batch_size = input_shape[0 ] seq_length = input_shape[1 ] width = input_shape[2 ] output = input_tensor if use_token_type: if token_type_ids is None : raise ValueError("`token_type_ids` must be specified if" "`use_token_type` is True." ) token_type_table = tf.get_variable( name=token_type_embedding_name, shape=[token_type_vocab_size, width], initializer=create_initializer(initializer_range)) flat_token_type_ids = tf.reshape(token_type_ids, [-1 ]) one_hot_ids = tf.one_hot(flat_token_type_ids, depth=token_type_vocab_size) token_type_embeddings = tf.matmul(one_hot_ids, token_type_table) token_type_embeddings = tf.reshape(token_type_embeddings, [batch_size, seq_length, width]) output += token_type_embeddings if use_position_embeddings: assert_op = tf.assert_less_equal(seq_length, max_position_embeddings) with tf.control_dependencies([assert_op]): full_position_embeddings = tf.get_variable( name=position_embedding_name, shape=[max_position_embeddings, width], initializer=create_initializer(initializer_range)) position_embeddings = tf.slice (full_position_embeddings, [0 , 0 ], [seq_length, -1 ]) num_dims = len (output.shape.as_list()) position_broadcast_shape = [] for _ in range (num_dims - 2 ): position_broadcast_shape.append(1 ) position_broadcast_shape.extend([seq_length, width]) position_embeddings = tf.reshape(position_embeddings, position_broadcast_shape) output += position_embeddings output = layer_norm_and_dropout(output, dropout_prob) return output
该函数起mask作用,主要用于对注意力矩阵 有效部分进行标记。
1 2 3 4 5 6 7 8 9 10 11 12 13 14 15 16 17 18 19 20 21 def create_attention_mask_from_input_mask (from_tensor, to_mask ): from_shape = get_shape_list(from_tensor, expected_rank=[2 , 3 ]) batch_size = from_shape[0 ] from_seq_length = from_shape[1 ] to_shape = get_shape_list(to_mask, expected_rank=2 ) to_seq_length = to_shape[1 ] to_mask = tf.cast( tf.reshape(to_mask, [batch_size, 1 , to_seq_length]), tf.float32) broadcast_ones = tf.ones( shape=[batch_size, from_seq_length, 1 ], dtype=tf.float32) mask = broadcast_ones * to_mask return mask
attention_layer 注意力层
Attention Mask
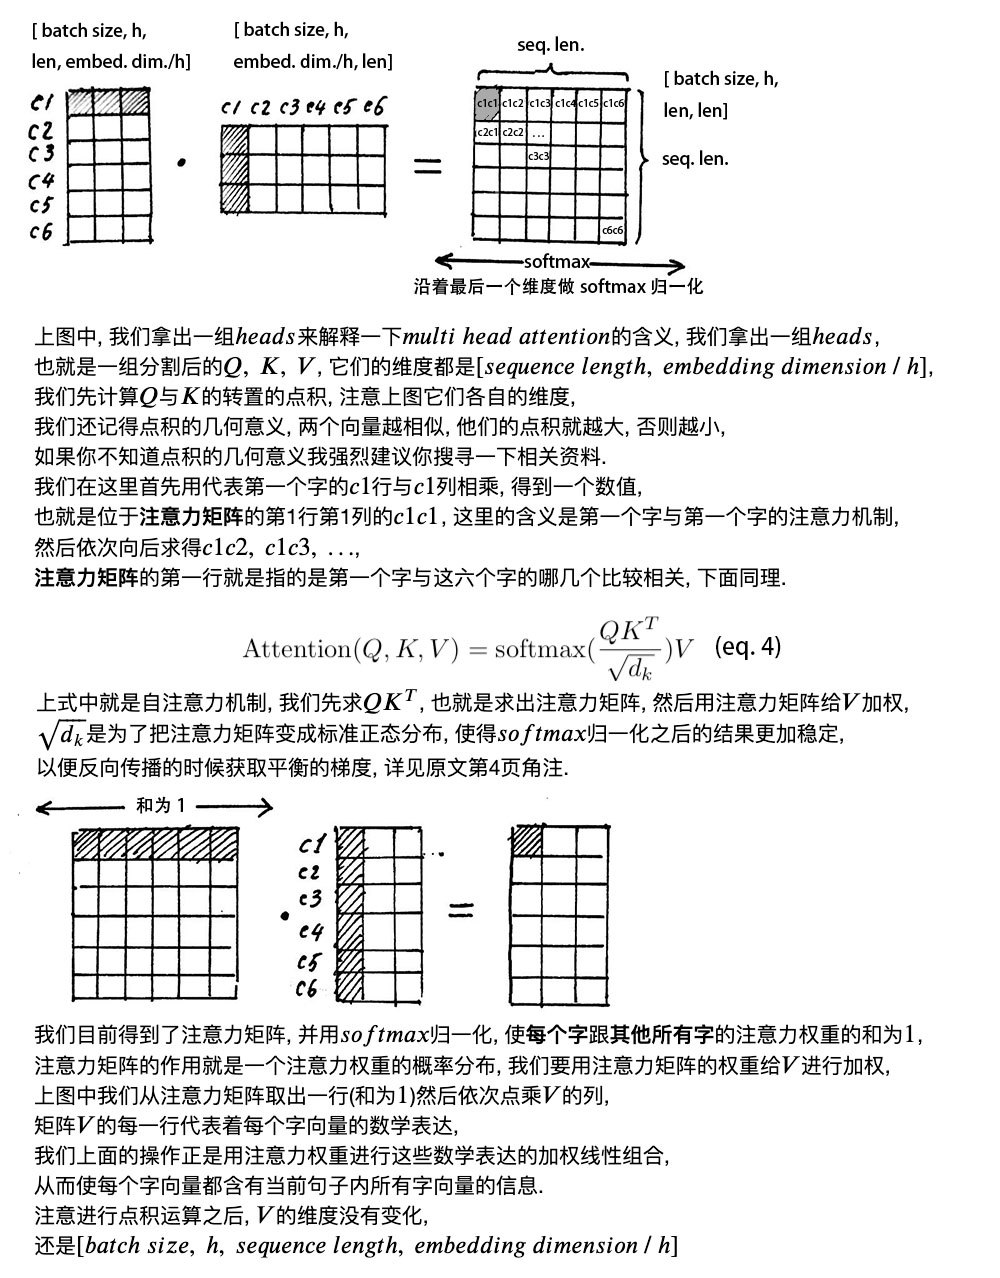
当样本句子 长度过短时,我们需要对句子进行padding ,通常我们用0填充。但在进行softmax计算时,0会产生意义,主要是因为e^0= 1。 为了避免0带来的影响,我们用一个很小的负数来代替0, 这样就可以避免填充带来的影响。{i}={\frac {e^{z {i}}}{\sum {j=1}^{K}e^{z {j}}}}
1 2 3 4 5 6 7 8 9 10 11 12 13 14 15 16 17 18 19 20 21 22 23 24 25 26 27 28 29 30 31 32 33 34 35 36 37 38 39 40 41 42 43 44 45 46 47 48 49 50 51 52 53 54 55 56 57 58 59 60 61 62 63 64 65 66 67 68 69 70 71 72 73 74 75 76 77 78 79 80 81 82 83 84 85 86 87 88 89 90 91 92 93 94 95 96 97 98 99 100 101 102 103 104 105 106 107 108 109 110 111 112 113 114 115 116 117 118 119 120 121 122 123 124 125 126 127 128 129 130 131 132 133 134 135 136 137 138 139 140 141 142 143 144 145 146 147 148 149 150 151 152 153 154 155 156 157 158 159 160 161 162 163 164 165 def attention_layer (from_tensor, to_tensor, attention_mask=None , num_attention_heads=1 , size_per_head=512 , query_act=None , key_act=None , value_act=None , attention_probs_dropout_prob=0.0 , initializer_range=0.02 , do_return_2d_tensor=False , batch_size=None , from_seq_length=None , to_seq_length=None ): def transpose_for_scores (input_tensor, batch_size, num_attention_heads, seq_length, width ): output_tensor = tf.reshape( input_tensor, [batch_size, seq_length, num_attention_heads, width]) output_tensor = tf.transpose(output_tensor, [0 , 2 , 1 , 3 ]) return output_tensor from_shape = get_shape_list(from_tensor, expected_rank=[2 , 3 ]) to_shape = get_shape_list(to_tensor, expected_rank=[2 , 3 ]) if len (from_shape) != len (to_shape): raise ValueError( "The rank of `from_tensor` must match the rank of `to_tensor`." ) if len (from_shape) == 3 : batch_size = from_shape[0 ] from_seq_length = from_shape[1 ] to_seq_length = to_shape[1 ] elif len (from_shape) == 2 : if (batch_size is None or from_seq_length is None or to_seq_length is None ): raise ValueError( "When passing in rank 2 tensors to attention_layer, the values " "for `batch_size`, `from_seq_length`, and `to_seq_length` " "must all be specified." ) from_tensor_2d = reshape_to_matrix(from_tensor) to_tensor_2d = reshape_to_matrix(to_tensor) query_layer = tf.layers.dense( from_tensor_2d, num_attention_heads * size_per_head, activation=query_act, name="query" , kernel_initializer=create_initializer(initializer_range)) key_layer = tf.layers.dense( to_tensor_2d, num_attention_heads * size_per_head, activation=key_act, name="key" , kernel_initializer=create_initializer(initializer_range)) value_layer = tf.layers.dense( to_tensor_2d, num_attention_heads * size_per_head, activation=value_act, name="value" , kernel_initializer=create_initializer(initializer_range)) query_layer = transpose_for_scores(query_layer, batch_size, num_attention_heads, from_seq_length, size_per_head) key_layer = transpose_for_scores(key_layer, batch_size, num_attention_heads, to_seq_length, size_per_head) attention_scores = tf.matmul(query_layer, key_layer, transpose_b=True ) attention_scores = tf.multiply(attention_scores, 1.0 / math.sqrt(float (size_per_head))) if attention_mask is not None : attention_mask = tf.expand_dims(attention_mask, axis=[1 ]) adder = (1.0 - tf.cast(attention_mask, tf.float32)) * -10000.0 attention_scores += adder attention_probs = tf.nn.softmax(attention_scores) attention_probs = dropout(attention_probs, attention_probs_dropout_prob) value_layer = tf.reshape( value_layer, [batch_size, to_seq_length, num_attention_heads, size_per_head]) value_layer = tf.transpose(value_layer, [0 , 2 , 1 , 3 ]) context_layer = tf.matmul(attention_probs, value_layer) context_layer = tf.transpose(context_layer, [0 , 2 , 1 , 3 ]) if do_return_2d_tensor: context_layer = tf.reshape( context_layer, [batch_size * from_seq_length, num_attention_heads * size_per_head]) else : context_layer = tf.reshape( context_layer, [batch_size, from_seq_length, num_attention_heads * size_per_head]) return context_layer
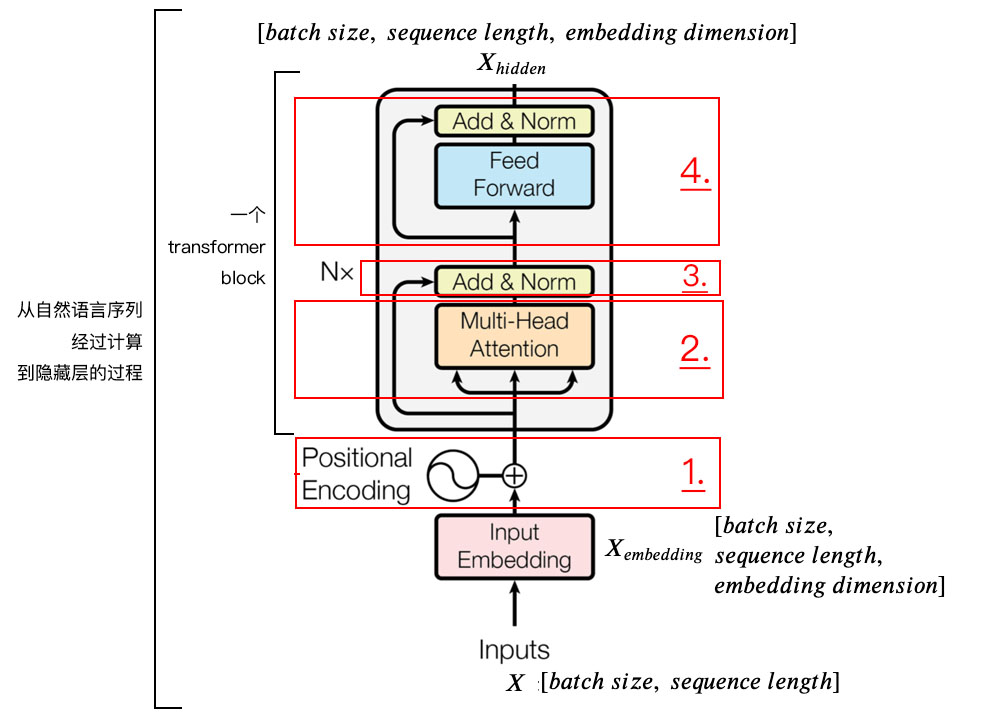
下图为Transformer Block 的示意图:
positional encoding 即位置嵌入 (或位置编码), 但在这里positional encoding 与Transformer 原论文中不同,这里是通过学习得到的,而原论文中是通过三角函数的周期关系得到.
self attention mechanismself attention mechanism, 自注意力机制 .
Layer NormalizationLayer Normalization和残差连接.
FeedForwardFeedForward, 其实就是两层线性映射并用激活函数激活, 比如说ReLUReLU.
Transformer Block encoder 整体结构:
经过上面3个步骤, 我们已经基本了解到来transformer编码器的主要构成部分, 我们下面用公式把一个transformer block的计算过程整理一下:
$$
$$
3).残差连接与Layer Normalization
下面是Bert源码中,实现Transformer block 的部分:
1 2 3 4 5 6 7 8 9 10 11 12 13 14 15 16 17 18 19 20 21 22 23 24 25 26 27 28 29 30 31 32 33 34 35 36 37 38 39 40 41 42 43 44 45 46 47 48 49 50 51 52 53 54 55 56 57 58 59 60 61 62 63 64 65 66 67 68 69 70 71 72 73 74 75 76 77 78 79 80 81 82 83 84 85 86 87 88 89 90 91 92 93 94 95 96 97 98 99 100 101 102 103 104 105 106 107 108 109 def transformer_model (input_tensor, attention_mask=None , hidden_size=768 , num_hidden_layers=12 , num_attention_heads=12 , intermediate_size=3072 , intermediate_act_fn=gelu, hidden_dropout_prob=0.1 , attention_probs_dropout_prob=0.1 , initializer_range=0.02 , do_return_all_layers=False ): if hidden_size % num_attention_heads != 0 : raise ValueError( "The hidden size (%d) is not a multiple of the number of attention " "heads (%d)" % (hidden_size, num_attention_heads)) attention_head_size = int (hidden_size / num_attention_heads) input_shape = get_shape_list(input_tensor, expected_rank=3 ) batch_size = input_shape[0 ] seq_length = input_shape[1 ] input_width = input_shape[2 ] if input_width != hidden_size: raise ValueError("The width of the input tensor (%d) != hidden size (%d)" % (input_width, hidden_size)) prev_output = reshape_to_matrix(input_tensor) all_layer_outputs = [] for layer_idx in range (num_hidden_layers): with tf.variable_scope("layer_%d" % layer_idx): layer_input = prev_output with tf.variable_scope("attention" ): attention_heads = [] with tf.variable_scope("self" ): attention_head = attention_layer( from_tensor=layer_input, to_tensor=layer_input, attention_mask=attention_mask, num_attention_heads=num_attention_heads, size_per_head=attention_head_size, attention_probs_dropout_prob=attention_probs_dropout_prob, initializer_range=initializer_range, do_return_2d_tensor=True , batch_size=batch_size, from_seq_length=seq_length, to_seq_length=seq_length) attention_heads.append(attention_head) attention_output = None if len (attention_heads) == 1 : attention_output = attention_heads[0 ] else : attention_output = tf.concat(attention_heads, axis=-1 ) with tf.variable_scope("output" ): attention_output = tf.layers.dense( attention_output, hidden_size, kernel_initializer=create_initializer(initializer_range)) attention_output = dropout(attention_output, hidden_dropout_prob) attention_output = layer_norm(attention_output + layer_input) with tf.variable_scope("intermediate" ): intermediate_output = tf.layers.dense( attention_output, intermediate_size, activation=intermediate_act_fn, kernel_initializer=create_initializer(initializer_range)) with tf.variable_scope("output" ): layer_output = tf.layers.dense( intermediate_output, hidden_size, kernel_initializer=create_initializer(initializer_range)) layer_output = dropout(layer_output, hidden_dropout_prob) layer_output = layer_norm(layer_output + attention_output) prev_output = layer_output all_layer_outputs.append(layer_output) if do_return_all_layers: final_outputs = [] for layer_output in all_layer_outputs: final_output = reshape_from_matrix(layer_output, input_shape) final_outputs.append(final_output) return final_outputs else : final_output = reshape_from_matrix(prev_output, input_shape) return final_output
Bert类 整体Bert模型架构
1 2 3 4 5 6 7 8 9 10 11 12 13 14 15 16 17 18 19 20 21 22 23 24 25 26 27 28 29 30 31 32 33 34 35 36 37 38 39 40 41 42 43 44 45 46 47 48 49 50 51 52 53 54 55 56 57 58 59 60 61 62 63 64 65 66 67 68 69 70 71 72 73 74 75 76 77 78 79 80 81 82 83 84 85 86 87 88 89 90 91 92 93 94 95 96 97 98 99 100 101 102 103 104 105 106 107 108 109 110 111 112 113 114 115 116 117 118 119 120 121 122 123 124 125 126 127 128 129 130 131 132 133 134 135 136 137 138 139 140 141 142 143 144 145 146 147 148 149 150 151 152 153 154 class BertModel (object ): """BERT model ("Bidirectional Encoder Representations from Transformers"). Example usage: ```python # Already been converted into WordPiece token ids input_ids = tf.constant([[31, 51, 99], [15, 5, 0]]) input_mask = tf.constant([[1, 1, 1], [1, 1, 0]]) token_type_ids = tf.constant([[0, 0, 1], [0, 2, 0]]) config = modeling.BertConfig(vocab_size=32000, hidden_size=512, num_hidden_layers=8, num_attention_heads=6, intermediate_size=1024) model = modeling.BertModel(config=config, is_training=True, input_ids=input_ids, input_mask=input_mask, token_type_ids=token_type_ids) label_embeddings = tf.get_variable(...) pooled_output = model.get_pooled_output() logits = tf.matmul(pooled_output, label_embeddings) ... """ def __init__ (self, config, is_training, input_ids, input_mask=None , token_type_ids=None , use_one_hot_embeddings=False , scope=None ): """Constructor for BertModel. Args: config: `BertConfig` instance. is_training: bool. true for training model, false for eval model. Controls whether dropout will be applied. input_ids: int32 Tensor of shape [batch_size, seq_length]. input_mask: (optional) int32 Tensor of shape [batch_size, seq_length]. token_type_ids: (optional) int32 Tensor of shape [batch_size, seq_length]. use_one_hot_embeddings: (optional) bool. Whether to use one-hot word embeddings or tf.embedding_lookup() for the word embeddings. scope: (optional) variable scope. Defaults to "bert". Raises: ValueError: The config is invalid or one of the input tensor shapes is invalid. """ config = copy.deepcopy(config) if not is_training: config.hidden_dropout_prob = 0.0 config.attention_probs_dropout_prob = 0.0 input_shape = get_shape_list(input_ids, expected_rank=2 ) batch_size = input_shape[0 ] seq_length = input_shape[1 ] if input_mask is None : input_mask = tf.ones(shape=[batch_size, seq_length], dtype=tf.int32) if token_type_ids is None : token_type_ids = tf.zeros(shape=[batch_size, seq_length], dtype=tf.int32) with tf.variable_scope(scope, default_name="bert" ): with tf.variable_scope("embeddings" ): (self.embedding_output, self.embedding_table) = embedding_lookup( input_ids=input_ids, vocab_size=config.vocab_size, embedding_size=config.hidden_size, initializer_range=config.initializer_range, word_embedding_name="word_embeddings" , use_one_hot_embeddings=use_one_hot_embeddings) self.embedding_output = embedding_postprocessor( input_tensor=self.embedding_output, use_token_type=True , token_type_ids=token_type_ids, token_type_vocab_size=config.type_vocab_size, token_type_embedding_name="token_type_embeddings" , use_position_embeddings=True , position_embedding_name="position_embeddings" , initializer_range=config.initializer_range, max_position_embeddings=config.max_position_embeddings, dropout_prob=config.hidden_dropout_prob) with tf.variable_scope("encoder" ): attention_mask = create_attention_mask_from_input_mask( input_ids, input_mask) self.all_encoder_layers = transformer_model( input_tensor=self.embedding_output, attention_mask=attention_mask, hidden_size=config.hidden_size, num_hidden_layers=config.num_hidden_layers, num_attention_heads=config.num_attention_heads, intermediate_size=config.intermediate_size, intermediate_act_fn=get_activation(config.hidden_act), hidden_dropout_prob=config.hidden_dropout_prob, attention_probs_dropout_prob=config.attention_probs_dropout_prob, initializer_range=config.initializer_range, do_return_all_layers=True ) self.sequence_output = self.all_encoder_layers[-1 ] with tf.variable_scope("pooler" ): first_token_tensor = tf.squeeze(self.sequence_output[:, 0 :1 , :], axis=1 ) self.pooled_output = tf.layers.dense( first_token_tensor, config.hidden_size, activation=tf.tanh, kernel_initializer=create_initializer(config.initializer_range)) def get_pooled_output (self ): return self.pooled_output def get_sequence_output (self ): return self.sequence_output def get_all_encoder_layers (self ): return self.all_encoder_layers def get_embedding_output (self ): return self.embedding_output def get_embedding_table (self ): return self.embedding_table
tokenization.py 主要用来将样本句子,进行分词处理,然后将处理后的数据传入给crea_pretraining_data.py 使用
creat_pretraining_data.py 主要是创建 预训练使用的数据。将输入文件中的样本,替换成 词汇表中的id.
并随机把一句话中的15%的token 替换成以下内容:
这些 token 有 80% 的几率被替换成 [mask]
有 10% 的几率被替换成任意一个其他的 token
有 10% 的几率原封不动.
然后将 处理好的数据输出到 tf_examples.tfrecord 文件中,以供run_pretraining.py 使用。
下面是 其中一个 样本 经过 creat_pretraining_data.py 在控制台中所打印的数据,及个 数据的含义。这些数据最后会保存在tfrecord文件中 以供 run_pretraining.py 使用。
tokens : 样本句子 经过tokenization 分词器,所得到的分词 向量
input_ids : 将tokens中 每一个token,替换成在vocab.txt 中所对应的id
input_mask :标记 真实的输入部分,应为有些句子会因为长度<指定的seg_length 会对句子向量用0进行padding, 所以这里用input_mask 来标记出真实部分的输入。
segment_ids :一般用于判断上下文是否有关联的任务,一般前部分的 0表示为句a,后面的1表示句b,最后面的0是 避免句子长度<seg_length 而进行的padding
masked_lm_positions : 给出句子被Mask 单词 在句中的位置
masked_lm_ids : 给出句子被Mask 单词 在vocab.txt中的id
masked_lm_weights :主要用于run_pretraining.py 中的get_masked_lm_output函数中 ,在经过one-hot 处理得到 该Mask 原有单词的概率后,方便求和计算损失
next_sentence_labels :主要用于 判断句a 和 句b 是否具有联系,,在Bert论文中 是设置的 50% 是具有联系,50%是随机句子
控制台输出:
I0825 00:50:17.326817 4758783424 create_pretraining_data.py:145] *** Example ***
run_pretraining.py run_pretraining.py 在得到 经过creat_pretraining_data.py处理的tfrecord文件后,通过MASKED LM 和Next Sentence Prediction 两个预训练任务 来对模型进行训练。
BERT语言模型任务一: MASKED LM 在BERT中, Masked LM(Masked language Model)构建了语言模型, 这也是BERT的预训练中任务之一, 简单来说, 就是随机遮盖或替换 一句话里面任意字或词, 然后让模型通过上下文的理解预测那一个被遮盖或替换的部分, 之后做LossLoss的时候只计算被遮盖部分的LossLoss , 其实是一个很容易理解的任务, 实际操作方式如下:
随机把一句话中15%15%的tokentoken替换成以下内容:
这些tokentoken有80%80%的几率被替换成[mask][mask];
有10%10%的几率被替换成任意一个其他的tokentoken;
有10%10%的几率原封不动.
之后让模型预测和还原 被遮盖掉或替换掉的部分, 模型最终输出的隐藏层的计算结果的维度是:随机遮盖或替换 的部分, 其余部分不做损失, 对于其他部分, 模型输出什么东西, 我们不在意.
BERT语言模型任务二: Next Sentence Prediction 首先我们拿到属于上下文的一对句子, 也就是两个句子, 之后我们要在这两段连续的句子里面加一些特殊tokentoken:
我们看到上图中两句话是[cls] my dog is cute [sep] he likes playing [sep], [cls]我的狗很可爱[sep]他喜欢玩耍[sep], 除此之外, 我们还要准备同样格式的两句话, 但他们不属于上下文关系的情况; [cls]我的狗很可爱[sep]企鹅不擅长飞行[sep], 可见这属于上下句不属于上下文关系的情况;
我们进行完上述步骤之后, 还要随机初始化一个可训练的segment embeddingssegment embeddings, 见上图中, 作用就是用embeddingsembeddings的信息让模型分开上下句, 我们一把给上句全00的tokentoken, 下句啊全11的tokentoken, 让模型得以判断上下句的起止位置, 例如:
注意力机制就是, 让每句话中的每一个字对应的那一条向量里, 都融入这句话所有字的信息, 那么我们在最终隐藏层的计算结果里, 只要取出[cls]token[cls]token所对应的一条向量, 里面就含有整个句子的信息, 因为我们期望这个句子里面所有信息都会往[cls]token[cls]token所对应的一条向量里汇总:
extract_feature.py 是在训练好的模型基础上 ,通过 输入的样本,得到 指定的层 Transform blocks的输出。
在Google 给出的模型中 有12 层 Transform blocks 和24 Transforn blocks 两种版本。 根据hanxiao的 的实验,发现 倒数第二层提供的 作为词向量 最佳。最后一层 过于接近目标了,不便于fine tuning。
该模块的 输出文件以json格式保存。
其中输出中的,“index“ :-1 ,指的是 倒数第一个 也是就最后 一个 Transform block的输出。
1 2 3 4 5 6 7 8 9 10 11 12 13 14 15 16 17 18 19 20 21 22 23 24 25 26 27 28 29 30 31 32 33 34 35 36 37 38 39 40 41 42 43 44 45 46 47 48 49 { "linex_index" : 0 , "features" : [ { "token" : "[CLS]" , "layers" : [ { "index" : -1 "values" : [ ...] } ] } { "token" : "i" , "layers" : [ { "index" : -1 "values" : [ ...] } ] } { "token" : "love" , "layers" : [ { "index" : -1 "values" : [ ...] } ] } { "token" : "you" , "layers" : [ { "index" : -1 "values" : [ ...] } ] } { "token" : "[SEP]" , "layers" : [ { "index" : -1 "values" : [ ...] } ] }
通过extract_feature.py 得到的指定Transform block 的输出,以供 下游任务 使用。
下面介绍下,基于Bert的下游任务的应用。
run_classifier.py 下图为基于Bert的classify下游任务的模型示意图:
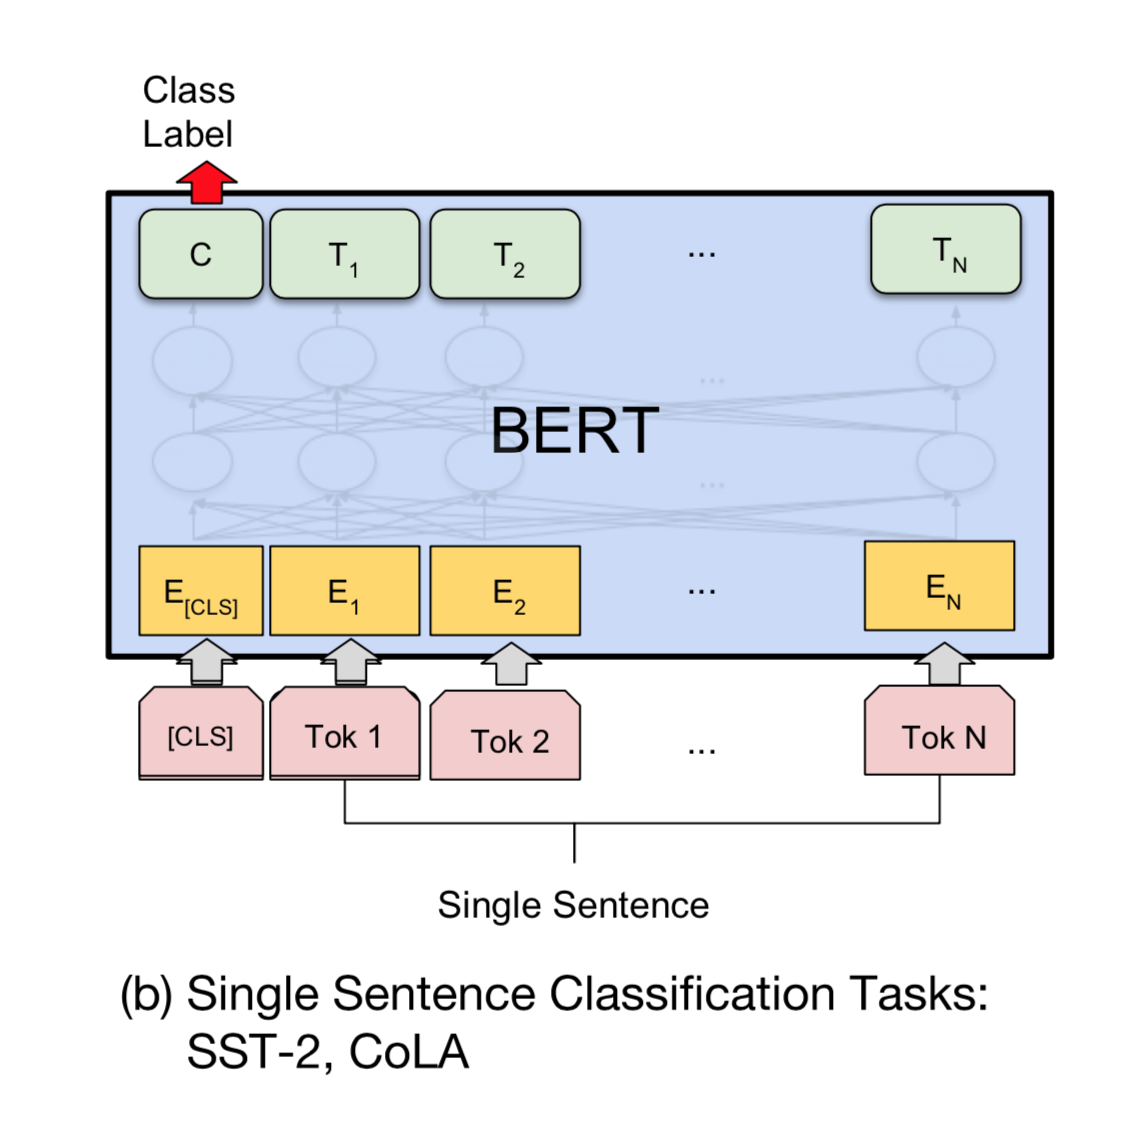
下面代码为基于Bert的classify下游任务的模型:
通过提取Bert中最后一个Transform blocks输出中的 [CLS]向量 来进行classify。
1
2
3
4
5
6
7
8
9
10
11
12
13
14
15
16
17
18
19
20
21
22
23
24
25
26
27
28
29
30
31
32
33
34
35
36
37
38
39
40
41
42
43
44
45
46
def create_model (bert_config, is_training, input_ids, input_mask, segment_ids, labels, num_labels, use_one_hot_embeddings ): """Creates a classification model.""" model = modeling.BertModel( config=bert_config, is_training=is_training, input_ids=input_ids, input_mask=input_mask, token_type_ids=segment_ids, use_one_hot_embeddings=use_one_hot_embeddings) output_layer = model.get_pooled_output() hidden_size = output_layer.shape[-1 ].value output_weights = tf.get_variable( "output_weights" , [num_labels, hidden_size], initializer=tf.truncated_normal_initializer(stddev=0.02 )) output_bias = tf.get_variable( "output_bias" , [num_labels], initializer=tf.zeros_initializer()) with tf.variable_scope("loss" ): if is_training: output_layer = tf.nn.dropout(output_layer, keep_prob=0.9 ) logits = tf.matmul(output_layer, output_weights, transpose_b=True ) logits = tf.nn.bias_add(logits, output_bias) probabilities = tf.nn.softmax(logits, axis=-1 ) log_probs = tf.nn.log_softmax(logits, axis=-1 ) one_hot_labels = tf.one_hot(labels, depth=num_labels, dtype=tf.float32) per_example_loss = -tf.reduce_sum(one_hot_labels * log_probs, axis=-1 ) loss = tf.reduce_mean(per_example_loss) return (loss, per_example_loss, logits, probabilities)
该文件主要用于情感分类,文本标签分类 。在Goole给的文件中,已经给出了几种demo,照着对应的demo,根据自己的数据文件进行修改就可以运用了。
在这里在官方文档的基础上,对电影评论进行分析。
这里我参照MrpcProcessor 进行修改 得到 我需要的my_bertProcessor,,值得注意的是 这些类 都需要继承DataProcessor。
1
2
3
4
5
6
7
8
9
10
11
12
13
14
15
16
17
18
19
20
21
22
23
24
25
26
27
28
29
30
31
32
33
34
35
36
37
class my_bertProcessor (DataProcessor ): def get_train_examples (self, data_dir ): return self._create_examples( self._read_tsv(os.path.join(data_dir, "train.tsv" )), "train" ) def get_dev_examples (self, data_dir ): return self._create_examples( self._read_tsv(os.path.join(data_dir, "dev.tsv" )), "dev" ) def get_test_examples (self, data_dir ): return self._create_examples( self._read_tsv(os.path.join(data_dir, "test.tsv" )), "test" ) def get_labels (self ): return ["0" , "1" ] def _create_examples (self, lines, set_type ): """Creates examples for the training and dev sets.""" examples = [] for (i, line) in enumerate (lines): if i == 0 : continue guid = "%s-%s" % (set_type, i) text_a = tokenization.convert_to_unicode(line[1 ]) text_b = None if set_type == "test" : label = "0" else : label = tokenization.convert_to_unicode(line[3 ]) examples.append( InputExample(guid=guid, text_a=text_a, text_b=text_b, label=label)) return examples
若是有关分析两个句子是否相似,或对话,这text_a,和text_b,分别表示两个句子。在这里,是对电影评论进行分析,判断该评论是积极还是消极,所以这里text_b = None.
然后,在main中,将自己的DataProcessor添加进去。
1
2
3
4
5
6
7
8
processors = { "cola" : ColaProcessor, "mnli" : MnliProcessor, "mrpc" : MrpcProcessor, "xnli" : XnliProcessor, "my_bert" : my_bertProcessor }
最后,在头部进行相关配置,也可以直接在shell中进行配置。
1 2 3 4 5 6 7 8 9 10 11 12 13 14 15 16 17 18 19 20 21 22 23 24 25 26 27 28 29 30 31 32 33 34 35 36 37 flags.DEFINE_string( "data_dir" , "./data" , "The input data dir. Should contain the .tsv files (or other data files) " "for the task." ) flags.DEFINE_string( "bert_config_file" , "./uncased_L-12_H-768_A-12/bert_config.json" , "The config json file corresponding to the pre-trained BERT model. " "This specifies the model architecture." ) flags.DEFINE_string("task_name" , "my_bert" , "The name of the task to train." ) flags.DEFINE_string("vocab_file" , "./uncased_L-12_H-768_A-12/vocab.txt" , "The vocabulary file that the BERT model was trained on." ) flags.DEFINE_string( "output_dir" , "./out" , "The output directory where the model checkpoints will be written." ) flags.DEFINE_string( "init_checkpoint" , "./uncased_L-12_H-768_A-12/bert_model.ckpt" , "Initial checkpoint (usually from a pre-trained BERT model)." ) flags.DEFINE_bool("do_train" , True , "Whether to run training." ) flags.DEFINE_bool("do_eval" , True , "Whether to run eval on the dev set." ) flags.DEFINE_bool( "do_predict" , True , "Whether to run the model in inference mode on the test set." )
运行后,会产生evel_result.txt和test_result.txt。
evel_result.txt
1
2
3
4
5
eval_accuracy = 0.67 eval_loss = 0.62240416 global_step = 18 loss = 0.618955
产生的test_result.txt,有两列,第一列表示消极,第二列表示积极。
test_result.txt
1
2
3
4
5
6
7
8
9
10
11
12
13
14
15
16
0.44854614 0.5514538 0.47491544 0.5250845 0.49895626 0.50104374 0.5280404 0.47195962 0.38655198 0.61344796 0.5250791 0.47492084 0.85924816 0.14075184 0.37843087 0.6215691 0.36665148 0.6333485 0.3015677 0.6984323 0.27718946 0.7228105 0.63728803 0.36271197 0.75838333 0.2416166 0.68974 0.31026 0.35574916 0.6442509 0.25000888 0.74999106
run_squad.py 下图为基于Bert的squad 下游任务模型示意图。
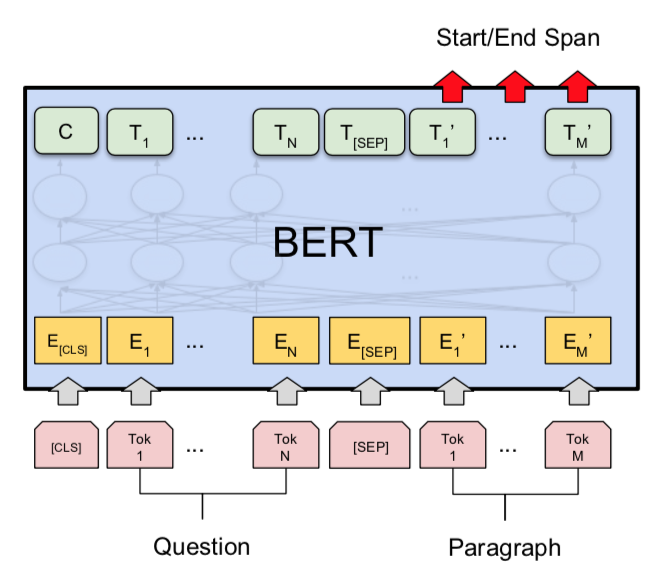
下面代码为run_squad基于Bert的下游任务的模型。
抽取Bert中的最后一个Transformer blocks 的输出, 然后进行权重矩阵相乘,得到一个二分类,从而判断该answer是否是该question的。
1
2
3
4
5
6
7
8
9
10
11
12
13
14
15
16
17
18
19
20
21
22
23
24
25
26
27
28
29
30
31
32
33
34
35
36
37
38
39
40
def create_model (bert_config, is_training, input_ids, input_mask, segment_ids, use_one_hot_embeddings ): """Creates a classification model.""" model = modeling.BertModel( config=bert_config, is_training=is_training, input_ids=input_ids, input_mask=input_mask, token_type_ids=segment_ids, use_one_hot_embeddings=use_one_hot_embeddings) final_hidden = model.get_sequence_output() final_hidden_shape = modeling.get_shape_list(final_hidden, expected_rank=3 ) batch_size = final_hidden_shape[0 ] seq_length = final_hidden_shape[1 ] hidden_size = final_hidden_shape[2 ] output_weights = tf.get_variable( "cls/squad/output_weights" , [2 , hidden_size], initializer=tf.truncated_normal_initializer(stddev=0.02 )) output_bias = tf.get_variable( "cls/squad/output_bias" , [2 ], initializer=tf.zeros_initializer()) final_hidden_matrix = tf.reshape(final_hidden, [batch_size * seq_length, hidden_size]) logits = tf.matmul(final_hidden_matrix, output_weights, transpose_b=True ) logits = tf.nn.bias_add(logits, output_bias) logits = tf.reshape(logits, [batch_size, seq_length, 2 ]) logits = tf.transpose(logits, [2 , 0 , 1 ]) unstacked_logits = tf.unstack(logits, axis=0 ) (start_logits, end_logits) = (unstacked_logits[0 ], unstacked_logits[1 ]) return (start_logits, end_logits)
然后 更具creat_model.py中 返回的两个类别概率进行计算损失,从而得到 最后的模型。
总结 看完Bert 整个部分的代码后,Bert大致流程,如下:
modeling.py 创建好 Multi-heads attention 模型
将输入的样本经过tokenization.py 处理
将2中得到的 句子 分词list 传入creat_pretraining_data.py 中,经过 替换,Mask 得到所需的 输入文件
将输入文件 放入 run_pretraining.py 中开始 通过 两个 预训练任务,对模型进行训练
对训练好的模型,通过 extract_features.py, 来根据输入的句子,得到 模型中指定Transformer block层的输出
根据5中指定层的输出,来开展下游任务的部署
参考:https://github.com/aespresso/a_journey_into_math_of_ml

