本文根据 Luong 论文 中NMT的的一个注意力例子来进行 中-英 NMT_with_Attenion ,本文也是根据该教程来对Docker部署进一步探索。
NMT_with_Attenion也是NLP中比较经典的值得复现的一个例子。
本文架构
Model
Train
Save model
Deploy
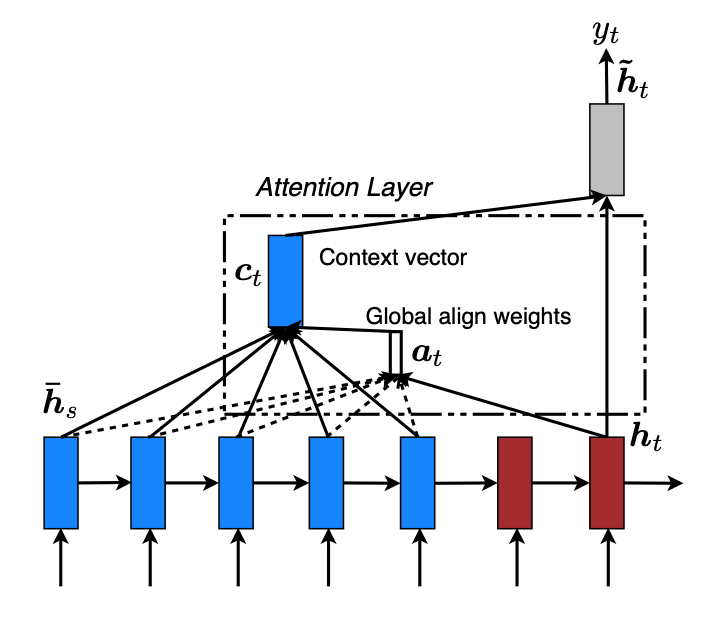
Model model的具体结构如Luong论文中图片所示,我们将蓝色部分的作为Encoder, 红色部分作为Decoder.
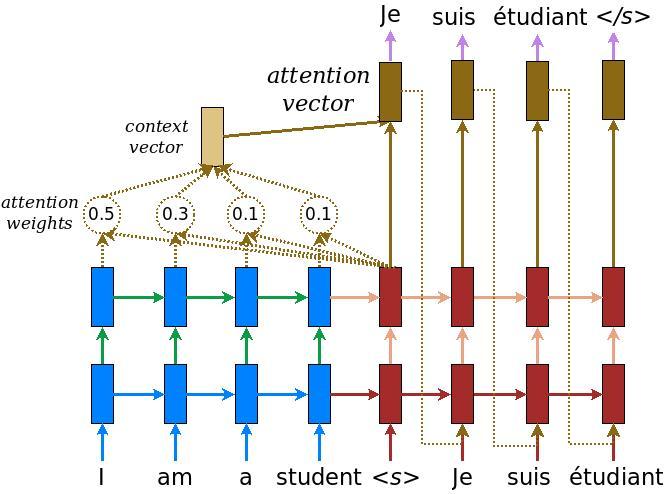
下图是Google Tensorflow中对该模型更进一步的描绘。具体部分,可以参考 上面给出的连接,里面有详细的介绍。
Encoder Encoder中使用了简单的使用了Embedding层+GRU。
1
2
3
4
5
6
7
8
9
10
11
12
13
14
15
16
17
18
19
class Encoder (tf.keras.Model): def __init__ (self, vocab_szie, embedding_dim, enc_units, batch_sz ): super (Encoder, self).__init__() self.batch_sz = batch_sz self.enc_units = enc_units self.embedding = tf.keras.layers.Embedding(vocab_szie, embedding_dim) self.gru = tf.keras.layers.GRU(self.enc_units, return_sequences=True , return_state=True , recurrent_initializer='glorot_uniform' ) def call (self, inputs ): input , hidden = inputs x = self.embedding(input ) output, state = self.gru(x, initial_state=hidden) return output, state def initialize_hidden_state (self ): return tf.zeros((self.batch_sz, self.enc_units))
这里,特别强调,在call中,有许多 例子 直接 将原始的inputs进行了改变,这样操作实际并不好。 (这点在许多教程,中并没有强调)
由call(self, inputs) —> call(self, input, hidden) 随意的进行了变化, 这将会导致使用 build() 以及后续部署操作带来不可预计的Bug, 因此在官方 中给出的建议是,如果要传入多个变量时,请传入tuple,然后进行解包操作 来获取相关变量,就如Encoder中的call 一样。这种操作, 可能会在IDE coding 声明时 带来不方便,需要编程人员了解你的inputs到底包含的是什么。这就需要 对代码注释进行完善。
这一点也有可能,在TensorFlow2.0 后续版本得到改进。
这样一来,可以有效避免部分不可预计的Bug, 而且在build中也可以得到传入参数的shape。
如
1
2
3
4
5
6
7
8
9
10
class MyModel (tf.keras.models.Model): def __init__ (self ): super (MyModel, self).__init__() def build (self, inputs ): a_shape, b_shape =inputs print ("a_shape :" , a_shape) print ("b_shape :" , b_shape) def call (self, inputs ): a, b = inputs return a@b
1
2
3
4
5
6
7
8
9
10
11
12
a = tf.random.uniform((2 ,3 ), dtype=tf.float32) b = tf.random.uniform((3 ,2 ), dtype=tf.float32) m = MyModel() print (m((a, b)))输出为: a_shape: (2 , 3 ) b_shape: (3 , 2 ) tf.Tensor( [[0.21918826 0.5524787 ] [0.80377287 0.7006702 ]], shape=(2 , 2 ), dtype=float32)
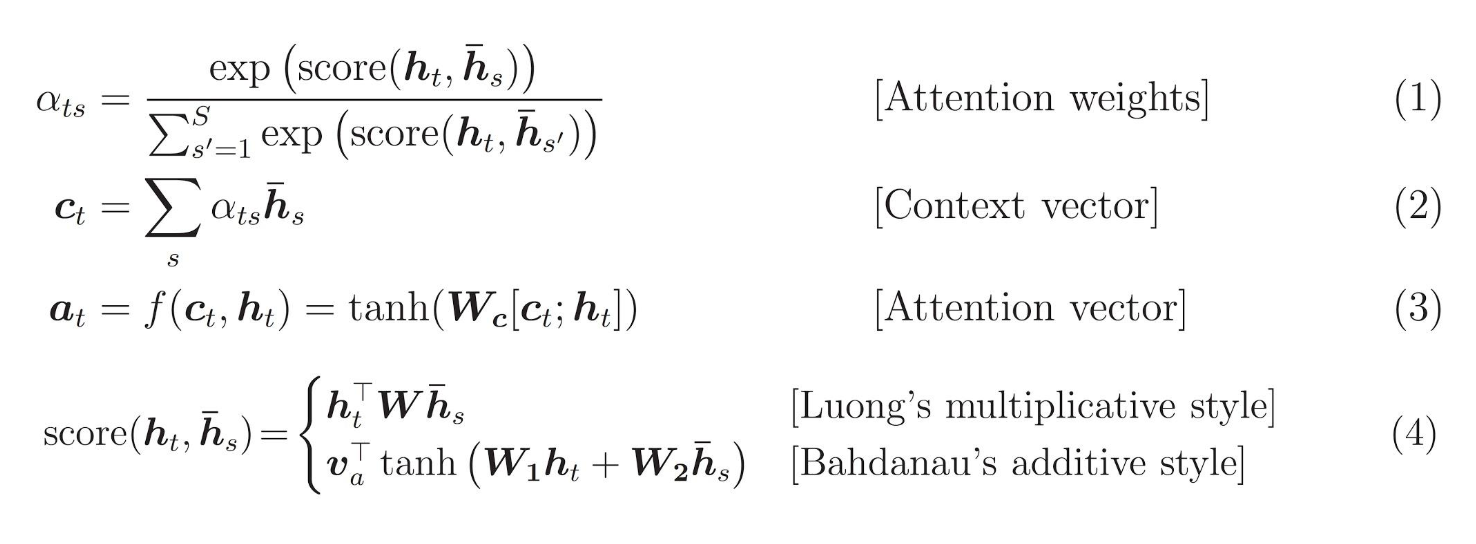
BahdanauAttention Google 样例中采用的是BahdanauAttention,后续也可以改成和Transformer中相似的attention。具体的解释 可以参考上面的Google样例。
简单的说就是
将Decoder中gru上个时间t-1 的 状态state 与Encoder 输出enc_output 分别进行Dense全连接。
然后将 1 中两个全连接后,所得进行相加(利用广播机制)。
再通过tanh激活。
激活后的向量 再通过Dense层向1维进行映射,从而压缩矩阵
最后通过softmax得到score,
然后在利用的到的score 对enc_output进行加权求和,从而得到BahdanauAttention后的特征向量
1
2
3
4
5
6
7
8
9
10
11
12
13
14
15
16
17
18
19
class BahdanauAttention (tf.keras.layers.Layer): def __init__ (self, units ): super (BahdanauAttention, self).__init__() self.W1 = tf.keras.layers.Dense(units) self.W2 = tf.keras.layers.Dense(units) self.V = tf.keras.layers.Dense(1 ) def call (self, inputs ): query, values = inputs hidden_with_time_axis = tf.expand_dims(query, 1 ) score = self.V(tf.nn.tanh(self.W1(values) + self.W2(hidden_with_time_axis))) attention_weights = tf.nn.softmax(score, axis=1 ) contex_vector = attention_weights * values contex_vector = tf.reduce_sum(contex_vector, axis=1 ) return contex_vector, attention_weights
Decoder Decoder中 ,初始输入的hidden, enc_output均是Encoder中的输出,初始输入x 为标记id.
简单来讲,Decoder 就是 将Encoder中的enc_output和 decoder中gru的上一个时间步t-1 的state 进行attention,将得到的特征 与 输入x经过Embedding得到的向量进行 拼接处理,作为这次gru时间步t 时的输入,在将时间t时的输出 进行全连接Dense向vocab_size进行映射,找到argmax id从而就是 预测的单词。
1
2
3
4
5
6
7
8
9
10
11
12
13
14
15
16
17
18
19
20
21
22
23
24
25
class Decoder (tf.keras.Model): def __init__ (self, vocab_size, embedding_dim, dec_units, batch_sz ): super (Decoder, self).__init__() self.batch_sz = batch_sz self.dec_units = dec_units self.embedding = tf.keras.layers.Embedding(vocab_size, embedding_dim) self.gru = tf.keras.layers.GRU(self.dec_units, return_sequences=True , return_state=True , recurrent_initializer='glorot_uniform' ) self.fc = tf.keras.layers.Dense(vocab_size) self.attention = BahdanauAttention(self.dec_units) def call (self, inputs ): x, hidden, enc_output = inputs context_vector, attention_weights = self.attention((hidden, enc_output)) x = self.embedding(x) x = tf.concat([tf.expand_dims(context_vector, 1 ), x], axis=-1 ) output, state = self.gru(x) output = tf.reshape(output, (-1 , output.shape[2 ])) x = self.fc(output) return x, state, attention_weights
Train 在前期训练过程中,我们引入了Teacher forcing 技巧。就是在Decoder gru中,原本每个时间t时刻,传入的是上个时间t-1时刻的预测输出,改为了传入的是实际真实 所期待的输出字符id 作为输入。这样可以在训练时避免由于上个时间t-1时刻预测错误,导致后面形成滚雪球效应,造成一连串的错误,从而使得模型收敛过慢。
1
2
3
4
5
6
7
8
9
10
11
12
13
14
15
16
17
18
19
20
21
@tf.function def train_step (inp, targ, enc_hidden ): loss = 0 with tf.GradientTape() as tape: enc_output, enc_hidden = encoder((inp, enc_hidden)) dec_hidden = enc_hidden dec_input = tf.expand_dims([targ_lang_tokenizer.word_index['<start>' ]] * BATCH_SIZE, 1 ) for t in range (1 , targ.shape[1 ]): predictions, dec_hidden, _ = decoder((dec_input, dec_hidden, enc_output)) loss += loss_function(targ[:, t], predictions) dec_input = tf.expand_dims(targ[:, t], 1 ) batch_loss = (loss / int (targ.shape[1 ])) variables = encoder.trainable_variables + decoder.trainable_variables gradients = tape.gradient(loss, variables) optimizer.apply_gradients(zip (gradients, variables)) train_loss(batch_loss)
Save model 通过训练好后,我们可以分别对Encoder,Decoder进行保存。
1
2
3
version = '1' encoder.save('path/encoder_zh/' +version) decoder.save('path/decoder_zh/' +version)
保存后,可看见产生如下文件,接下来我们就可以开始 部署了。
1
2
3
4
5
6
7
8
9
10
11
12
13
14
15
16
17
/Users/lollipop/Documents/tf2/learn/encoder_zh └── 1 ├── assets ├── saved_model.pb └── variables ├── variables.data-00000-of-00002 ├── variables.data-00001-of-00002 └── variables.index /Users/lollipop/Documents/tf2/learn/decoder_zh └── 1 ├── assets ├── saved_model.pb └── variables ├── variables.data-00000-of-00002 ├── variables.data-00001-of-00002 └── variables.index
在部署前,在终端输入下面命令,可以查看encoder decoder保存的一些信息。
1 saved_model_cli show --dir /Users/lollipop/Documents/tf2/learn/encoder_zh/1 --tag_set serve --signature_def serving_default
输出如下:
在输出中我们 可以看见一些input_1, input_2, ouput_1, output_2 等信息,这些在我们 通过rest 向服务端进行信息传输时需要用到。
1
2
3
4
5
6
7
8
9
10
11
12
13
14
15
16
17
18
19
20
The given SavedModel SignatureDef contains the following input(s): inputs['input_1'] tensor_info: dtype: DT_INT32 shape: (-1, 46) name: serving_default_input_1:0 inputs['input_2'] tensor_info: dtype: DT_FLOAT shape: (-1, 1024) name: serving_default_input_2:0 The given SavedModel SignatureDef contains the following output(s): outputs['output_1'] tensor_info: dtype: DT_FLOAT shape: (-1, 46, 1024) name: StatefulPartitionedCall:0 outputs['output_2'] tensor_info: dtype: DT_FLOAT shape: (-1, 1024) name: StatefulPartitionedCall:1 Method name is: tensorflow/serving/predict
Deploy 部署前默认已经安装的Docker 和tensorflow/serving的docker镜像。
如果不了解,可以查看以前的文章docker+tensorflow/serving
Deploy in docker 打开两个终端,分别输入下面命令,将模型部署在docker上
1 # docker run -p 8501:8501 --name encoder --mount source =path/encoder_zh,type =bind ,target=/models/encoder -e MODEL_NAME=encoder -t tensorflow/servien
1 # docker run -p 8502:8501 --name decoder --mount source =path/decoder_zh,type =bind ,target=/models/decoder -e MODEL_NAME=decoder -t tensorflow/serving
–name 指定 部署项目的名字
-p 指定端口映射
source 模型保存位置
后面对应的参数进行修改
部署成功后
通过
进行查看
1
2
3
CONTAINER ID IMAGE COMMAND CREATED STATUS PORTS NAMES eea666daa1ba tensorflow/serving "/usr/bin/tf_serving…" 24 hours ago Up 24 hours 8500 /tcp, 0.0 .0 .0 :8502 ->8501 /tcp decoder 5f2c5ee249ef tensorflow/serving "/usr/bin/tf_serving…" 24 hours ago Up 24 hours 8500 /tcp, 0.0 .0 .0 :8501 ->8501 /tcp encoder
Load model 对Docker部署的模型进行通信前,我们先加载已保存的Encoder,Decoder模型。
1
2
3
4
load_en = tf.saved_model.load('/Users/lollipop/Documents/tf2/learn/encoder_zh/1' ) encoder = load_en.signatures['serving_default' ] load_de = tf.saved_model.load('/Users/lollipop/Documents/tf2/learn/decoder_zh/1' ) decoder = load_de.signatures['serving_default' ]
加载后,我们可以通过encoder.inputs, encoder.outputs 查看相应的参数对应关系。
1
2
3
4
5
6
[<tf.Tensor 'input_1:0' shape=(None , 46 ) dtype=int32>, <tf.Tensor 'input_2:0' shape=(None , 1024 ) dtype=float32>, <tf.Tensor 'statefulpartitionedcall_args_2:0' shape=<unknown> dtype=resource>, <tf.Tensor 'statefulpartitionedcall_args_3:0' shape=<unknown> dtype=resource>, <tf.Tensor 'statefulpartitionedcall_args_4:0' shape=<unknown> dtype=resource>, <tf.Tensor 'statefulpartitionedcall_args_5:0' shape=<unknown> dtype=resource>]
1
2
[<tf.Tensor 'Identity:0' shape=(None , 46 , 1024 ) dtype=float32>, <tf.Tensor 'Identity_1:0' shape=(None , 1024 ) dtype=float32>]
Rest client 这里我使用的是Rest进行通信,比较简单。至于grpc,感觉有点复杂,就没有详细接触。
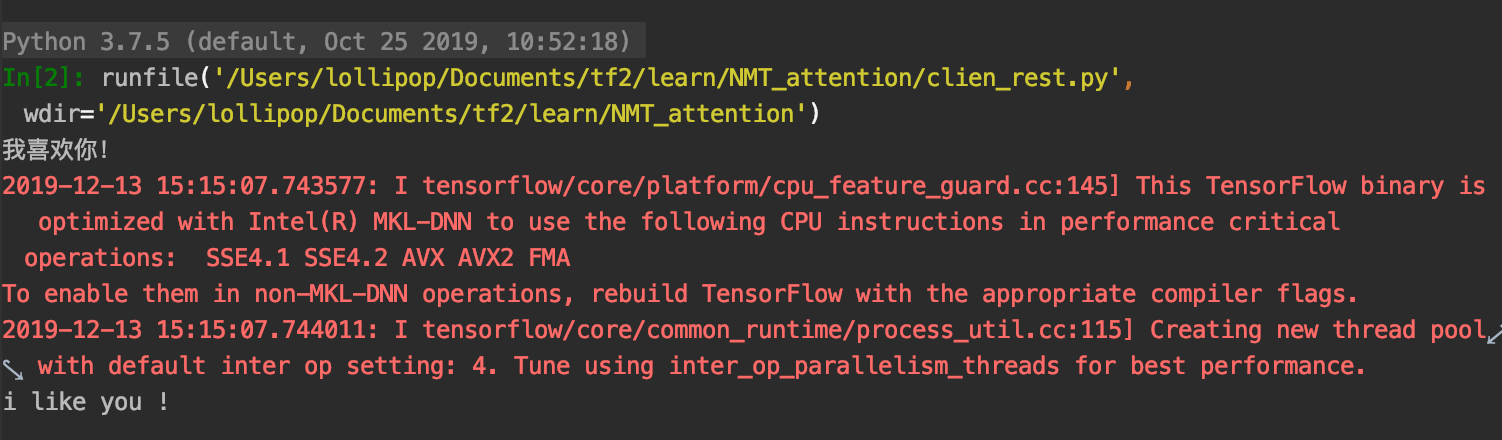
1
2
3
4
5
6
7
8
9
10
11
12
13
14
15
16
17
18
19
20
21
22
23
24
25
26
27
28
29
30
31
32
33
34
35
36
37
38
39
40
41
42
43
44
45
46
47
48
49
50
51
52
53
54
55
56
57
58
59
60
61
62
63
64
65
66
67
68
69
70
71
72
73
74
75
76
77
78
79
80
81
82
83
import tensorflow as tfimport jsonimport data_processimport requestsunits = 1024 encoder_ref = 'http://localhost:8501/v1/models/encoder:predict' decoder_ref = 'http://localhost:8502/v1/models/decoder:predict' input_tensor, target_tensor, inp_lang_tokenizer, targ_lang_tokenizer = data_process.load_dataset('cmn.txt' ) max_length_inp, max_length_tar = data_process.max_length(input_tensor), data_process.max_length(target_tensor) ''' 其中值得注意的 是 instance处,[]里面是每个实例。 也就是说[]里面的 每一个大括号对应一个预测样本,因此 输入的 维度不包括example_size, 如 有2个30维的图片,正常的表示为 (2 30 30 3), 在传入时,就应转换成 "instance":[{"input":( 30 30 3)},{"input":( 30 30 3)}] 每个大括号代表一个样例 instance 中的 input_1, input_2, 以及output_1 output_2,是根具model的输入 输出 顺序来的。 如果不清楚可以 在加载模型后 通过 encoder.inputs encoder.outputs 来进行查看 在终端中 输入以下命令 将模型部署 映射到8501端口 docker run -p 8501:8501 --name encoder --mount source=path/encoder_zh,type=bind,target=/models/encoder -e MODEL_NAME=encoder -t tensorflow/serving encoder 的rest_client ''' def encoder_rest (input , hidden data = json.dumps({"instances" : [{"input_1" : input .numpy().tolist(), "input_2" : hidden.numpy().tolist()}]}) json_response = requests.post(encoder_ref, data=data) predictions = json.loads(json_response.text)['predictions' ] en_output = predictions[0 ]['output_1' ] en_state = predictions[0 ]['output_2' ] return en_state, en_output def decoder_rest (x, en_hidden, en_output ): data = json.dumps({"instances" : [{"input_1" : x.numpy().tolist(), "input_2" : en_hidden, "input_3" : en_output}]}) json_response = requests.post(decoder_ref, data=data) predictions = json.loads(json_response.text)['predictions' ] x = predictions[0 ]['output_1' ] state = predictions[0 ]['output_2' ] attention_weights = predictions[0 ]['output_3' ] return x, state, attention_weights def translate (sentence ): sentence = data_process.preprocess_sentence_zh(sentence) inputs = [inp_lang_tokenizer.word_index[i] for i in sentence.split()] inputs = tf.keras.preprocessing.sequence.pad_sequences([inputs], maxlen=max_length_inp, padding='post' ) inputs = tf.convert_to_tensor(inputs) result = '' hidden = tf.zeros((1 , units)) en_state, en_out = encoder_rest(inputs[0 ], hidden[0 ]) de_inputs = tf.expand_dims([targ_lang_tokenizer.word_index['<start>' ]], 0 ) de_input = de_inputs[0 ] decoder_rest(de_input, en_state, en_out) de_hideen = en_state result = '' for t in range (max_length_tar): x, state, _ = decoder_rest(de_input, de_hideen, en_out) prediction_id = tf.argmax(x, axis=-1 ).numpy() if targ_lang_tokenizer.index_word[prediction_id] == '<end>' : break result += targ_lang_tokenizer.index_word[prediction_id] + ' ' de_input = tf.expand_dims([prediction_id], 0 )[0 ] de_hideen = state return result sentence = '我喜欢你!' print (sentence)print (translate(sentence))
输出如下:
[code]
在Google教程代码下,复现的小小起步,后面会接着复现Transformer,Bert , Transformer-XL·········